
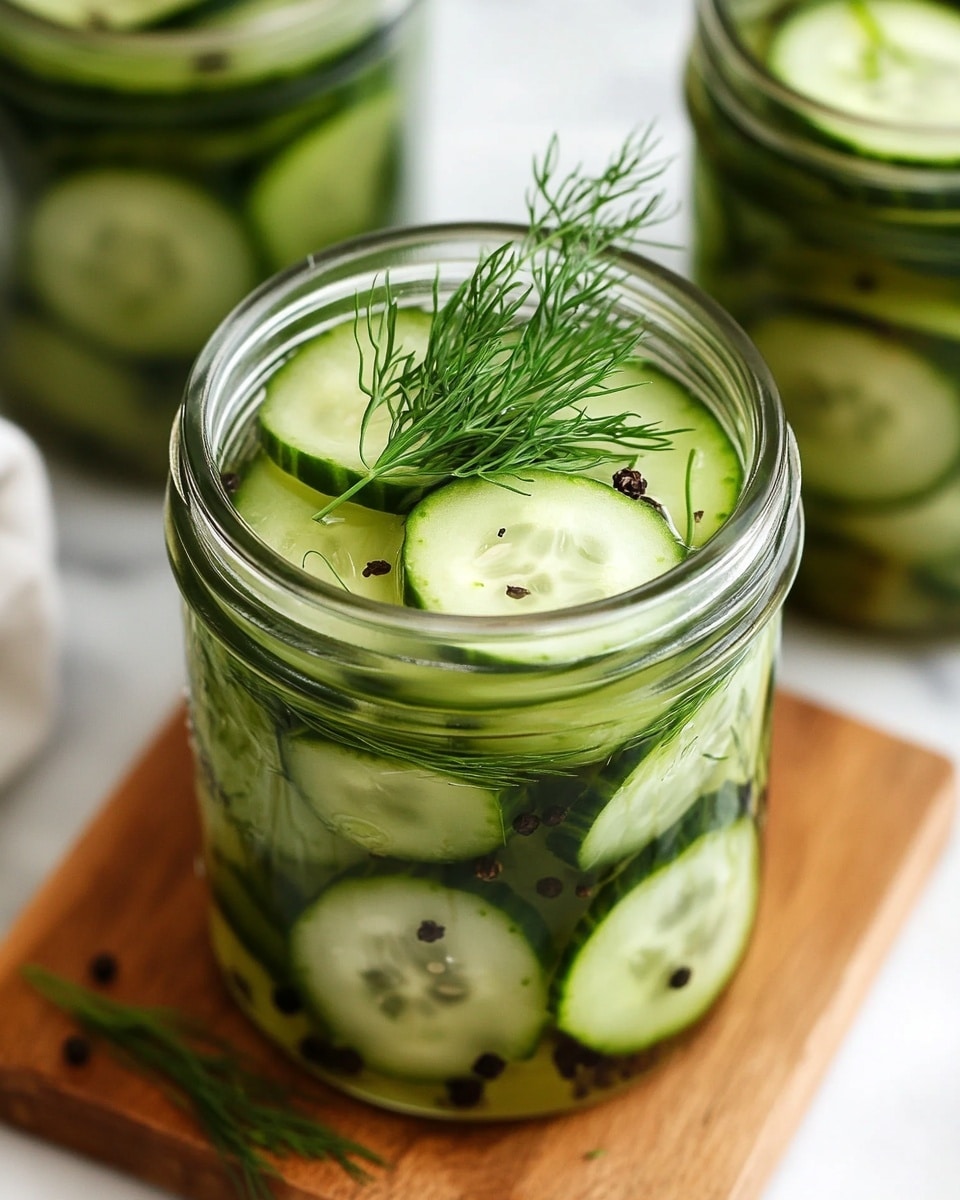
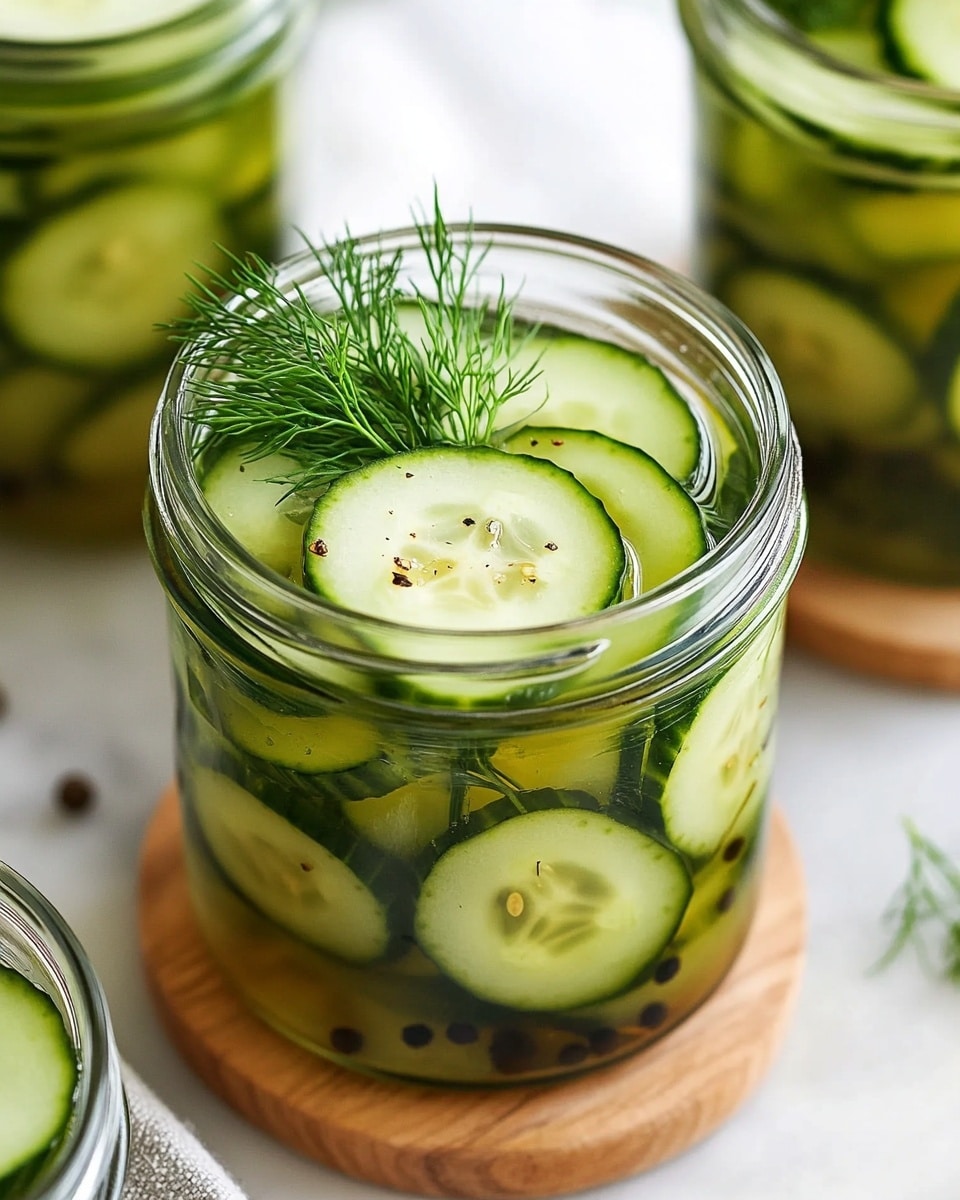
I absolutely love sharing this Refrigerator Dill Pickles (Super Easy!) Recipe because it’s one of those magic kitchen projects that make you feel like a real pickle pro without any fuss. These pickles are crisp, tangy, and fresh-tasting, perfect for when you want a quick homemade pickle fix without the weeks-long wait of traditional canning. Trust me, once you try these, you’ll find that having a jar on hand in your fridge is an absolute game changer.
When I first tried this recipe, I was amazed at how simple the ingredients are and how quickly the flavors come together. You can whip up a batch and in just a couple of days, you have crunchy, zesty pickles ready to jazz up sandwiches, salads, or even just a snack straight from the jar. Plus, it’s a fantastic way to use up cucumbers if you’re ever overwhelmed by garden bounty or find a great deal at the market!
Why You’ll Love This Recipe
- Super Simple: You only need a handful of everyday ingredients and no special equipment to get started.
- Fast Flavor: Unlike traditional pickles, these are ready to enjoy in just 24-48 hours.
- Customizable: You can easily adjust the garlic, spice, and dill to match your taste buds.
- Fridge-Friendly: Safe and delicious refrigerator storage means no pressure to can or store long term.

Ingredients You’ll Need
The ingredients for this Refrigerator Dill Pickles (Super Easy!) Recipe are straightforward and come together to make that perfect crunchy, tangy pickle flavor. You don’t need anything fancy—just good fresh cucumbers and the right balance of spices to get that classic dill pickle bite.
- English cucumbers or mini/persian cucumbers: English cucumbers have fewer seeds and thinner skin, which gives a cleaner, crisp bite, but mini or persian ones work great if you like smaller pickles.
- Fresh dill: Fresh dill is essential for that classic aroma and flavor—don’t substitute with dried, it just won’t be the same.
- Garlic cloves: Smashed garlic infuses the brine with gentle pungency—double it for serious garlic lovers.
- Black peppercorns: They add subtle spice and complexity without overpowering the cucumbers.
- Red pepper flakes: Just a touch for a hint of heat; you can add more if you like it spicy.
- White or cider vinegar: This is what gives your pickles that signature tanginess—warm water helps dissolve the salt faster.
- Salt: Use pickling or kosher salt to keep your pickles crunchy and flavorful.
Variations
I love that this Refrigerator Dill Pickles (Super Easy!) Recipe is so adaptable—you can tweak the spices or cucumber shapes based on what mood you’re in or what you have on hand. Making it your own is part of the fun!
- More Garlic: When I crave garlicky pickles, I double the garlic cloves and sometimes toss in a smashed clove per jar for an extra punch—it’s heavenly.
- Spicy Kick: I occasionally add extra red pepper flakes and black peppercorns if I want a bold heat that warms up each bite.
- Cucumber Cuts: Slices, spears, or chips—each change the eating experience. My family loves crinkle cut chips for the fun texture.
- Vinegar Swap: Using apple cider vinegar gives a slightly sweeter tang, which I enjoy for a milder flavor profile.
How to Make Refrigerator Dill Pickles (Super Easy!) Recipe
Step 1: Layer Your Flavor Foundations
Start by adding the aromatics and spices to each pint jar: one smashed garlic clove, a teaspoon of black peppercorns, an eighth teaspoon of red pepper flakes, and 2 fronds of fresh dill. This layering infuses your pickles with incredible flavor from the start. I like to gently press the garlic and spices down to spread their essence without crushing them too much.
Step 2: Prep and Pack Your Cucumbers
Slice your cucumbers however you like—whole mini cucumbers, spears, or even crinkle cut chips. I discovered this trick of using different shapes to keep things interesting, especially if I make multiple jars at once. Pack them snugly into the jars but avoid crowding so they have room to absorb the brine evenly. Adding one more dill frond on top of the cucumbers is my secret for extra garlicky dill flavor.
Step 3: Mix and Pour the Brine
Warm up your water so the salt dissolves completely, then stir in your vinegar and salt to form the brine. Pour the brine carefully over the cucumbers, making sure they’re covered. If there’s a tiny gap, it’s okay—just try to cover as much as possible for the best pickle soak. I use a small funnel or a measuring cup for a smooth pour, avoiding messy spills.
Step 4: Seal and Refrigerate
Put the lids firmly on your jars and pop them in the fridge. Your pickles will start tasting good after about 24 hours, but the flavor deepens up to 48 hours or longer. I usually wait two full days so the cucumbers soak up all that garlicky dill goodness. These will keep fresh for 3-4 weeks in the fridge—perfect for snacking over the next month without worrying about spoilage.
Pro Tips for Making Refrigerator Dill Pickles (Super Easy!) Recipe
- Use Fresh Dill: Fresh dill really makes a difference; dried dill just can’t deliver the bright aroma and flavor pickles deserve.
- Don’t Overpack the Jars: Leave a little breathing room for the brine to circulate, so the cucumbers pickle evenly.
- Smashed Garlic Magic: Smashing garlic releases its oils and gives a mellow garlicky note—don’t just chop!
- Patience Is Key: Although you can try your pickles early, waiting a full 48 hours maximizes flavor and crunch.
How to Serve Refrigerator Dill Pickles (Super Easy!) Recipe
Garnishes
I often add a sprinkle of freshly cracked black pepper or a few extra fresh dill sprigs on serving platters when I bring these pickles to the table—it ups the presentation and enhances that fresh herbal zing. Sometimes I toss in a slice of fresh lemon or a thin chili ring for an extra pop of color and flavor when guests are around.
Side Dishes
These pickles are dreams alongside grilled burgers, stacked sandwiches, or sloppy joes—my family goes crazy for adding these tangy crunch bites to their favorites. They also make a great side on charcuterie boards or with creamy dips like hummus or ranch for casual snacking.
Creative Ways to Present
For fun get-togethers, I love arranging different shaped pickles—chips, spears, whole minis—in a rustic wooden tray with jars of mustard and aioli nearby. You can even thread pickle spears on cocktail skewers for unique party bites. It’s a simple way to add some flair with almost zero extra work.
Make Ahead and Storage
Storing Leftovers
I keep the pickles sealed in their original jars, always refrigerated. They stay crisp and flavorful for up to 3-4 weeks, which makes it easy for me to prepare a batch and enjoy them slowly over time without spoiling. Just be sure to always use clean utensils to avoid contamination.
Freezing
Freezing pickles isn’t something I recommend because the texture gets mushy once thawed, losing that satisfying crunch that makes refrigerator dill pickles so special. I stick to enjoying mine fresh from the fridge.
Reheating
These pickles are best served cold or at room temperature—I don’t heat them because the brine and crunch are so refreshing. Just bring them out of the fridge about 10 minutes before serving if you want a more mellow chill.
FAQs
-
How long do Refrigerator Dill Pickles (Super Easy!) Recipe keep in the fridge?
They stay fresh and tasty for about 3 to 4 weeks when kept in sealed jars in the refrigerator. Just be sure to use clean utensils when serving to prolong their shelf life.
-
Can I use regular cucumbers instead of English cucumbers?
You can, but English cucumbers or mini/persian cucumbers work best for pickling because they have thinner skins and fewer seeds, which keeps the pickles crisper and less bitter.
-
Do I have to use white vinegar, or can I substitute cider vinegar?
Cider vinegar works beautifully and adds a slightly sweeter, fruitier flavor. Both vinegars work well, so feel free to use whichever you prefer or have on hand.
-
Can I make these pickles less spicy?
Absolutely! Just reduce or omit the red pepper flakes and use fewer black peppercorns to dial back the heat while keeping the dill flavor front and center.
-
How soon can I eat these pickles after making them?
You can start tasting them after 24 hours, but they’re best after about 48 hours when the flavor really develops and the cucumbers soak up that briny goodness.
Final Thoughts
This Refrigerator Dill Pickles (Super Easy!) Recipe has become a staple in my kitchen because it’s quick, flavorful, and such a joy to make. I love how it turns a simple cucumber into a crunchy, garlicky treasure you can enjoy anytime. Give it a try—you’ll be amazed at how little time and effort it takes to create something that makes your meals pop with flavor. Once you start keeping these pickles in your fridge, I bet you won’t want to go back to store-bought!
Print
Refrigerator Dill Pickles (Super Easy!) Recipe
- Prep Time: 25 minutes
- Cook Time: 0 minutes
- Total Time: 2 days 25 minutes
- Yield: 4 pints of pickles (8 cups)
- Category: Pickles & Preserves
- Method: No-Cook
- Cuisine: American
- Diet: Vegetarian
Description
These Refrigerator Dill Pickles are a super easy and quick way to make crisp, flavorful pickles at home without any canning or special equipment. Using fresh dill, garlic, and a simple vinegar brine, you can create delicious homemade pickles that are ready to enjoy after just 24-48 hours in the fridge. Perfect as a tangy snack or as a crunchy addition to burgers, sandwiches, and more.
Ingredients
For the Pickles:
- 2 long English cucumbers – or about 1.3 lbs. (600g) of mini or Persian cucumbers
- 8-12 fronds of fresh dill (about a 0.75 oz container)
- 4 garlic cloves – smashed with the flat side of a knife or the bottom of a glass
- 4 teaspoons black peppercorns
- 1/2 teaspoon red pepper flakes
For the Pickle Brine:
- 4 cups warm water
- 1/2 cup (8 tablespoons) white vinegar or cider vinegar
- 1 tablespoon salt
Instructions
- Combine Seasonings: In each pint jar, place 1 smashed garlic clove, 1 teaspoon black peppercorns, 1/8 teaspoon red pepper flakes, and 2 fronds of fresh dill to infuse flavor into the pickles.
- Prepare Cucumbers: Slice your cucumbers into your desired shape—whole mini cucumbers, pickle spears, pickle chips, or crinkle cut pickle chips—to customize your pickles.
- Fill Jars: Divide the prepared cucumbers evenly among the pint jars. Pack them close together but avoid overfilling to allow brine circulation. Optionally, place one more dill frond on top of the cucumbers in each jar for extra flavor.
- Make Pickle Brine: Stir together warm water, vinegar, and salt until the salt dissolves completely. Pour the brine carefully into each jar to cover the cucumbers fully to ensure proper pickling.
- Refrigerate Pickles: Seal each jar tightly and refrigerate for 24-48 hours before tasting. The pickles will continue to develop flavor over time and will stay fresh in the fridge for 3-4 weeks. Note that these pickles are not safe for long-term room temperature storage.
Notes
- Love garlicky pickles? Double the amount of garlic cloves for a stronger garlic punch.
- Want your pickles spicier? Add extra black peppercorns and red pepper flakes to the jars.
- Recipe quantity can be adjusted easily—this recipe yields 4 pint jars (2 quarts). Halve for 2 pints or quarter for 1 pint.
- Serving Ideas: These pickles are perfect on burgers, sandwiches, wraps, sloppy joes, and as a tangy snack.
Nutrition
- Serving Size: 1/4 cup (approximate serving)
- Calories: 5
- Sugar: 1 g
- Sodium: 400 mg
- Fat: 0 g
- Saturated Fat: 0 g
- Unsaturated Fat: 0 g
- Trans Fat: 0 g
- Carbohydrates: 1 g
- Fiber: 0.3 g
- Protein: 0.2 g
- Cholesterol: 0 mg

