
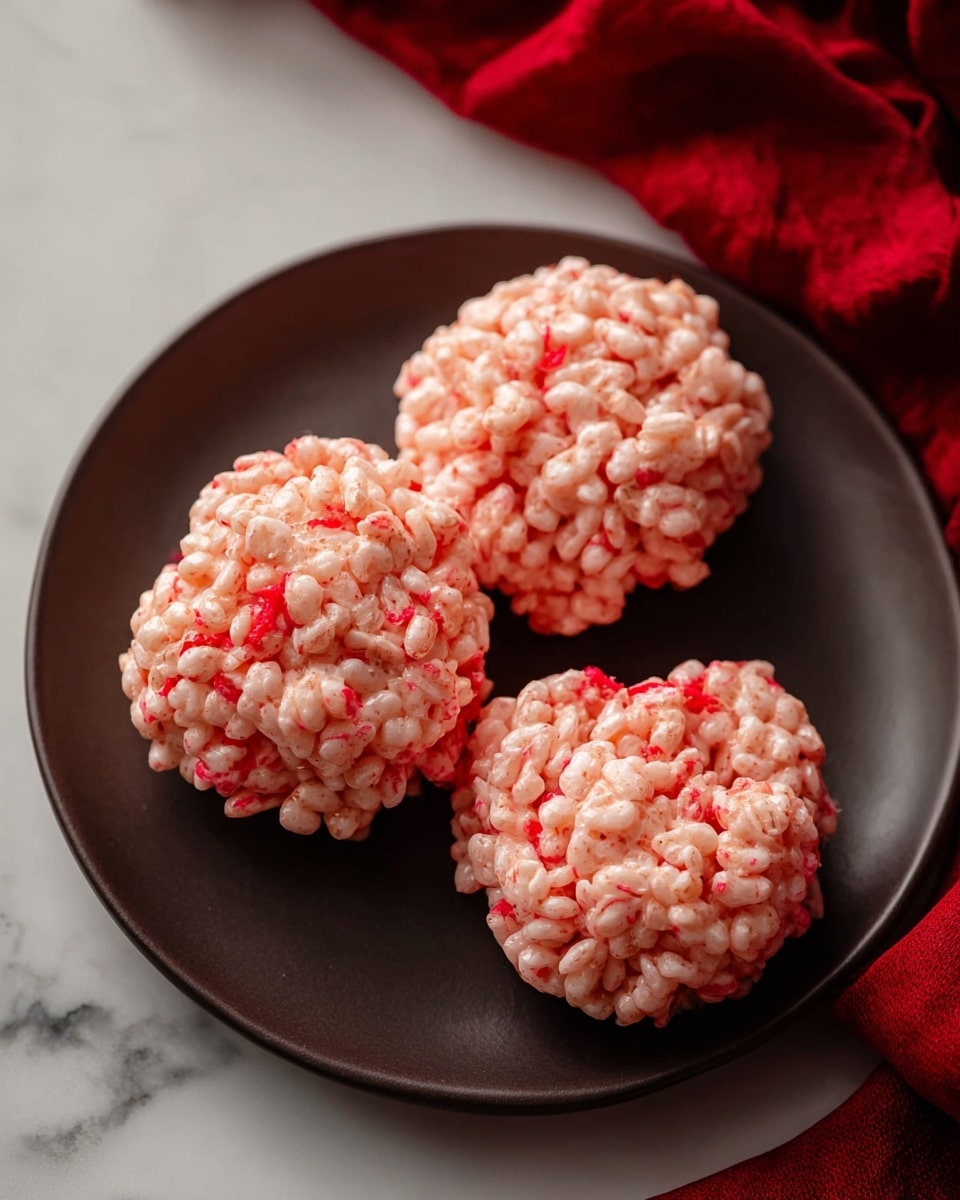
If you’re looking for a fun and spooky treat to jazz up your Halloween party or just want a sweet snack with a clever twist, this Rice Krispies Brains Recipe is absolutely fan-freaking-tastic. I absolutely love how these marshmallowy, crispy cereal treats transform into creepy little brains with just a few simple steps, and I’m excited to share all the tips and tricks so you can make them perfectly every time!
Why You’ll Love This Recipe
- Super Simple Ingredients: You’ll find everything you need in your pantry, making it a breeze to whip up last minute.
- Fun and Festive: The way these treats look is perfect for Halloween or any spooky-themed gathering.
- No Baking Required: Great for when you want a quick, mess-free project with the kids or friends.
- Customizable Colors and “Blood” Effects: You can get as creative as you want with food coloring and decorating.

Ingredients You’ll Need
When you look at the ingredients, you’ll see how they come together perfectly to give that classic crisp, gooey texture. Rice Krispies cereal is the star, and the mini marshmallows melt into that irresistible sugary glue. Butter helps everything hold its shape without being greasy, and the red food coloring? That’s your magic touch for turning them into edible brains!
- Rice Krispies cereal: I use the classic kind, but any crispy rice cereal will make the treat perfectly crunchy.
- Unsalted butter: Using unsalted lets you control the salt level, and it melts smoothly into the marshmallows.
- Mini marshmallows: These melt faster than larger ones and make the mixture easier to manage.
- Red food coloring: This is key for that realistic brain effect — a few drops go a long way!
Variations
I love making this Rice Krispies Brains Recipe my own by tweaking the colors and adding little details. You might find that switching up the “blood” color or mixing in other candies can add some surprising flair. Feel free to experiment — it’s all about having fun with the process!
- Color Variations: I once made a green slime version using green food coloring for a “mutant” brain effect that my kids went nuts over.
- Gluten-Free: Make sure to use gluten-free crispy rice cereal if you want to keep it safe for gluten-sensitive friends.
- Add Candy Details: Add edible eyes or small gummy worms crawling through the “brain” for a creepy, fun touch.
How to Make Rice Krispies Brains Recipe
Step 1: Prep Your Workspace Like a Pro
First off, line a large baking sheet with parchment paper or a silicone mat. This makes cleanup a breeze and helps you pop the brains off easily when they set. Then scoop your Rice Krispies into a big bowl—trust me, having those ready to go is a lifesaver once your marshmallows start melting.
Step 2: Melt Butter and Marshmallows Gently
Heat your butter over low heat in a saucepan until melted, then toss in those mini marshmallows. Stir continuously—don’t leave the pot alone or you’ll risk scorching. When everything’s smooth and melted, it’s time to add your red food coloring. I like to add about 6 drops for a nice pinkish hue since it lightens when mixed, but feel free to adjust based on how gory you want your brains!
Step 3: Combine and Mold Into Brains
Remove the saucepan from heat and immediately pour in the rice cereal, stirring well so every crispy bit is coated. Here’s a trick I discovered: if you lightly spray an ice cream scoop or ¼ cup measure with non-stick spray, you can pack the mixture tightly without it sticking, and then drop perfect mounds onto your baking sheet. Use your hands to shape each mound into an oblong, slightly squished circle — this gives that brain-like shape.
Step 4: Create Brain Details for Realism
Take the handle of a butter knife and gently press an indent on top of each mound to form the classic “brain grooves.” Then, using the non-blade side of the knife and your free hand, nudge those grooves closer together—it’s subtle but makes a huge difference in the look. For an optional finishing touch, I like to paint a little “blood” by using red food coloring diluted with a few drops of water and a small paintbrush. Let the treats cool completely before serving to keep their shape intact.
Pro Tips for Making Rice Krispies Brains Recipe
- Low and Slow Melting: I learned that melting the butter and marshmallows on low heat prevents burning and keeps the mixture smooth.
- Non-Stick Scoop Trick: Spraying your scoop helps get uniform brain shapes without losing half of the mix stuck inside.
- Timing is Everything: Work quickly but carefully after marshmallow melting since it sets fast—and you want pliable but not sticky shapes.
- Avoid Overcrowding: Leave enough space between brains on the tray so they don’t smoosh together while cooling.
How to Serve Rice Krispies Brains Recipe
Garnishes
For garnishes, I love adding a little extra “blood,” like using a red gel icing pen for fine lines or placing edible candy eyes to give these brains a creepy personality. You could also sprinkle some red sugar crystals on top when still sticky for a little sparkle that looks like fresh blood.
Side Dishes
I usually serve these with some simple Halloween-themed snacks — think “monster” popcorn or gummy worms dangling in cups of punch. These brains pair perfectly with spooky drinks or even alongside pumpkin-shaped cookies for a festive buffet.
Creative Ways to Present
One year, I arranged these Rice Krispies Brains Recipe treats on a platter lined with smashed Oreos to mimic “dirt,” then scattered candy worms around. Kids (and grown-ups) loved digging into this creepy graveyard. Another time, I served them inside clear jars with “specimen” labels for a mad scientist theme — so much fun!
Make Ahead and Storage
Storing Leftovers
I keep any leftovers airtight in a container at room temperature, and they usually stay fresh for about a week without losing their chewy-crisp texture. Just make sure they’re sealed well so they don’t get stale!
Freezing
I’ve frozen these brains wrapped tightly in plastic wrap and then placed in a freezer bag. When thawed, they do lose a little bit of crispness but still taste great — perfect if you want to prep weeks ahead.
Reheating
Reheating isn’t usually necessary, but if you want to soften them slightly, popping them in the microwave for about 10-15 seconds works wonders. Just don’t overdo it, or they’ll get too gooey and lose shape.
FAQs
-
Can I use a different cereal for the Rice Krispies Brains Recipe?
Absolutely! While classic Rice Krispies give the best crispy texture, you can substitute with similar puffed rice cereals or even corn flakes for a different crunch. Just be mindful that texture and flavor might vary slightly.
-
How do I get the perfect brain shape?
Using a non-stick sprayed ice cream scoop to form uniform mounds helps a ton. Then shaping gently by hand into an oblong oval and adding grooves with a butter knife’s handle creates that signature brain look without too much fuss.
-
Why is my marshmallow mixture too sticky or crumbly?
Make sure you melt your marshmallows fully and keep the heat low to avoid seizing. If it’s too sticky, spraying your hands with non-stick spray or slightly wetting them helps when shaping. If crumbly, more melted marshmallow might be needed for better binding.
-
Can I make these gluten-free?
Yes! Just swap out your regular Rice Krispies for any certified gluten-free crispy rice cereal. The rest of the recipe stays the same, so it’s an easy swap for gluten-sensitive family or friends.
-
How do I store the Rice Krispies Brains to keep them fresh?
Store them in an airtight container at room temperature away from moisture. This keeps them chewy and crispy for up to a week. Avoid refrigeration as it can make them harden or stale faster.
Final Thoughts
I can’t tell you how many times I’ve made this Rice Krispies Brains Recipe and had my family and friends ooh-ing and aah-ing over the gory details. It’s one of those nostalgic snacks that’s easy, fun, and absolutely irresistible. Whether you’re baking with kids, prepping for a spooky party, or just craving something nostalgic with a twist, this recipe won’t let you down. So go ahead, gather your ingredients, and dive into this creative and delicious project — I promise you’ll love every squishy, crunchy bite!
Print
Rice Krispies Brains Recipe
- Prep Time: 15 minutes
- Cook Time: 0 minutes
- Total Time: 15 minutes
- Yield: 16 treats
- Category: Snack
- Method: No-Cook
- Cuisine: American
- Diet: Vegetarian
Description
These spooky Rice Krispies Brains are a fun and festive treat perfect for Halloween or any eerie-themed party. Made with crispy rice cereal, melted marshmallows, and colored red to mimic brains, these easy no-bake snacks are shaped and decorated to add a creepy yet delicious twist to a classic favorite.
Ingredients
Base Ingredients
- 5 cups (132g) Rice Krispies or any kind of crispy rice cereal
- ¼ cup (57g) unsalted butter
- 1 10-oz bag (283g) mini marshmallows (about 8 cups)
Decorative Ingredients
- Red food coloring (about 6 drops for mixture, plus a few drops for painting)
Instructions
- Prepare the baking sheet: Line a large baking sheet with parchment paper or a silicone baking mat to prevent the treats from sticking and set it aside.
- Measure the cereal: Place the 5 cups of Rice Krispies cereal into a large mixing bowl and set aside until ready to combine with marshmallow.
- Melt butter and marshmallows: In a large saucepan over low heat, melt the ¼ cup of unsalted butter. Add the 10-ounce bag of mini marshmallows and stir continuously until completely melted and smooth.
- Add food coloring: Remove the saucepan from heat and stir in about 6 drops of red food coloring, adjusting to achieve a pinkish hue that will brighten once mixed with the cereal.
- Combine with cereal: Add the Rice Krispies cereal to the melted marshmallow mixture and stir thoroughly until every piece is coated evenly.
- Form brain shapes: Lightly spray an ice cream scoop or a ¼ cup measuring cup with non-stick spray. Gently press a portion of the cereal mixture into the scoop and drop it onto the prepared baking sheet. Using your hands, shape each mound into a slightly oblong circle resembling a brain.
- Create brain details: Use the handle of a butter knife to make indents on the top of each shaped treat, mimicking the brain’s lobes. Then use the non-blade side of the knife to gently press and bring the sides closer, forming a realistic brain appearance.
- Paint blood streaks: Dip a small paintbrush into a few drops of red food coloring placed in a small bowl and carefully paint streaks of ‘blood’ onto the treats for a gory effect.
- Let set and store: Allow the Rice Krispies Brains to cool and set completely at room temperature. Once firm, store them in an airtight container for up to one week to maintain freshness.
Notes
- Spraying the scoop or measuring cup with non-stick spray helps release the sticky mixture easily when shaping.
- Adjust the amount of red food coloring to get the desired shade of pink or red for the brain treats.
- For an extra spooky touch, use edible food markers or gel icing to add more details like veins or cracks.
- These treats are best eaten within a week to enjoy optimal freshness and texture.
Nutrition
- Serving Size: 1 treat
- Calories: 120
- Sugar: 10g
- Sodium: 80mg
- Fat: 3.5g
- Saturated Fat: 2g
- Unsaturated Fat: 1.5g
- Trans Fat: 0g
- Carbohydrates: 22g
- Fiber: 0.5g
- Protein: 1g
- Cholesterol: 10mg


