
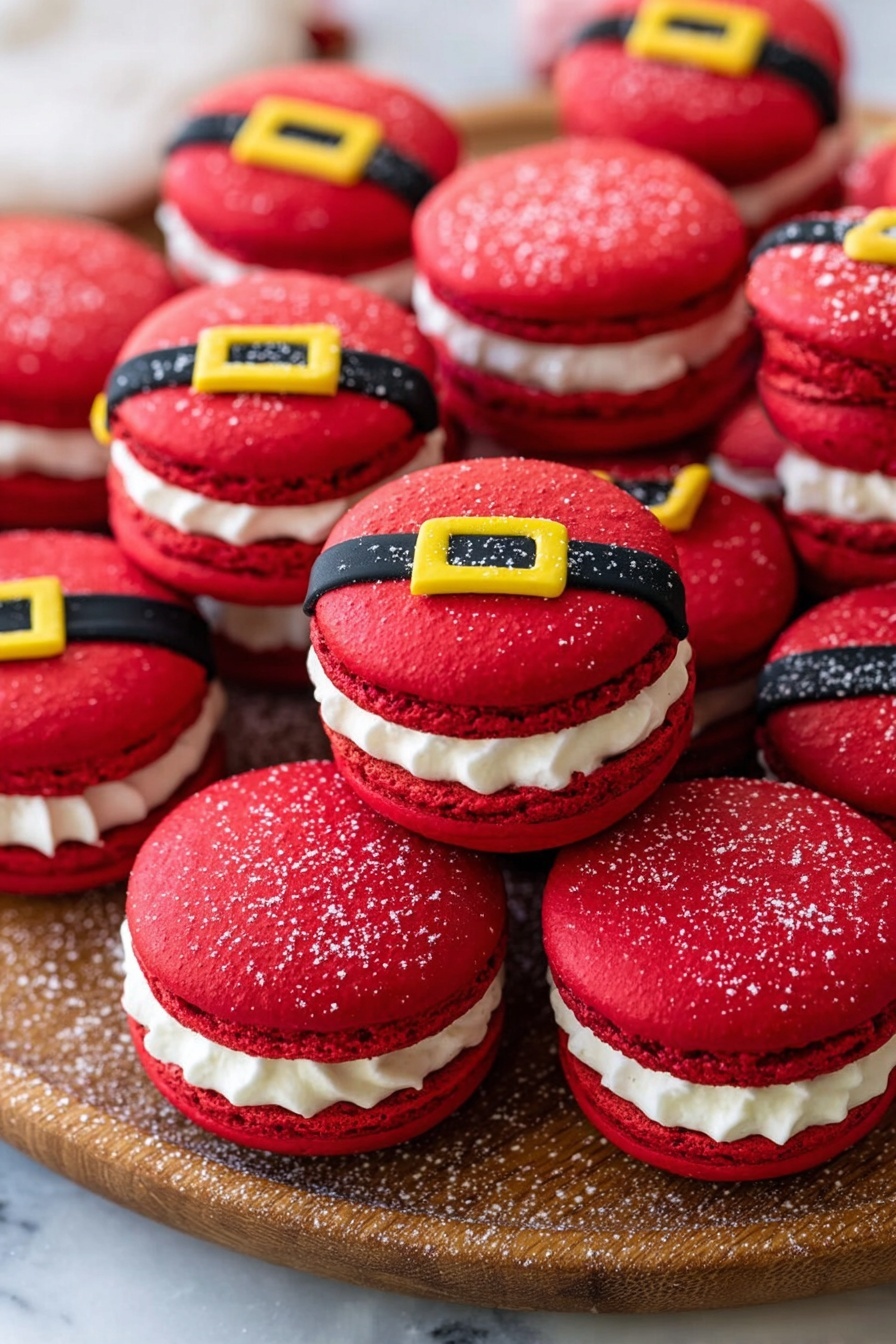
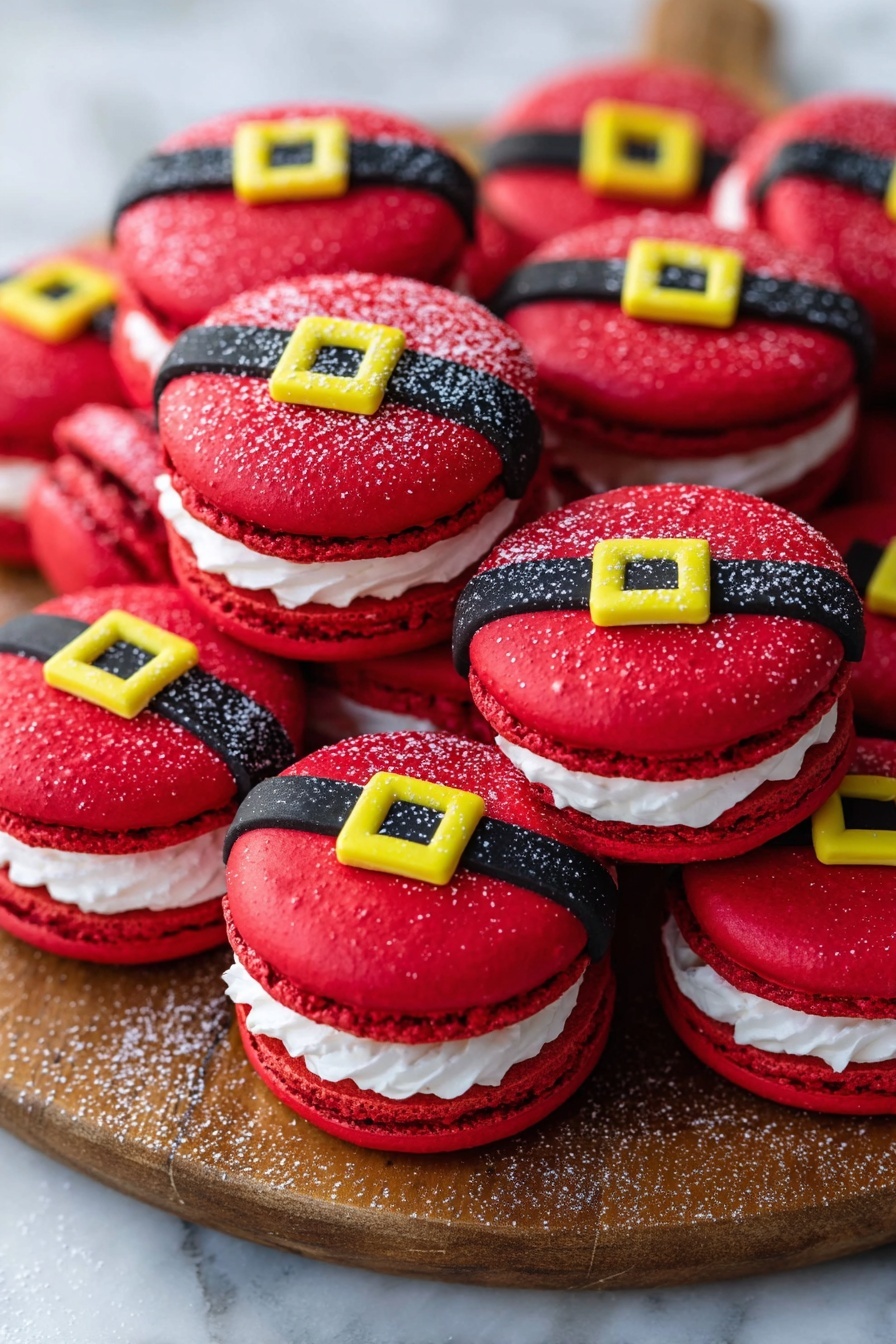
If you’re dreaming of festive treats that bring a smile the moment you see them, then you’re going to adore this Santa Claus Macarons Recipe. I absolutely love how these macarons come to life with bright red shells, a cute little belt made from royal icing, and a creamy sugar cookie buttercream filling that just melts in your mouth. Whether you’re a macaron pro or dipping your toes in for the first time, this recipe will guide you every step of the way to festive success. Ready to make some magic?
Why You’ll Love This Recipe
- Festive and Fun Design: These macarons bring Santa Claus to life with playful decoration that’s perfect for the holidays.
- Learn Macaron Basics: The recipe walks you through making perfect shells and beautifully smooth meringue, ideal for beginners and seasoned bakers alike.
- Mouthwatering Filling: The sugar cookie buttercream is my personal favorite—it adds an irresistible richness and texture.
- Make Ahead Friendly: You can prepare these ahead, freeze them, and impress guests anytime with fresh, stunning macarons.

Ingredients You’ll Need
Choosing the right ingredients is crucial for a vibrant, tender, and flavorful macaron. The smooth almond flour mixed with the powdered sugar gives you that iconic crisp shell with a chewy inside, while the royal icing and buttercream finish the look and flavor perfectly. Let me share some tips on the key players here.
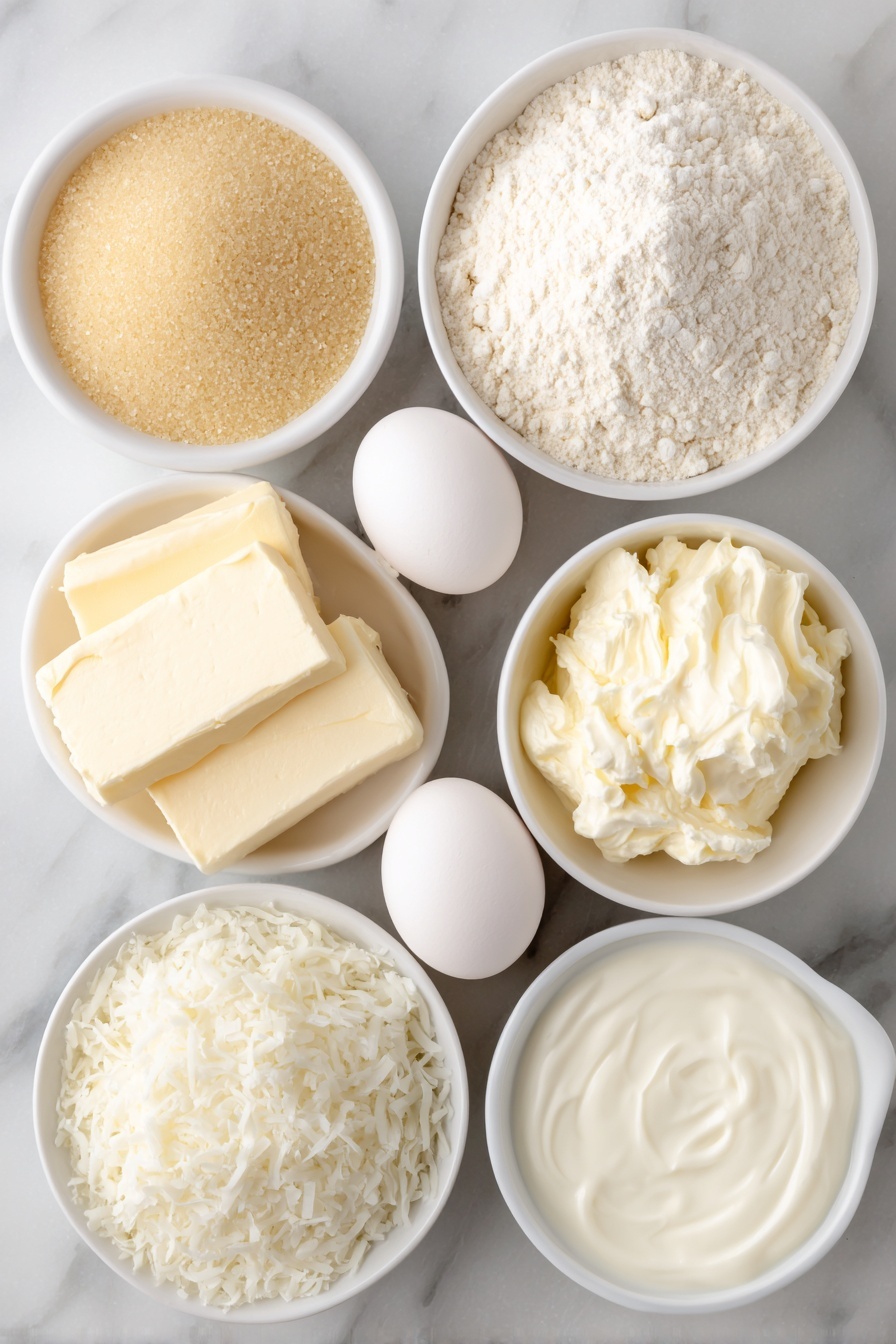
- Domino® Golden Sugar: Adds a subtle caramel note, perfect for both sweetness and depth in your macaron shells and buttercream.
- Egg white powder (optional): If you live somewhere humid like I do, this helps stabilize your meringue; otherwise, you can skip it without worry.
- Egg whites: Fresh is best here, but if you whisk them just right, frozen and thawed egg whites will do the trick too!
- Almond flour: Make sure it’s finely ground and fresh to avoid gritty macarons; I like to sift it with powdered sugar for a lighter texture.
- Domino® Powdered Sugar: This is your go-to for smoothness and sweetness in both shells and fillings.
- Meringue powder: Essentials for that glossy royal icing; it helps with structure and stability.
- Gel food coloring (black, yellow, red): I trust gels because they give vibrant color without thinning the batter or icing.
- All-purpose flour: Used in the buttercream, but it’s toasted first—this step was a game-changer to keep the frosting safe and delicious.
- Unsalted butter: Softened, this is the creamy base for the sugar cookie buttercream that your taste buds will thank you for.
- Vanilla and almond extracts: Add a warm, comforting aroma and subtle nutty notes that elevate the overall flavor.
- Desiccated coconut: Rolled along the edges for extra texture and that charming snowy effect on the macarons.
Variations
While I adore the classic Santa look, I love playing around with this recipe to suit different tastes and occasions. Feel free to tweak colors, fillings, or even the shapes to keep things fresh and personalized for your celebrations!
- Color Variations: I’ve swapped the bright red for pastel pink or green to create a fun elf or vintage Santa vibe—totally charming and just as tasty.
- Flavored Buttercream: Adding a hint of peppermint extract transforms these into a peppermint dream, which my family goes wild over every Christmas.
- Vegan Adaptation: I’ve experimented with aquafaba instead of egg whites for meringue, and while it works, the texture differs slightly—perfect for those avoiding eggs but still craving macarons.
- Without Coconut: If coconut isn’t your thing, finely crushed freeze-dried raspberries on the edges make a lovely alternative with a pop of color and tartness.
How to Make Santa Claus Macarons Recipe
Step 1: Preparing to Bake Perfection
First things first: organize your space and ingredients. Lay out your piping bags, baking mats, bowls, and sift your almond flour with the powdered sugar. I like to preheat my oven to 300ºF for about an hour beforehand. It sounds long, but stabilizing the temperature helps me avoid cracked or lopsided shells. Be patient—finding your oven’s sweet spot can take time, but it’s worth it.
Step 2: Make the Meringue with Love
Whisk the golden sugar (and egg white powder if you’re using it) over simmering water until fully dissolved—you want that syrup silky, no sugar crunching under your fingers! Then whip the egg whites in your mixer, building from low to a stiff, glossy peak. This step can take 13-15 minutes, so grab a cup of coffee and chat with yourself about how gorgeous this meringue is becoming. Avoid overwhipping—it leads to hollow shells, and trust me, you don’t want that disaster.
Step 3: Folding in the Dry Ingredients
Bring in the sifted almond flour and powdered sugar, fold gently in a ‘J’ motion, and gradually press the air out by scraping the sides and bottom. The batter’s ready when it’s shiny and flows slowly off your spatula in a figure-8 shape without breaking. I learned this visual cue saved me from under- or over-mixing—a crucial step for those perfect feet on your macarons.
Step 4: Piping and Resting
Fill your piping bag, seal it at the top for control, and pipe neat circles over your template. Once piped, give the tray a good bang on the counter—that shakes out air bubbles. Use a toothpick to pop any stubborn bubbles on your shells. Here’s a biggie: don’t rush resting your macarons, especially with that red food coloring we use for the Santa shell—it needs a good 30-60 minutes to form a dry, firm skin to prevent cracking. This was a game changer when I first made this recipe!
Step 5: Baking with Care
Bake one tray at a time for 15 to 20 minutes at 300ºF. Watch for that tell-tale sign: nicely formed feet and no jiggle when you gently tap. If the tops are still soft, give them a few more minutes—the exact time varies by oven. Once out, cool completely before moving to the magic of decorating.
Step 6: Royal Icing Belt Decoration
Whip up the royal icing until glossy and fluffy, then divide and color it black and yellow. Pipe a thin black belt line near the center of half your macarons, let that set (a fridge chill helps!), then add a bright yellow buckle atop the belt. It sounds fancy, but the contrast makes your Santa shells instantly recognizable and charming.
Step 7: Make the Sugar Cookie Buttercream
Don’t skip baking the flour first—this step ensures it’s safe and adds a warm, toasty flavor to your buttercream. Beat your butter and sugars until creamy, then add the toasted flour and extracts. If your buttercream feels too thick or thin, tweak with a splash of milk or additional powdered sugar until spreadable yet stable. It’s the perfect fluffy partner to those delicate shells.
Step 8: Assembly and Coconut Coating
Pipe the buttercream onto the bottoms, nestle the decorated Santa shells on top, then roll the edges in desiccated coconut for that snowy, festive touch. It adds a delightful texture and finishes the look beautifully. My family goes crazy for this final touch—it just screams holiday happiness.
Pro Tips for Making Santa Claus Macarons Recipe
- Preheat Patience: My trick is preheating the oven for at least an hour; it stabilizes temperature and avoids cracking.
- Meringue Mastery: Don’t rush whipping—watch the peaks and glossy texture instead of the clock for perfect stiffness.
- Rest to Impress: Especially with red coloring, resting the shells until dry to the touch prevents cracking in the oven.
- Folding Philosophy: Gently but thoroughly fold your batter to get the perfect flowing consistency—you’ll recognize it when you see it.
How to Serve Santa Claus Macarons Recipe
Garnishes
I love serving these with a light dusting of powdered sugar as faux snow around the plate, or sprigs of fresh rosemary to suggest mini Christmas trees—it just adds to the festive feel and smells fantastic.
Side Dishes
Pair these with warm spiced tea or a creamy hot chocolate—both complement the sweet, buttery flavors perfectly and make for a cozy holiday treat.
Creative Ways to Present
For holiday parties, I’ve arranged these macarons on serving platters shaped like Santa’s sleigh or arranged in clusters with string lights for extra sparkle. Gift boxes tied with red ribbon also make wonderful presents that ooze charm and personality.
Make Ahead and Storage
Storing Leftovers
Store these macarons in an airtight container in the fridge for up to five days. I usually place parchment paper between layers to keep them neat, and they maintain their texture wonderfully if eaten within this window.
Freezing
If you want to prep in advance, these freeze beautifully for up to 1-2 months. Just wrap them tightly and thaw in the fridge overnight before serving—fresh-tasting and festive whenever you need a hit of holiday cheer.
Reheating
I usually let frozen macarons come to room temperature naturally; microwaving tends to ruin the delicate texture. If you’re in a hurry, a short 10-second blast on low power in the microwave does the trick, but be cautious!
FAQs
-
Can I use fresh egg whites instead of egg white powder?
Absolutely! Fresh egg whites work great, especially if you live in a less humid climate. Egg white powder mainly helps stabilize the meringue in humid areas but isn’t essential.
-
How do I know when the macaron batter is ready to pipe?
Look for a smooth, glossy batter that flows slowly off your spatula in a figure-8 shape without breaking. It should take about 10-15 seconds to fold back into the batter—this means the air is just right for perfect shells.
-
Why do I have to let the macarons rest before baking?
Resting allows the shells to form a dry skin on the surface, which helps prevent cracking and supports the signature macaron “feet” during baking. This step is especially important when using vibrant food coloring.
-
Can I make the royal icing and buttercream ahead of time?
Yes! Both can be made a day in advance and stored in airtight containers in the fridge. Bring to room temperature and re-whip the buttercream before assembling for the best texture.
Final Thoughts
This Santa Claus Macarons Recipe holds a special place in my heart because it combines the challenge of perfect macarons with the fun of festive decorating. Each batch feels like gifting a little bit of holiday joy, and I promise, once you master this, you’ll be sharing these beauties year after year. Give it a try—you’ll be amazed at how satisfying and fun making these seasonal treats can be!
Print
Santa Claus Macarons Recipe
- Prep Time: 2 hours
- Cook Time: 40 minutes
- Total Time: 2 hours 40 minutes
- Yield: 22 macarons
- Category: Dessert
- Method: Baking
- Cuisine: French
Description
Santa Claus Macarons are festive, beautifully decorated French macarons featuring crisp almond shells filled with a sugar cookie buttercream and adorned with royal icing to resemble Santa’s iconic belt. This recipe guides you through creating glossy red macaron shells, a smooth royal icing for decoration, and a creamy buttercream infused with toasted flour and shredded coconut for extra texture and flavor. Perfect for holiday celebrations or gifting, these macarons combine technique with fun seasonal design.
Ingredients
Macaron Shells
- 100 grams Domino® Golden Sugar
- 4 grams egg white powder (optional)
- 100 grams egg whites
- 105 grams almond flour
- 105 grams Domino® Powdered Sugar
Royal Icing
- 1 1/2 cups Domino® Powdered Sugar (187 grams)
- 1 tbsp meringue powder
- 4 tbsp water
- 2 drops black gel food coloring
- 1 drop yellow gel food coloring
Sugar Cookie Buttercream
- 1/2 cup all-purpose flour (63 grams)
- 1/2 cup unsalted butter (113 grams)
- 1/4 cup Domino® Golden Sugar (50 grams)
- 1 1/4 cups Domino® Powdered Sugar (156 grams)
- 1 tsp vanilla extract
- 1/8 tsp almond extract
- 1/2 tbsp milk or heavy cream
- 1/4 cup desiccated coconut shredded (50 grams)
Instructions
- Prepare Macaron Ingredients and Equipment: Gather all ingredients and prepare two baking sheets lined with parchment paper or silicone mats with macaron templates. Fit a large piping bag with a 1/4-inch round tip and set aside.
- Sift Dry Ingredients: Sift powdered sugar and almond flour together in a bowl and set aside for folding into the meringue later.
- Preheat Oven: Preheat oven to 300ºF (270ºF for convection ovens) for 60 to 90 minutes to stabilize temperature and reduce fluctuations during baking.
- Make Sugar Syrup for Meringue: Place a bowl over a pot of barely simmering water. Add granulated sugar and optional egg white powder; whisk to remove clumps. Add egg whites and whisk continuously until sugar dissolves completely without cooking the eggs.
- Whip Meringue: Transfer mixture to a stand mixer bowl. Whip on low for 30 seconds, then medium for 2 minutes, then medium-high until stiff peaks form and meringue is glossy and stable. Watch for defined waves on the whisk and stiff peaks when lifted.
- Fold Dry Ingredients and Color: Add sifted almond flour and powdered sugar to the meringue. Add about 1 tbsp red gel food coloring if using. Fold gently using a spatula in a letter J motion, pressing batter against bowl sides to deflate air, until batter is glossy, thick, and flows slowly in figure 8 shapes falling off the spatula.
- Pipe Macaron Shells: Transfer batter to piping bag. Pipe circles over each template spot on the baking sheets. Tap trays against the counter to release air bubbles and pop any visible bubbles with a toothpick.
- Rest Macarons: Allow piped shells to rest until a firm, dry skin forms on top and they are no longer sticky to the touch. This can take up to an hour or more, depending on humidity.
- Bake Macarons: Bake one tray at a time for 15–20 minutes at 300ºF (or adjusted oven temp). Look for developed feet and a non-jiggly, matte shell surface. Adjust baking time based on oven performance to avoid under or overbaking.
- Cool Shells: Let baked macarons cool completely on trays before decorating.
- Prepare Royal Icing: In a mixer bowl, combine powdered sugar and meringue powder. Slowly add water while mixing on low until smooth. Whip on medium-high until glossy and fluffy, with a consistency similar to sweetened condensed milk. Divide into two bowls, color one black, the other yellow.
- Decorate Shells: Pipe a black royal icing line across half of shells to form Santa’s belt. Allow it to dry (fridge helps speed drying). Pipe a yellow square buckle on the black belt. Let decorated shells dry while preparing filling.
- Heat Treat Flour for Buttercream: Spread flour on a baking sheet and bake at 350ºF for 5 minutes, stirring once. Cool completely before use to ensure it’s safe to consume raw.
- Make Sugar Cookie Buttercream: Cream butter and sugars thoroughly for 4-5 minutes until smooth. Incorporate cooled flour, vanilla, and almond extracts on low speed. Add milk or cream gradually to reach desired consistency. Add more powdered sugar if too runny.
- Assemble Macarons: Fill a piping bag with buttercream and pipe onto undecorated bottom shells. Sandwich with decorated shells on top. Roll edges gently in shredded coconut to coat the buttercream filling sides.
- Store Macarons: Refrigerate covered for up to 5 days or freeze up to 1-2 months. Allow frozen macarons to thaw at room temperature before serving.
Notes
- Egg white powder is optional and recommended if you live in humid climates (humidity above 30%) to stabilize the meringue. In dry climates it can be omitted.
- Resting the macaron shells before baking is critical, especially with added food coloring, to prevent cracking.
- Baking times vary widely by oven type and temperature; watch for visual cues like feet and firmness rather than relying solely on time.
- Heat treating the flour in the buttercream ensures safety as the frosting is not cooked afterward.
- Use gel food coloring to achieve vibrant colors without affecting batter consistency.
- Keep royal icing covered during decoration prep to prevent crusting.
- Macarons are best enjoyed after resting in the fridge for at least 24 hours to allow flavors to meld.
Nutrition
- Serving Size: 1 macaron
- Calories: 110 kcal
- Sugar: 15 g
- Sodium: 10 mg
- Fat: 4 g
- Saturated Fat: 2.5 g
- Unsaturated Fat: 1 g
- Trans Fat: 0 g
- Carbohydrates: 17 g
- Fiber: 1 g
- Protein: 2 g
- Cholesterol: 10 mg
