

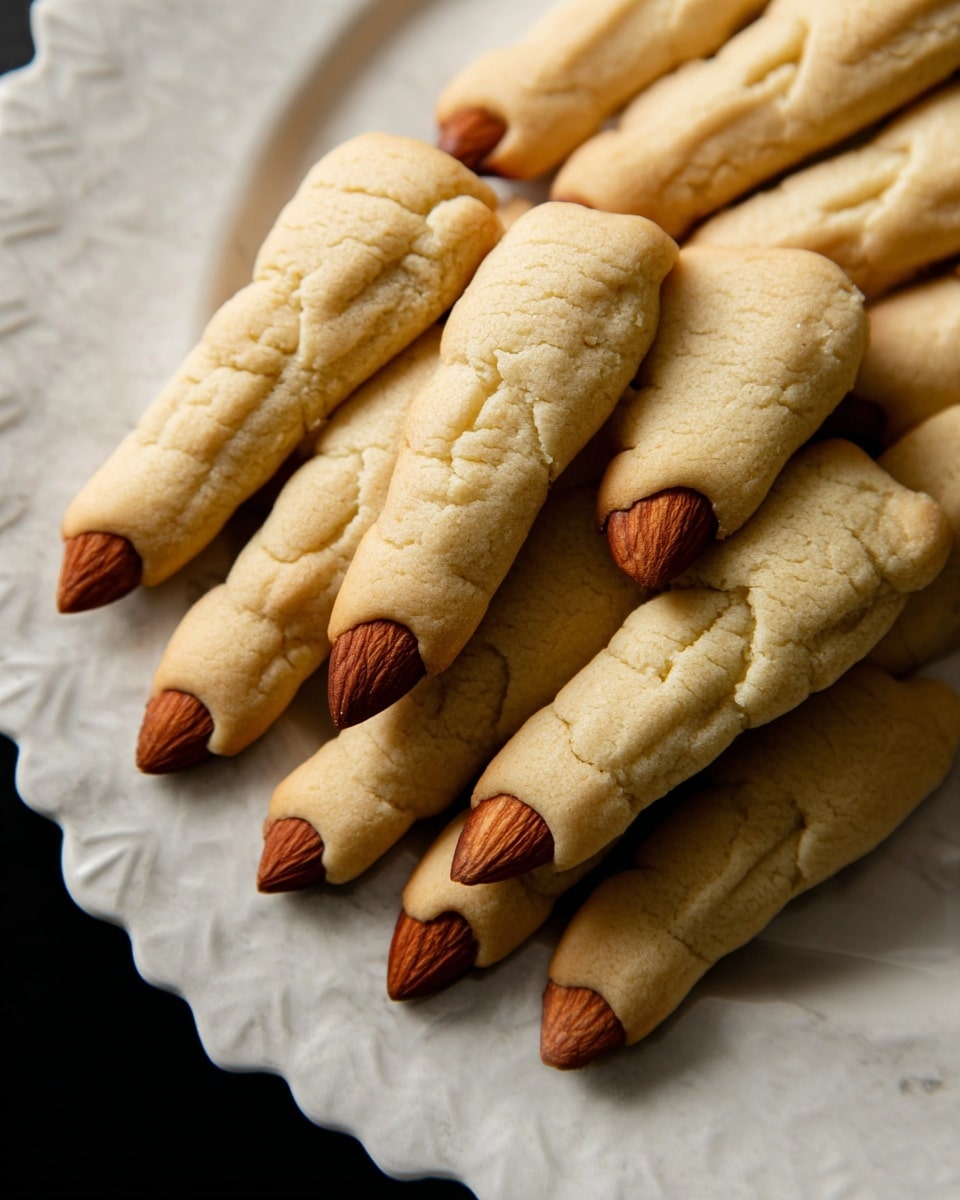
If you’re on the hunt for a fun and spooky treat this season, you’re going to absolutely adore this Shortbread Witches Fingers Recipe. It’s one of those Halloween classics that’s as delightful to make as it is to eat, perfect for sharing or sneaking a few yourself. I love this recipe because it turns simple ingredients into creepy-cool finger-shaped cookies that even the kids get excited to help with. Stick around—I’m going to walk you through every single step so you nail these witches’ fingers perfectly every time.
Why You’ll Love This Recipe
- Perfectly Buttery Texture: The unsalted butter gives these cookies that melt-in-your-mouth shortbread feel that’s hard to beat.
- Fun to Make and Shape: Pinching the fingers and adding almond nails brings out your creative side—kids especially love this part.
- Customizable and Halloween-Ready: You can add color or a splash of jam to make them extra spooky or festive to suit your vibe.
- Easy Ingredients, Big Impact: Using pantry staples means you’ll likely have everything on hand for a last-minute creepy treat.

Ingredients You’ll Need
For this Shortbread Witches Fingers Recipe, the ingredients all work together to create a crumbly yet sturdy cookie that shapes beautifully without cracking. The cinnamon adds a subtle warm depth without overpowering the simple sweetness.
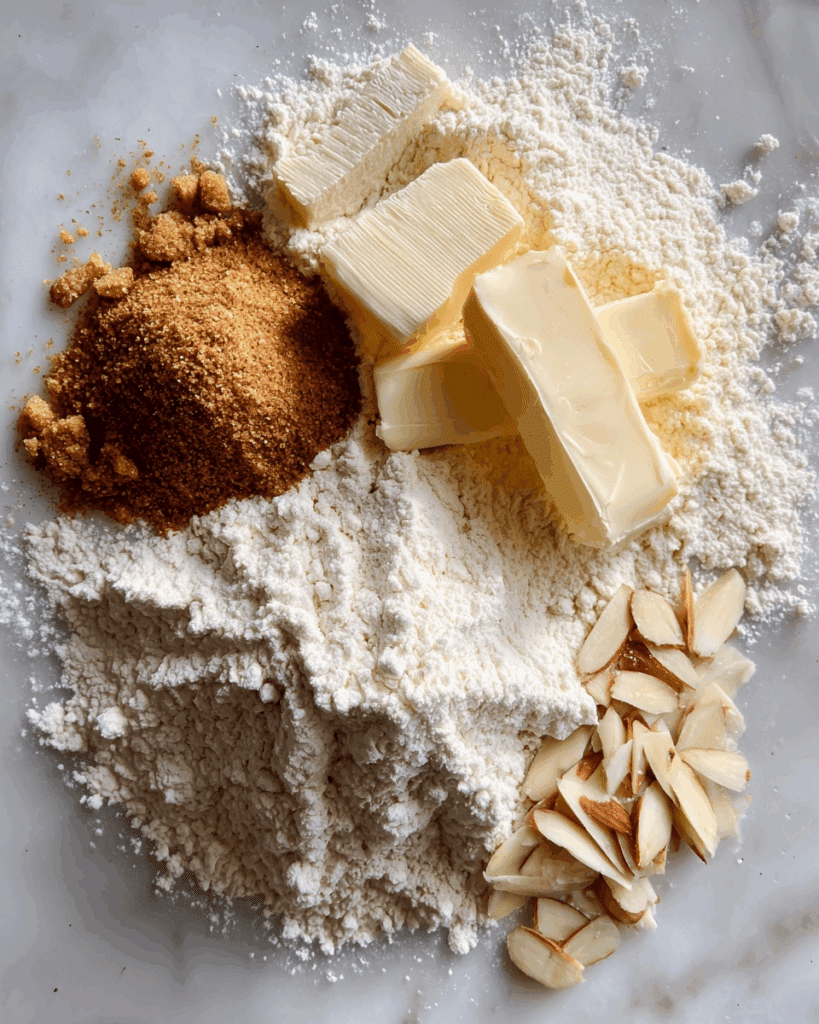
- All-purpose flour: Spoon and level it for accuracy to keep your dough just right—not too dry, not too sticky.
- Unsalted butter: Softened but still cool, so it creams nicely with the sugar for that ideal shortbread texture.
- Brown sugar: Lightly packed to add a subtle molasses undertone—feel free to swap for granulated if you want a cleaner sweetness.
- Vanilla extract: The magic touch that makes every baked good taste so comforting and familiar.
- Ground cinnamon: Just a hint to bring a warm fall vibe—don’t skip it!
- Kosher salt: A tiny pinch to balance the sweetness and deepen flavor.
- Slivered almonds: These become your creepy fingernails; you could also swap them with any other nut or even small candies if you want.
Variations
I love that this Shortbread Witches Fingers Recipe is like a blank canvas—you can tweak it to fit whatever spooky mood you’re in or dietary needs you might have. I’ve tried several twists, and honestly, they’re all winners.
- Green Witch Fingers: I discovered this trick when I added green food coloring to the dough during mixing for a more “witchy” look—super fun for kids’ parties.
- Nut-free option: Instead of almonds, try tiny pieces of dried fruit or colored candy “nails” to keep everyone safe without losing the creepy effect.
- Jam-topped gruesome fingers: For an extra gory presentation, I sometimes add a dab of red jam at the nail and broken end right before serving—it never fails to get a delighted squeal.
- Spice it up: Feel free to add a touch of nutmeg or ginger along with the cinnamon to deepen the spice profile.
How to Make Shortbread Witches Fingers Recipe
Step 1: Cream the Butter, Sugar, and Vanilla
Start by softening your butter—don’t let it get too melty, just soft enough so it creams smoothly with the brown sugar and vanilla. I use a hand mixer for about 1 to 2 minutes until it’s fluffy and pale. This step is key because it helps give your shortbread that tender crumb everyone loves.
Step 2: Add Spice, Flour, and Salt Carefully
Next, mix in the cinnamon, all-purpose flour, and a pinch of kosher salt. I always fold these in gently with a spatula to avoid overworking the dough—this keeps it from becoming tough. The dough will look crumbly at first; that’s totally normal!
Step 3: Press, Roll, and Cut Into Fingers
Once the dough starts to come together, press it into a firm square. Use parchment paper or a lightly floured rolling pin to roll it out to about 1/2 to 1/4 inch thick—a thickness that bakes evenly but still holds shape nicely. Cut the rectangle in half lengthwise, then slice 1/2 inch wide strips across to make those eerie finger shapes.
Step 4: Shape Your Witches Fingers
Pinch three times along each strip to create knuckles and texture. This part is always fun—I love this because it really brings the fingers to life! Then, use small slices to cut little “snags” across the knuckles, adding to the creepy effect. Pop a slivered almond into the tip of each strip to form the fingernails. Transfer everything to a parchment-lined baking sheet.
Step 5: Chill and Bake
Chilling the shaped fingers is crucial—it helps them hold their form while baking. I usually chill them for 30 minutes but you can cover and refrigerate up to 3 days ahead. When ready, preheat your oven to 350°F and let the pans warm slightly with the dough out of the fridge for about 10 minutes; this little trick helps the cookies bake evenly. Bake for 9 to 11 minutes until the bottoms just start to color. Let them cool a bit on the pan, then move to a rack to finish cooling.
Pro Tips for Making Shortbread Witches Fingers Recipe
- Use Cold Butter but Soften Slightly: I learned that using butter just softened enough helps the dough come together without becoming greasy or sticky.
- Don’t Overwork Your Dough: Mixing flour into the butter mixture just until it comes together ensures the shortbread stays tender instead of tough.
- Chill for Shape Retention: Chilling firmed up the dough nicely before baking, which means I avoided those sad flat fingers.
- Add Almond Nails Early: Pressing in the almonds before chilling helped them stay put and toast lightly in the oven without falling off.
How to Serve Shortbread Witches Fingers Recipe
Garnishes
I often sprinkle a tiny pinch of cinnamon sugar on top before baking to add a subtle sparkle that catches the light, making them look even more witches-finger-real. For Halloween parties, I sometimes add a little red jam or edible “blood” around the almond nails—it’s always a hit and adds a fun graphic touch.
Side Dishes
These shortbread fingers go beautifully with hot apple cider or a warm cup of chai tea. I especially enjoy pairing the spicy warmth of chai with these cookies—totally cozy and festive! If you want to keep the theme going, a big bowl of popcorn with a pinch of pumpkin spice makes a great salty-sweet snack along with them.
Creative Ways to Present
One of my favorite ways to present these is organizing them in a “jar of fingers,” where the cookies are stacked upright inside a tall glass vase or jar—looks super creepy and makes a fantastic centerpiece for a Halloween gathering. Another idea is to place the fingers sticking out of a cupcake or brownie, as if they’re eerily “stuck” in the cake.
Make Ahead and Storage
Storing Leftovers
If you have leftovers (and I hope you do!), store them in an airtight container on your countertop. They keep wonderfully fresh for about a week. I’ve found that letting them come to room temperature before eating brings back that classic shortbread softness and flavor perfectly.
Freezing
These cookies freeze beautifully—either pre-baked or after baking. I like to flash freeze them on a baking sheet first, then transfer to a zip-top freezer bag with parchment layers in between so they don’t stick together. They’ll keep fresh for a few months this way and are great to pull out for last-minute spooky treats.
Reheating
To refresh frozen fingers, pop them in a 300°F oven for about 5 minutes until just warmed through. This little heat boost revives the buttery aroma and crisp edges without drying them out. Just be sure to keep an eye on them so they don’t over-bake.
FAQs
-
Can I make this Shortbread Witches Fingers Recipe dairy-free?
Absolutely! You can swap the unsalted butter for a dairy-free margarine or vegan butter substitute with similar fat content. Just keep in mind that some dairy-free butters can have a different water content, so watch the dough texture closely—it should come together nicely without being too crumbly or sticky.
-
How do I keep the almond nails from falling off during baking?
Press the slivered almonds firmly into the dough before chilling. The chill helps set the dough around the almonds so they stay put. I also avoid adding the almonds after baking since they tend to fall off then.
-
Can I use granulated sugar instead of brown sugar?
Yes! Using granulated sugar will still work perfectly well; the cookies will have a slightly lighter sweetness and less molasses flavor, but the texture stays great. I personally love the subtle depth brown sugar adds, but it’s a fine swap in a pinch.
-
Why do my witches’ fingers spread too much during baking?
This usually happens if the dough is too warm or overworked. Chilling the shaped cookies before baking and ensuring the butter isn’t too soft helps prevent spreading. Rolling the dough to the right thickness also matters—about 1/4 to 1/2 inch is just right.
Final Thoughts
When I first tried this Shortbread Witches Fingers Recipe, I was blown away by how something so simple could look so festive and taste so incredible. It’s become a staple in my kitchen every fall because it combines classic shortbread comfort with a little Halloween fun that never gets old. I’m confident that once you try it, you’ll keep coming back to this recipe year after year—perfect for both parties and cozy nights in with a warm drink. Give it a go, have fun shaping those creepy fingers, and let me know how yours turn out!
Print
Shortbread Witches Fingers Recipe
- Prep Time: 25 minutes
- Cook Time: 11 minutes
- Total Time: 1 hour 6 minutes
- Yield: 30 cookies
- Category: Dessert
- Method: Baking
- Cuisine: American
Description
These Shortbread Witches Fingers are a perfect spooky treat for Halloween or any occasion. Crisp on the outside and tender inside, these buttery cookies are shaped like witch fingers with almond slivers for nails, featuring a hint of cinnamon for warmth. Easy to make and fun to shape, they bring festive charm and delicious flavor to your dessert table.
Ingredients
Dry Ingredients
- 6 ounces all purpose flour (1 1/4 cups + 1 tablespoon, spooned and leveled)
- 1/2 teaspoon ground cinnamon
- pinch kosher salt
Wet Ingredients
- 4 ounces unsalted butter (1/2 cup), softened
- 2 ounces brown sugar (1/4 cup, lightly packed)
- 1 teaspoon vanilla extract
For Decoration
- 1 tablespoon slivered almonds
Instructions
- Cream Butter, Sugar, and Vanilla: In a mixing bowl, cream together the brown sugar, unsalted butter, and vanilla extract until smooth and creamy, about 1 to 2 minutes using a hand or stand mixer.
- Add Dry Ingredients and Form Dough: Fold in ground cinnamon, all-purpose flour, and pinch of kosher salt gently until the dough just begins to come together. Turn the dough out onto a clean surface for rolling.
- Roll and Shape Dough: Press the dough together until no more crumbs remain, then shape it into a square. Cover with parchment paper or lightly flour your rolling pin and roll dough into a rectangle between 1/2 inch and 1/4 inch thick.
- Cut into Finger Shapes: Slice the rectangle lengthwise in half, then cut crosswise every 1/2 inch to create many thin, long rectangles that will become fingers.
- Mold Fingers: Pinch each rectangle three times along its length to form knuckles, approximately 1/2 inch apart, shaping each rectangle into a finger appearance.
- Detail Fingers: Transfer shaped fingers onto a parchment-lined baking sheet. Using a knife, slice three small lines across the bumps between the pinches to give more finger definition.
- Add Almond Nails: Insert a slivered almond at the tip of each finger to mimic a fingernail.
- Chill Dough: Cover the baking sheet with the shaped fingers and chill in the refrigerator for 30 minutes to 3 days to firm up the dough.
- Preheat and Bake: Preheat the oven to 350°F (175°C). Remove the baking sheet from the refrigerator and allow fingers to warm slightly for about 10 minutes while the oven preheats. Bake the cookies for 9 to 11 minutes, or until the bottoms begin to just lightly color.
- Cool: Remove from the oven and let the cookies cool on the baking sheet for 5 minutes before transferring them to a wire rack to cool completely.
Notes
- You can substitute granulated sugar for brown sugar if preferred.
- Add green food dye when adding the flour to the dough to create green witch finger cookies.
- Any type of nut can be used as a fingernail if slivered almonds are unavailable.
- Store the cooled cookies in an airtight container at room temperature for up to one week.
- For a more gruesome effect, add red jam to the fingernail and severed ends to resemble blood. Store these version in the refrigerator or wait to add the jam until serving.
Nutrition
- Serving Size: 1 cookie
- Calories: 95
- Sugar: 4.5g
- Sodium: 40mg
- Fat: 5g
- Saturated Fat: 3g
- Unsaturated Fat: 2g
- Trans Fat: 0g
- Carbohydrates: 12g
- Fiber: 0.3g
- Protein: 1g
- Cholesterol: 15mg


