Description
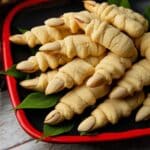
These Shortbread Witches Fingers are a perfect spooky treat for Halloween or any occasion. Crisp on the outside and tender inside, these buttery cookies are shaped like witch fingers with almond slivers for nails, featuring a hint of cinnamon for warmth. Easy to make and fun to shape, they bring festive charm and delicious flavor to your dessert table.
Ingredients
Scale
Dry Ingredients
- 6 ounces all purpose flour (1 1/4 cups + 1 tablespoon, spooned and leveled)
- 1/2 teaspoon ground cinnamon
- pinch kosher salt
Wet Ingredients
- 4 ounces unsalted butter (1/2 cup), softened
- 2 ounces brown sugar (1/4 cup, lightly packed)
- 1 teaspoon vanilla extract
For Decoration
- 1 tablespoon slivered almonds
Instructions
- Cream Butter, Sugar, and Vanilla: In a mixing bowl, cream together the brown sugar, unsalted butter, and vanilla extract until smooth and creamy, about 1 to 2 minutes using a hand or stand mixer.
- Add Dry Ingredients and Form Dough: Fold in ground cinnamon, all-purpose flour, and pinch of kosher salt gently until the dough just begins to come together. Turn the dough out onto a clean surface for rolling.
- Roll and Shape Dough: Press the dough together until no more crumbs remain, then shape it into a square. Cover with parchment paper or lightly flour your rolling pin and roll dough into a rectangle between 1/2 inch and 1/4 inch thick.
- Cut into Finger Shapes: Slice the rectangle lengthwise in half, then cut crosswise every 1/2 inch to create many thin, long rectangles that will become fingers.
- Mold Fingers: Pinch each rectangle three times along its length to form knuckles, approximately 1/2 inch apart, shaping each rectangle into a finger appearance.
- Detail Fingers: Transfer shaped fingers onto a parchment-lined baking sheet. Using a knife, slice three small lines across the bumps between the pinches to give more finger definition.
- Add Almond Nails: Insert a slivered almond at the tip of each finger to mimic a fingernail.
- Chill Dough: Cover the baking sheet with the shaped fingers and chill in the refrigerator for 30 minutes to 3 days to firm up the dough.
- Preheat and Bake: Preheat the oven to 350°F (175°C). Remove the baking sheet from the refrigerator and allow fingers to warm slightly for about 10 minutes while the oven preheats. Bake the cookies for 9 to 11 minutes, or until the bottoms begin to just lightly color.
- Cool: Remove from the oven and let the cookies cool on the baking sheet for 5 minutes before transferring them to a wire rack to cool completely.
Notes
- You can substitute granulated sugar for brown sugar if preferred.
- Add green food dye when adding the flour to the dough to create green witch finger cookies.
- Any type of nut can be used as a fingernail if slivered almonds are unavailable.
- Store the cooled cookies in an airtight container at room temperature for up to one week.
- For a more gruesome effect, add red jam to the fingernail and severed ends to resemble blood. Store these version in the refrigerator or wait to add the jam until serving.
Nutrition
- Serving Size: 1 cookie
- Calories: 95
- Sugar: 4.5g
- Sodium: 40mg
- Fat: 5g
- Saturated Fat: 3g
- Unsaturated Fat: 2g
- Trans Fat: 0g
- Carbohydrates: 12g
- Fiber: 0.3g
- Protein: 1g
- Cholesterol: 15mg