

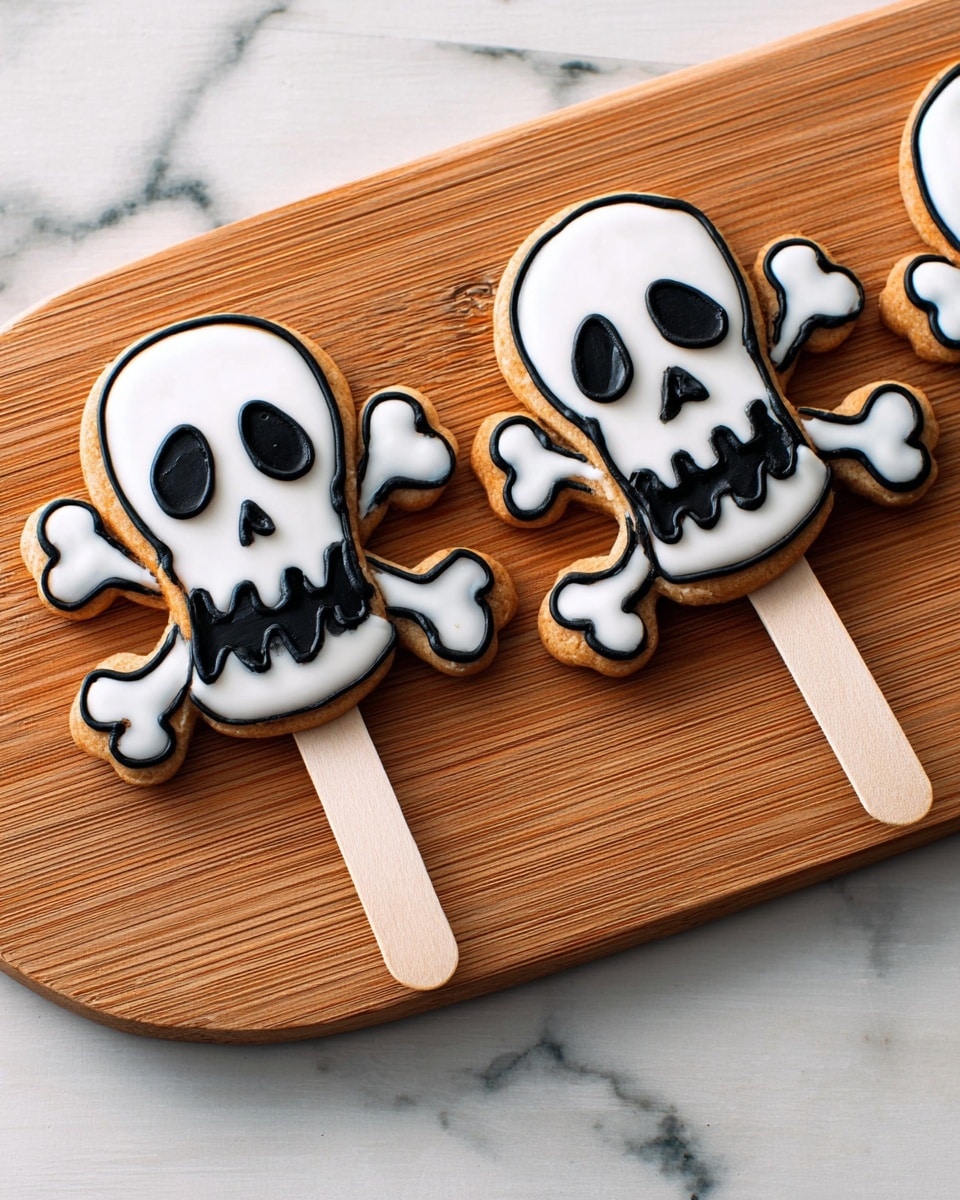
If you love fun, spooky treats that are as delightful to make as they are to eat, then you’re going to absolutely adore this Skull and Crossbones Cookie Pops Recipe. These charming cookie pops bring the perfect mix of whimsy and sweetness that instantly turns any gathering into a memorable event. Whether it’s for a Halloween party, pirate-themed bash, or just because you want to impress your friends with something unique, this recipe will be your new go-to.
Why You’ll Love This Recipe
- Easy to Make: Using pre-made cookie mix means you get fantastic flavor without fuss.
- Perfectly Themed: The skull and crossbones shape is fun and instantly festive for parties.
- Great for Kids: Decorating with white and black icing lets you be creative or get the little ones involved.
- Impressive Presentation: The cookie pops on sticks are both cute and convenient for serving.

Ingredients You’ll Need
These ingredients come together to create a cookie with a wonderful tender texture and just the right amount of sweetness. Using Betty Crocker’s mixes makes things straightforward and foolproof, especially if you’re not a seasoned baker yet.
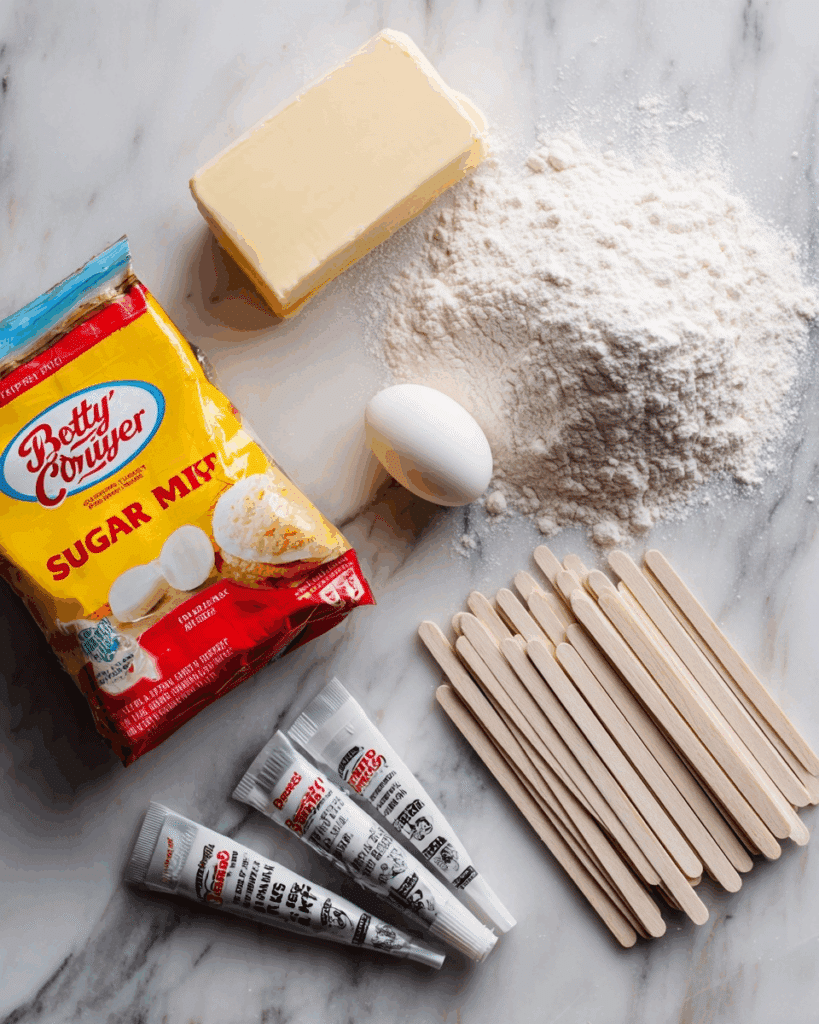
- Betty Crocker Sugar Cookie Mix: This is your base for a soft, delicious cookie that holds its shape well.
- Flour: You’ll need a bit more flour than what’s listed on the package to get the dough perfect for rolling and cutting.
- Butter: Always opt for unsalted so you can control the salt level exactly.
- Egg: Helps bind everything together and adds richness.
- Craft sticks: Flat wooden sticks with rounded ends work best — they’re sturdy and safe for little hands.
- Betty Crocker Decorating Cookie Icing (white): This creates the perfect base for your skull designs.
- Betty Crocker Decorating Cookie Icing (black): Ideal for adding crosses and details, creating dramatic contrast.
Variations
I love how the Skull and Crossbones Cookie Pops Recipe lends itself to all sorts of creative tweaks. You can really make it your own, whether you want to swap flavors, colors, or make it friendly for certain diets.
- Flavor Twist: Once, I swapped butter for browned butter to add a nutty depth—the cookies got rave reviews!
- Color Variations: Beyond black and white icing, I sometimes add a splash of red to make my “eyes” pop with an extra spooky vibe.
- Dietary Options: You can try gluten-free mixes if you need to avoid gluten. Just make sure the dough firms up enough for cutting and sticking.
- Mini Pops: For a kid’s party, I made smaller versions with mini skull cutters—so cute and bite-sized!
How to Make Skull and Crossbones Cookie Pops Recipe
Step 1: Make and Chill the Dough
Start with the cookie mix, add the extra flour the package calls for, softened butter, and egg. Stir everything together until you get a soft dough ball. From my experience, refrigerating the dough for at least an hour is key—it makes rolling out the dough much easier and helps maintain those precise skull shapes without shrinking during baking.
Step 2: Roll and Cut Your Skulls
Lightly flour your clean surface and roll the dough to about 1/4-inch thickness. I like using a silicone baking mat to keep things neat. Cut out the shapes with your 3-inch skull and crossbones cookie cutter. When placing them on the ungreased cookie sheet, space them 2 inches apart so they don’t merge in the oven. Don’t forget to insert the craft sticks halfway into each cookie—this part can be a little delicate, so gently push in the stick and avoid bending the dough edges.
Step 3: Bake and Cool
Bake at 375°F for about 8 to 10 minutes, but keep an eye on those edges—they should turn a lovely golden brown, not dark. Once out, let them cool on the sheet for 5 minutes to firm up, then transfer to a cooling rack. This helps the cookies avoid getting soggy and ensures the sticks stay securely in place.
Step 4: Decorate Like a Pro
Now the fun part—decorating! Use the white icing to create the skull base, smoothing it out so it looks crisp and clean. Once the white icing has set slightly, add black details for the eyes, nose, and, of course, the crossbones. I found that piping bags with a fine tip make this process a breeze and give you more control to draw those delicate lines.
Pro Tips for Making Skull and Crossbones Cookie Pops Recipe
- Chilling Is Crucial: Don’t skip the chilling — it makes rolling and cutting so much easier and prevents spreading during baking.
- Gentle Stick Insertion: Insert craft sticks before baking while dough is cold to avoid breaking the cookie later.
- Use Piping Bags: For detailed decorating, small piping bags or decorating tubes work best instead of plastic bags.
- Cool Completely: Wait until cookies are fully cooled before decorating so icing sets nicely and doesn’t melt.
How to Serve Skull and Crossbones Cookie Pops Recipe
Garnishes
I usually keep the garnishes simple with just the classic black and white icing—it really brings out the bold theme. But sometimes I add edible glitter or tiny silver sugar beads for a bit of fun sparkle that kids especially love. Makes the cookie pops look like little jewels!
Side Dishes
These cookie pops shine as a party treat, but I like pairing them with a refreshing iced tea or a batch of homemade lemonade to balance the sweetness. For a full spooky spread, try serving alongside some fruit skewers or popcorn for easy munching between bites.
Creative Ways to Present
When I’ve hosted Halloween parties, I’ve stood these cookie pops up in a foam block covered with black tissue paper or inside a decorative vase filled with mini candies—so they look like a bouquet of spooky treats! You can also tie a tiny ribbon around each stick for a festive flair that wows guests.
Make Ahead and Storage
Storing Leftovers
I usually store my cookie pops in an airtight container at room temperature for up to a week. Keeping them in a single layer prevents breaking or smudging the icing. If you stack them, slip parchment paper between layers as a little insurance against sticking and cracking.
Freezing
If you want to freeze these cookies, I recommend freezing them undecorated. Wrap each in plastic wrap and place in a freezer-safe container. When you’re ready to enjoy, thaw completely before adding icing. This keeps the decoration fresh and crisp.
Reheating
Since these are cookie pops, reheating isn’t usually necessary, but if you do want to warm them slightly, pop them in the oven at 300°F just for 5 minutes — this gently refreshes the cookie without melting the icing. Avoid microwaving as it softens the icing and can make the sticks soggy.
FAQs
-
Can I make the Skull and Crossbones Cookie Pops Recipe without a cookie cutter?
While a cookie cutter makes shaping these cookies easy and consistent, you can try hand-cutting the shapes with a paring knife if you’re comfortable with freehand. Just keep the edges clean and about 3 inches in size so the cookie holds the stick well.
-
What if I don’t have craft sticks? Can I use something else?
If craft sticks aren’t on hand, you could try sturdy lollipop sticks or even skewers cut to length, but make sure they’re food-safe and not too sharp to avoid breaking the cookie or hurting fingers.
-
How do I prevent the icing from smudging?
Let the cookies cool fully before decorating, and allow the icing to set at room temperature without stacking. Using piping bags for detailed work helps precision, and waiting 1-2 hours for the icing to dry before handling really reduces smudging.
-
Can I prepare the dough a day ahead?
Absolutely! You can make the dough and keep it wrapped in plastic wrap in the fridge overnight. It will still roll beautifully the next day, which is great when prepping for parties.
-
Are these cookies kid-friendly to decorate?
Yes! The decorating step is super fun for kids, especially with the simple black and white icing. Just supervise piping to avoid messes and provide safety tips with the sticks.
Final Thoughts
This Skull and Crossbones Cookie Pops Recipe is truly one of my favorites for adding excitement to any occasion. It’s easy enough that even if you’re a beginner, you’ll find success, and fun enough to keep experienced bakers entertained. Plus, the look on people’s faces when they see these spooky, sweet pops is priceless. I can’t recommend them enough for your next party or treat project—trust me, you’ll be glad you tried these!
Print
Skull and Crossbones Cookie Pops Recipe
- Prep Time: 45 min
- Cook Time: 10 min
- Total Time: 2 hr 25 min
- Yield: 18 cookie pops
- Category: Dessert, Snack
- Method: Baking
- Cuisine: American
Description
Delightfully spooky and fun, these Skull and Crossbones Cookie Pops are perfect for Halloween or pirate-themed parties. Made from a classic sugar cookie dough and decorated with white and black icing, these cookie pops combine festive creativity with delicious homemade flavor.
Ingredients
Cookie Dough
- 1 pouch (17.5 oz) Betty Crocker™ Sugar Cookie Mix
- Flour, butter, and egg called for on cookie mix pouch for cutout cookies
Decoration
- 2 pouches (7 oz each) Betty Crocker™ Decorating Cookie Icing white icing
- 1 pouch (7 oz) Betty Crocker™ Decorating Cookie Icing black icing
- 18 craft sticks (flat wooden sticks with round ends)
Instructions
- Prepare the Dough: In a medium bowl, combine the sugar cookie mix with the specified amounts of flour, butter, and egg as directed on the cookie mix pouch. Stir until a dough forms, then shape it into a ball and flatten slightly. Wrap the dough in plastic wrap and refrigerate for 1 hour or until firm to make it easier to roll out and cut.
- Roll and Cut Cookies: Preheat your oven to 375°F. On a lightly floured surface, roll the chilled dough to 1/4-inch thickness. Use a 3-inch skull and crossbones-shaped cookie cutter to cut out the shapes. Place the cutouts 2 inches apart on an ungreased cookie sheet. Insert a craft stick halfway into the center of each cookie carefully to form the ‘pop’ sticks.
- Bake the Cookies: Bake the cookies for 8 to 10 minutes, or until the edges turn golden brown. Remove from the oven and let cool on the cookie sheet for 5 minutes, then transfer to a cooling rack to cool completely. This helps the cookies set and prevents breakage when decorating.
- Decorate the Cookie Pops: Use the white and black Betty Crocker Decorating Cookie Icings to embellish the cookies with skull and crossbones designs. Allow the icing to stand until fully set before serving or packaging to prevent smudging.
Notes
- Make sure the dough is well-chilled to prevent spreading during baking.
- Use light flour dusting to avoid sticking when rolling the dough.
- Insert craft sticks gently to avoid breaking the dough or distorting the shape.
- Decoration can be customized with additional colors or details using food coloring or edible markers.
- Store decorated cookie pops in an airtight container at room temperature for up to 5 days.
Nutrition
- Serving Size: 1 cookie pop
- Calories: 160
- Sugar: 12g
- Sodium: 110mg
- Fat: 7g
- Saturated Fat: 4g
- Unsaturated Fat: 3g
- Trans Fat: 0g
- Carbohydrates: 22g
- Fiber: 0.5g
- Protein: 1g
- Cholesterol: 20mg


