
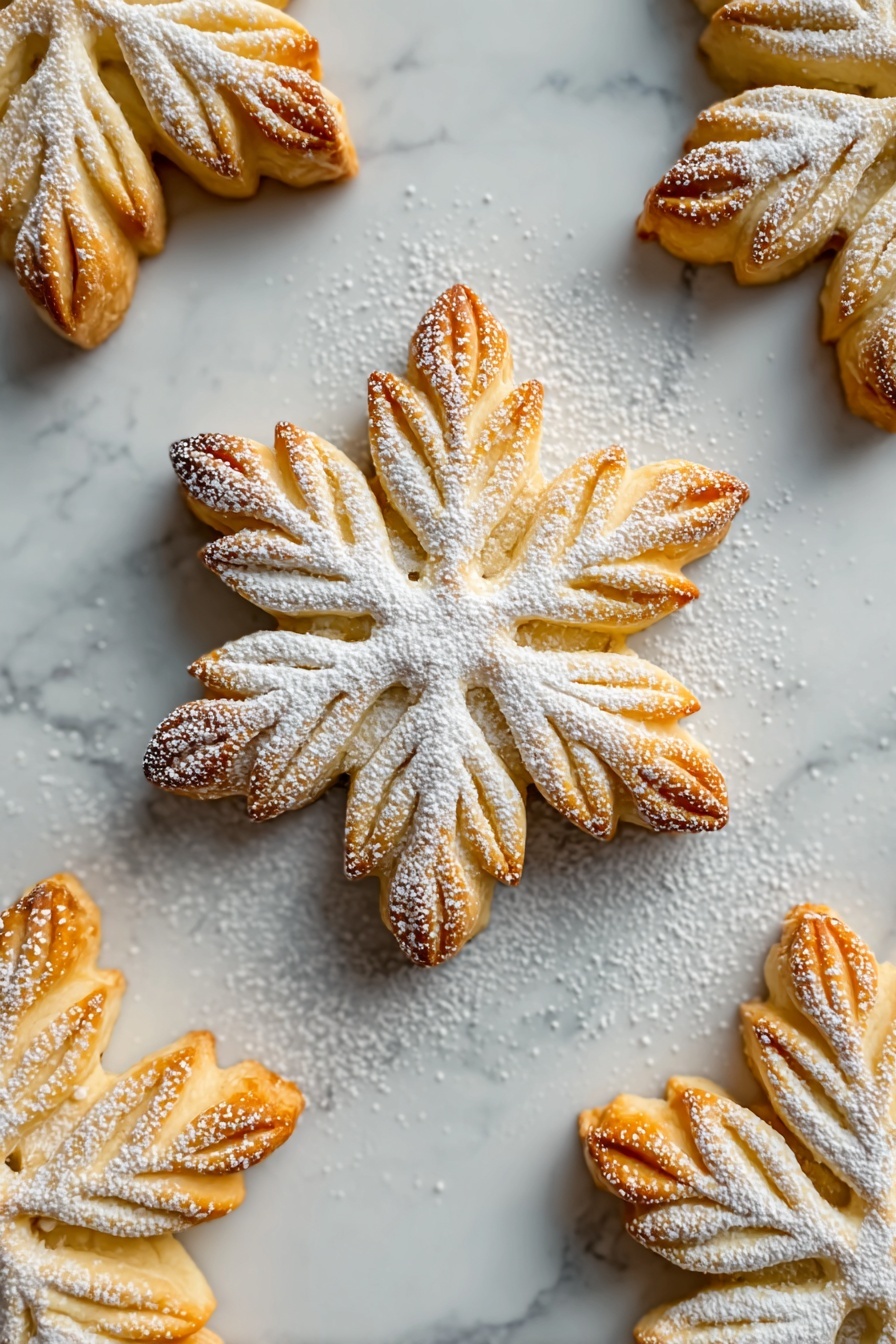
If you’re searching for a charming, melt-in-your-mouth treat that’s as delightful to look at as it is to eat, this Snowflake Cookie Recipe is going to become your new favorite. I absolutely love how these delicate cookies come out crisp yet tender, with a snowy dusting that just screams cozy winter vibes. Whether you’re baking for the holidays or just want a sweet little pick-me-up, stick around—I’m about to walk you through everything you need to make these magical snowflake cookies a total success in your kitchen.
Why You’ll Love This Recipe
- Beautiful, Unique Shape: The six or seven-point snowflake design is surprisingly easy to create and looks stunning on any cookie platter.
- Delicate But Sturdy Texture: These cookies hold their shape well but still have that lovely, buttery crumb we all crave.
- Simple Ingredients: You likely have everything in your pantry already, so it’s a no-fuss recipe perfect for last-minute baking.
- Versatile Flavors: The hint of almond extract is optional but adds an elegant twist if you want to mix things up.

Ingredients You’ll Need
Every ingredient in this Snowflake Cookie Recipe plays an important role in delivering that perfect balance of flavor and texture. Since it’s a straightforward dough, quality and freshness really shine through—so here are some tips on picking what’s best.
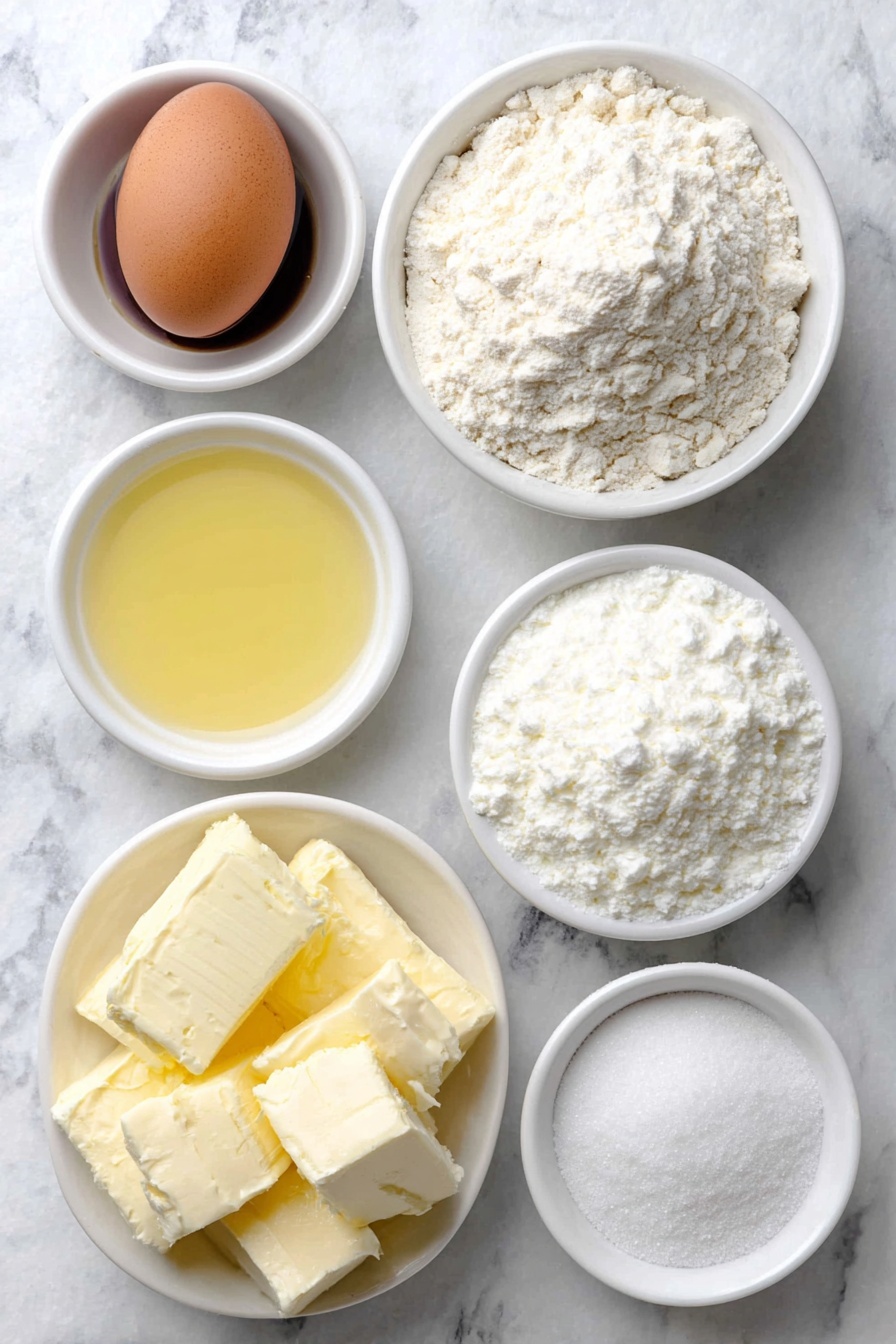
- All-purpose flour: Make sure it’s fresh, and if you can, sift it for lighter cookies.
- Powdered sugar: This adds extra tenderness and sweetness without graininess—plus, it’s also great for dusting the finished cookies.
- Granulated sugar: Creates just enough sweetness and helps with that slight crispiness around the edges.
- Unsalted butter: Softened, not melted, to help with the dough’s texture and flavor control.
- Vanilla extract: A must for warm, inviting notes in almost any cookie.
- Almond extract (optional): I like to add this for a subtle nutty flavor that makes the cookies extra special.
- Salt: Balances the sweetness and enhances flavor.
- Large egg: Helps bind everything together and adds moisture, keeping the cookies tender.
Variations
I love playing around with this Snowflake Cookie Recipe depending on the occasion. It’s fun to tweak flavors or the shapes a bit to keep it fresh but still familiar. Don’t be afraid to make it your own.
- Adding Citrus Zest: I sometimes mix in a teaspoon of lemon or orange zest for a bright surprise in these buttery cookies.
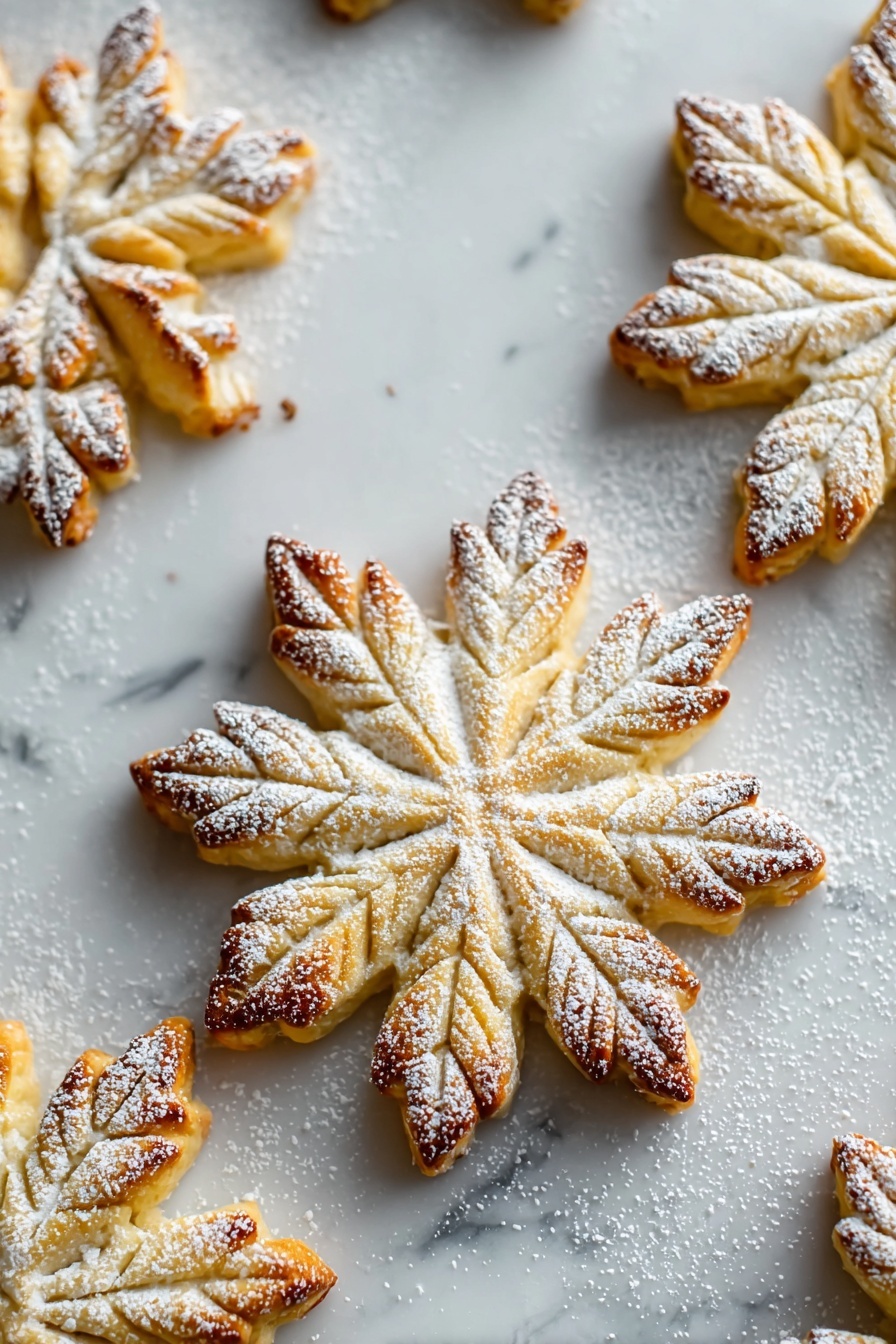
- Seven-Point Snowflakes: Instead of the classic six-point design, try seven points—it gives a slightly different look and my family insists they taste a bit fancier.
- Gluten-Free Version: I’ve swapped the all-purpose flour for a gluten-free blend with good results—just watch your dough texture and chill times a bit more carefully.
- Sparking Sugar: Add a sprinkle of coarse sanding sugar before baking for an extra crunchy, festive finish.
How to Make Snowflake Cookie Recipe
Step 1: Creaming the Butter and Sugars
Start by softening your butter to just room temperature—not melted! I use a hand mixer on medium speed to cream it together with both granulated and powdered sugars. This takes about 3 minutes and is key because you want a light, fluffy base for your dough that traps air, helping these cookies bake up tender and slightly crumbly. When you first try this, don’t rush it; you’ll see the mixture become pale and fluffy, which signals you’re on the right track.
Step 2: Mixing in Egg and Extracts
Next, add your egg, vanilla extract, and if you like, almond extract. Beat everything together until fully combined. The almond extract is optional but gives a lovely, subtle depth I adore. Just trust me 😉 —it adds a cozy, slightly nutty twist that lifts these cookies beyond the ordinary.
Step 3: Incorporating Dry Ingredients
Whisk your flour and salt in a separate bowl to distribute the salt evenly. Gradually add this to your wet mix on low speed. Here’s where you’ve got to watch yourself: mix just until the dough comes together. Overmixing can lead to tough cookies, and nobody wants that! When you see a smooth dough forming with no flour streaks, stop—perfect!
Step 4: Chilling the Dough
Divide the dough into two discs, wrap each tightly in plastic wrap, and pop them in the fridge for at least an hour. I used to skip this step and regret it—the dough gets easier to roll and won’t stick like crazy if it’s chilled. Plus, it makes those pretty snowflake shapes much more defined. Patience here definitely pays off!
Step 5: Rolling and Shaping Your Snowflakes
Here’s the fun part! On a lightly floured surface, roll one disc of dough to about 1/4-inch thickness. Use a round cookie cutter for uniform circles. To make six-point snowflakes, use a knife or toothpick to mark evenly spaced points around each circle and gently pinch each point to create “arms” of the snowflake. For a twist, try seven-point snowflakes by dividing the circle into seven segments instead. It took me a couple batches to feel confident doing this, but once you get the rhythm, it’s almost meditative!
Step 6: Baking to Golden Perfection
Preheat your oven to 350°F (175°C). Line your baking sheets with parchment paper and arrange the cookies about 2 inches apart—you want enough space for them to breathe as they bake. Bake for 10 to 12 minutes, keeping a close eye on the edges. You’re looking for just a hint of golden brown, not deep color. Overbaking dries them out, so pull them out when they look lightly golden. That’s when these cookies have the best texture!
Step 7: Cooling and Adding the Snowy Dusting
Let your cookies cool completely on a wire rack. This step is crucial because they firm up as they cool. Once cool, dust them lightly with powdered sugar for that classic snowy effect. I like to do this just before serving, so the sugar looks fresh and powdery. It’s a simple step that elevates these cookies from everyday to magical.
Pro Tips for Making Snowflake Cookie Recipe
- Keep Dough Cold: Cold dough rolls out easier and holds the intricate snowflake shapes better—don’t skip chilling!
- Use a Sharp Tool for Shaping: A toothpick or sharp knife helps you create precise points without tearing the dough.
- Don’t Overmix the Dough: Mixing just enough to bring the dough together keeps cookies tender, not tough or dense.
- Watch Your Bake Time: Pull cookies when edges are lightly golden to preserve the perfect texture; don’t wait till they’re deeply browned.
How to Serve Snowflake Cookie Recipe
Garnishes
I love dusting these snowflake cookies with a fine sifting of powdered sugar just before serving, which gives them that fresh-fallen snow look. Sometimes I’ll add a tiny edible glitter or a dot of royal icing in the center for a little festive sparkle—always a hit with guests, especially kids.
Side Dishes
These cookies go beautifully with a warm cup of spiced hot cocoa or a simple mug of tea. For gatherings, I like to set them alongside fruit preserves or a tangy lemon curd dip for an unexpected contrast.
Creative Ways to Present
For holiday parties, arrange the snowflake cookies on a mirror tray or rustic wooden board with sprigs of pine or holly around. Wrapping them individually in clear cellophane tied with twine or ribbon makes for charming edible gifts your friends will adore.
Make Ahead and Storage
Storing Leftovers
I keep leftover cookies in an airtight container at room temperature, and they stay fresh for about a week. The key is making sure they’re completely cool before sealing the container so they don’t get soggy.
Freezing
I’ve had great success freezing these cookies—just freeze them unbaked after shaping on parchment-lined trays, then transfer to freezer bags. When ready, bake them straight from frozen, adding a minute or two to baking time. It’s perfect for holiday prep!
Reheating
To warm leftovers, I pop a few cookies in the oven at 300°F for about 5 minutes. This revives their crisp edges and buttery aroma without drying them out like a microwave can.
FAQs
-
Can I make the Snowflake Cookie Recipe without almond extract?
Absolutely! Almond extract is optional and can be omitted without affecting the overall texture. Your cookies will still turn out delicious with just vanilla extract for flavor.
-
How do I prevent my snowflake cookies from spreading too much while baking?
Chilling the dough well before rolling and shaping is key to minimizing spread. Also, make sure your butter isn’t too soft or melted, and avoid overbaking to keep crisp edges intact.
-
Can I use a different flour type in the Snowflake Cookie Recipe?
Yes, you can experiment with gluten-free flour blends or even whole wheat flour. Just be mindful of texture differences and adjust chilling time if dough feels too sticky.
-
How long will these cookies stay fresh?
Stored in an airtight container at room temperature, these cookies stay fresh for up to one week. They also freeze well for longer storage.
-
What’s the best way to shape the snowflake points?
I like using a toothpick or a small paring knife to mark evenly spaced points around each cookie circle, then gently pinch the dough at those points to form the arms. This method is simple and effective once you get the hang of it.
Final Thoughts
This Snowflake Cookie Recipe holds a special place in my heart—it’s simple, yet the result looks like you spent hours crafting something elegant and delicate. When I first made them, I was amazed at how these few humble ingredients transformed into something so beautiful and delicious. I truly think once you try making them yourself, you’ll enjoy the process and the sweet reward just as much as I do. So grab your rolling pin, dust off that apron, and make these your next baking adventure—you won’t regret it!
Print
Snowflake Cookie Recipe
- Prep Time: 25 minutes
- Cook Time: 12 minutes
- Total Time: 1 hour 37 minutes
- Yield: 24 cookies
- Category: Baking
- Method: Baking
- Cuisine: American
Description
Delightfully delicate and buttery Snowflake Cookies that are perfect for the winter season. These charming cookies feature intricate six- or seven-point snowflake designs and are dusted with powdered sugar for a festive, snowy finish. Soft and tender with a subtle hint of vanilla and almond, they are an ideal treat for holiday gatherings, cookie exchanges, or anytime you want to add a touch of elegance to your cookie platter.
Ingredients
Dry Ingredients
- 2 cups all-purpose flour
- 1/2 teaspoon salt
Sugars
- 1/2 cup powdered sugar (plus extra for dusting)
- 1/4 cup granulated sugar
Wet Ingredients
- 1 cup unsalted butter, softened
- 1 large egg
- 1 teaspoon vanilla extract
- 1/4 teaspoon almond extract (optional)
Instructions
- Prepare the Dough: In a large bowl, cream together the softened butter, granulated sugar, and powdered sugar using a hand mixer or stand mixer on medium speed until light and fluffy, about 3 minutes. Beat in the egg, vanilla extract, and almond extract if using, until fully combined.
- Add Dry Ingredients: In a separate bowl, whisk together the all-purpose flour and salt. Gradually add this dry mixture to the wet ingredients, mixing on low speed just until the dough comes together smoothly. Avoid overmixing to keep the cookies tender.
- Chill the Dough: Divide the dough into two equal portions and shape each into a disc. Wrap each disc tightly in plastic wrap and refrigerate for at least 1 hour or until firm enough to roll out easily.
- Roll and Shape – Six-Point Snowflakes: On a lightly floured surface, roll one chilled dough disc to about 1/4-inch thickness. Use a round cookie cutter to cut out circles. Using a knife or toothpick, mark six evenly spaced points around each circle’s edge, then gently pinch the dough at each mark to create the arms of the six-point snowflake.
- Roll and Shape – Seven-Point Snowflakes: For a fun variation, mark the edges of the dough circles into seven segments instead of six, and pinch each segment point to form seven-point snowflake shapes.
- Bake the Cookies: Preheat your oven to 350°F (175°C) and line baking sheets with parchment paper. Arrange the shaped cookies about 2 inches apart on the sheet. Bake in the preheated oven for 10 to 12 minutes, or until the edges are lightly golden but the centers remain pale. Avoid overbaking to keep the texture tender.
- Cool and Dust: Transfer the cookies to wire racks to cool completely. Once cooled, dust them lightly with powdered sugar to give a beautiful snowy effect before serving or storing.
Notes
- Keep the dough cold to prevent sticking and maintain cookie shape during cutting and shaping.
- Use a light dusting of flour on the rolling surface as needed to roll out the dough smoothly.
- Store the baked cookies in an airtight container at room temperature for up to one week to maintain freshness and texture.
Nutrition
- Serving Size: 1 cookie
- Calories: 110
- Sugar: 6g
- Sodium: 70mg
- Fat: 7g
- Saturated Fat: 4g
- Unsaturated Fat: 3g
- Trans Fat: 0g
- Carbohydrates: 11g
- Fiber: 0.3g
- Protein: 1g
- Cholesterol: 22mg

