
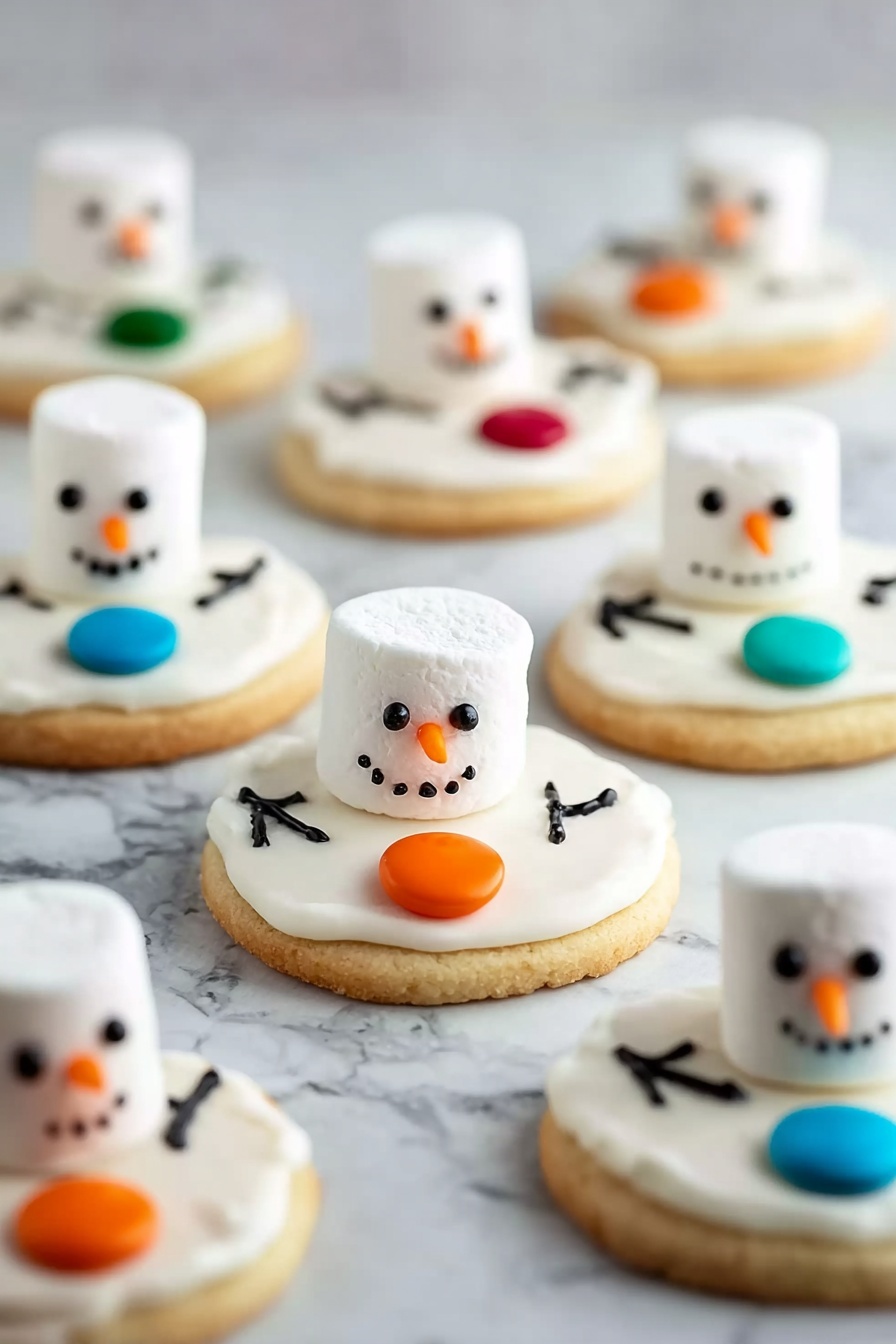
If you’re looking for a holiday treat that’s as cute as it is delicious, you’ve got to try this Snowman Cookies with Royal Icing Recipe. I absolutely love how these cookies come together — they’re buttery, sweet, and decorated to look like the most adorable melting snowmen you’ve ever seen. This isn’t just any plain cookie decorating; it’s a playful way to bring a little winter magic (and sugar!) to your kitchen. Stick around, because I’m going to share step-by-step how to make them, some tricks I learned, and ideas that’ll make your batch stand out.
Why You’ll Love This Recipe
- Playful Design: These cookies look like melting snowmen, adding a fun twist to holiday treats.
- Easy Decoration: The royal icing lets you get creative without stress, even if you’re not an expert decorator.
- Crowd-Pleaser: My family goes crazy for these — the mix of sugar cookie and sweet royal icing is irresistible.
- Quick to Make: You can whip up these festive cookies in about 20 minutes, perfect for last-minute holiday baking.

Ingredients You’ll Need
Choosing the right ingredients really makes a difference with this Snowman Cookies with Royal Icing Recipe. I like to use sturdy sugar cookies as a base so they hold the royal icing nicely, and the little details like marshmallows and sprinkles bring the snowman to life.
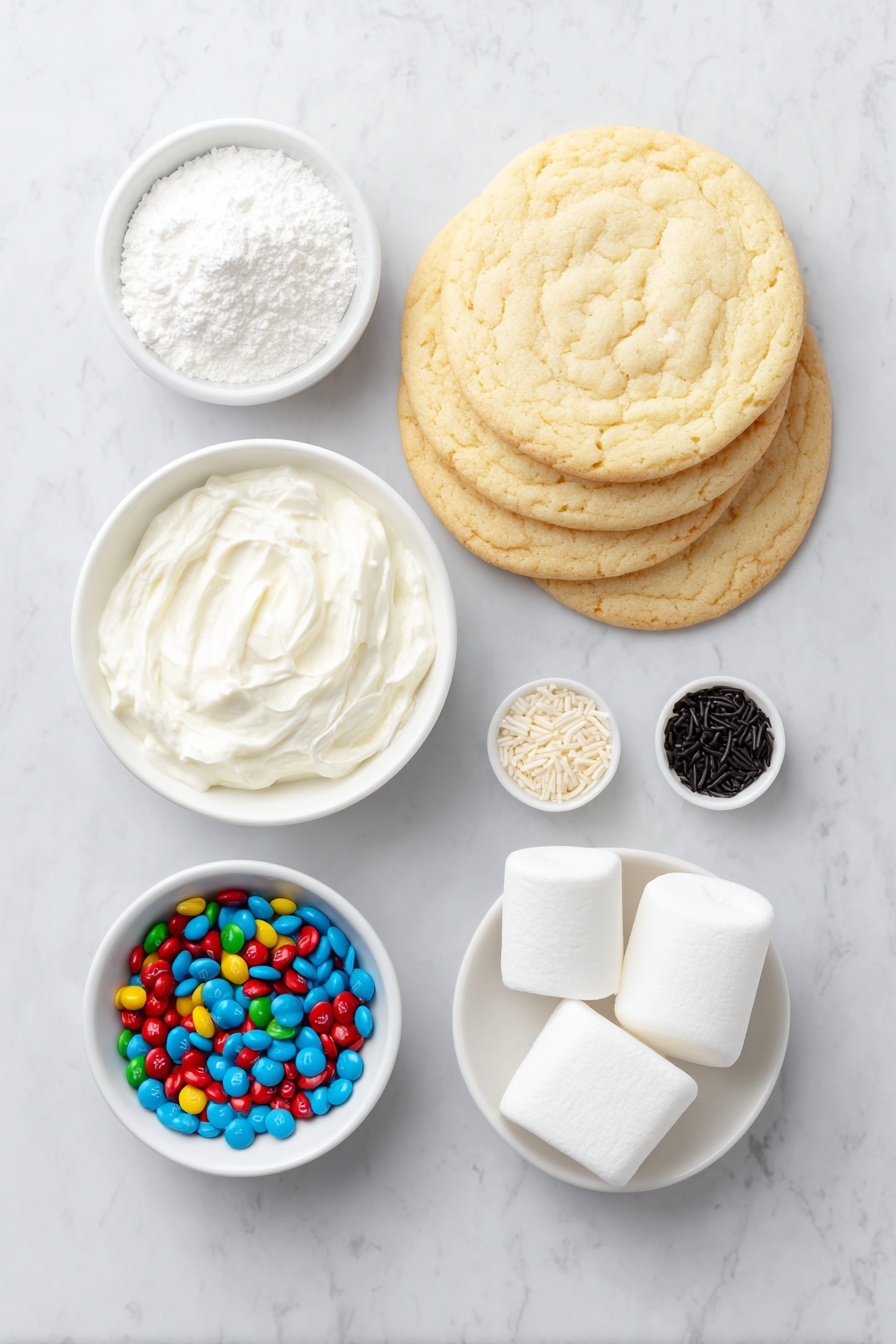
- Sugar cookies: Use your favorite recipe or store-bought for convenience — just make sure they’re thick enough for decorating.
- Royal icing: This is the star for decorating; it dries hard so your cookie designs last.
- Marshmallows: Cut marshmallows add dimension and look like a snowman’s head — plus, they’re soft and fun to nibble on.
- Long orange sprinkles: Perfect for the snowman’s carrot nose, adding a pop of color.
- M&Ms: Great for buttons or added decoration — I love using red for a festive vibe.
- Black gel food color: Needed to dye some of the icing black for the details like eyes and stick arms.
Variations
I like to switch up these Snowman Cookies with Royal Icing Recipe in small ways to keep things interesting or cater to everyone’s tastes. Feel free to get creative — the more personal, the better!
- Flavored Icing: Once, I added a hint of peppermint extract to the royal icing, which gave the cookies a lovely holiday twist without overpowering the sweetness.
- Gluten-Free Sugar Cookies: I’ve swapped the sugar cookies for a gluten-free dough with great success, just make sure your dough is a bit thicker to hold the royal icing.
- Chocolate Buttons: Instead of M&Ms, dark chocolate chips give a richer flavor and look super cute as buttons.
- Colored Sprinkles: Using rainbow sprinkles on top for a kid-friendly batch is always a hit — my niece went wild for that version!
How to Make Snowman Cookies with Royal Icing Recipe
Step 1: Prepare Black Royal Icing for Details
Start by taking about half a cup of your royal icing and mix in the black gel food coloring until you reach a deep, rich black. Here’s a trick I discovered: thin the icing to a 15-second consistency by adding just a few drops of water at a time — this means if you dip a spoon in and lift it out, the icing should smooth out in about 15 seconds. Then, pop that black icing into a piping bag with a tiny snip on the tip so you can pipe delicate details later on.
Step 2: Thin Remaining White Icing and Frost Cookies
Next, thin the rest of your white royal icing to a slightly thicker 10-second consistency — this way it’s nice and smooth for frosting. Spread or pipe the white icing generously over each cookie, letting it drip naturally over the sides for that “melting snowman” look. This part is fun because the randomness makes each cookie unique!
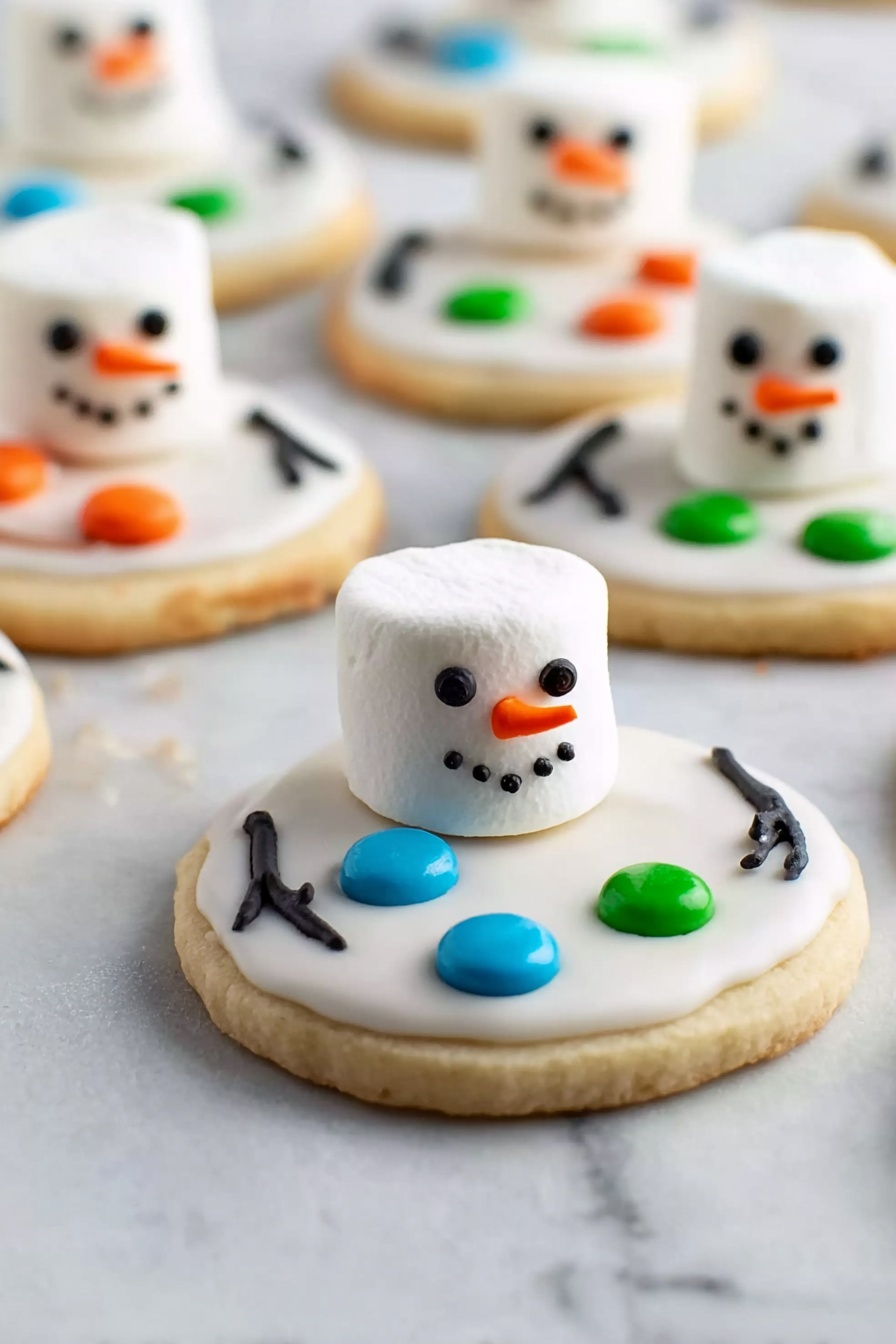
Step 3: Add Marshmallows and Candy Embellishments
While the white icing is still wet, stick a marshmallow half toward the back of each cookie — this is the snowman’s head, which gives character and dimension. Then press in a few M&Ms as buttons down the front. Finally, pipe black icing stick arms “floating” away from the marshmallow head to make it look like the snowman’s arms are raised.
Step 4: Let Set and Finish with Face Details
Allow the cookies to dry and set for about 20-30 minutes. Once firm, use your black icing to pipe on two little eyes and a surprised “O” mouth — it’s such a silly, charming expression that always gets a smile. To finish, use a touch of white icing to glue on a tiny orange sprinkle for the carrot nose. This last step really brings the melted snowman to life.
Pro Tips for Making Snowman Cookies with Royal Icing Recipe
- Consistency Matters: I learned thinning your royal icing precisely makes decorating easier — too thin and it runs; too thick and it’s hard to pipe.
- Work Quickly: Adding marshmallows and candies immediately after icing helps everything stick perfectly without sliding off.
- Use Gel Colors: Gel colors help you get vibrant black without watered-down icing — it makes a huge difference in the sparkle of your snowman’s face.
- Avoid Overcrowding: Give each cookie enough space to dry without touching so your designs stay crisp and neat.
How to Serve Snowman Cookies with Royal Icing Recipe
Garnishes
I usually add a sprinkle of edible glitter or a dusting of powdered sugar to serve these snowman cookies — it gives them a little frosty sparkle that’s just magical. Plus, a few extra orange sprinkles on the side echo the carrot noses and look pretty on the platter.
Side Dishes
These cookies pair delightfully with a warm cup of hot cocoa topped with whipped cream, or a crisp peppermint tea for a refreshing contrast. I also like serving them alongside a cheese and fruit board at holiday gatherings for a sweet, whimsical finish.
Creative Ways to Present
For festive parties, I’ve arranged these cookies standing up in clear glass jars layered with fake snow or white sugar pearls — it looks like a little winter scene that guests can admire before digging in. Wrapping a few in cellophane tied with red ribbon also makes adorable homemade gifts.
Make Ahead and Storage
Storing Leftovers
I keep leftover snowman cookies in an airtight container at room temperature, layering parchment paper between them so they don’t stick. They stay fresh and tasty for about 4-5 days, but honestly, they rarely last that long!
Freezing
Freezing decorated cookies can be tricky because royal icing is delicate, but I’ve had good success by wrapping each cookie individually in plastic wrap and storing them in a freezer-safe container. Thaw them overnight in the wrapper to avoid condensation spoiling the icing.
Reheating
No need to reheat these sweet treats! They’re perfect eaten at room temperature. Just bring them out of the fridge ahead of time to soften the icing slightly if it feels too firm from chilling.
FAQs
-
Can I use store-bought royal icing for this recipe?
Absolutely! Store-bought royal icing works great if you’re short on time. Just make sure to thin it to the right consistency before decorating for the best results.
-
How do I know if my royal icing is the right consistency?
Try the “10-second rule”: dip a spoon in the icing and watch how fast it smooths out. For these cookies, thin white icing to 10-second consistency and black to 15 seconds for easy piping and smooth drip effects.
-
Can I make this recipe with gluten-free cookies?
Yes, definitely. Just pick a gluten-free sugar cookie recipe that’s sturdy enough to hold the royal icing and decorate the same way. I recommend a slightly thicker dough to avoid crumbling.
-
How long does it take for the royal icing to dry completely?
Typically, royal icing sets firm in about 20-30 minutes at room temperature, but for a completely hard finish, it’s best to let the cookies sit for a few hours or overnight.
Final Thoughts
I have to tell you, this Snowman Cookies with Royal Icing Recipe quickly became a holiday tradition in my house. It’s fun, fast, and the results are just plain adorable — perfect for baking with kids or impressing your friends at a winter party. I hope you enjoy making and sharing these festive cookies as much as I do. Trust me, once you nail the icing consistency and get your snowmen “melting,” you’ll keep coming back to this recipe every year. Happy baking!
Print
Snowman Cookies with Royal Icing Recipe
- Prep Time: 20 minutes
- Cook Time: 0 minutes
- Total Time: 20 minutes
- Yield: 12 cookies
- Category: Dessert
- Method: No-Cook
- Cuisine: American
Description
Delightfully festive Melted Snowman Cookies feature sugar cookies topped with white royal icing that drips like melting snow, adorned with marshmallow snowmen decorated with candy details for a playful winter treat perfect for holiday celebrations or winter gatherings.
Ingredients
Cookies
- 12 sugar cookies
Royal Icing
- 2 cups royal icing
- Black gel food color
Decorations
- 6 marshmallows, cut in half
- Long orange sprinkles (for noses)
- M&Ms (for buttons and eyes)
Instructions
- Prepare Black Icing: Take 1/2 cup of your royal icing and mix in the black gel food coloring until you reach the desired shade of black. Thin the icing to a 15-second consistency by adding a few drops of water until it flows smoothly but holds shape. Transfer the black icing into a piping bag and cut a small tip for detail work.
- Prepare White Icing: Thin the remaining white royal icing to a 10-second consistency, which means it will slowly smooth out when drizzled but still be thick enough to stay mostly in place. Put this icing into a separate piping bag and snip off a small tip for easy application.
- Frost the Cookies: Using the white icing, frost each sugar cookie generously, allowing the icing to drip slightly over the edges to mimic melting snow. Work quickly so the icing is still wet for attaching decorations.
- Arrange Marshmallows and Candies: Immediately press the cut marshmallow halves toward the back of each cookie, creating the snowman’s head. Add M&Ms on the cookie as buttons and use additional M&Ms on the marshmallow for eyes.
- Pipe Arms and Face Details: While the icing is still tacky, pipe black stick arms extending outward from the marshmallow edges to create the snowman’s arms floating away from the body. Let the cookies set for 20 to 30 minutes to harden the icing partially.
- Add Facial Features: After the icing has set, pipe two black eyes and a surprised ‘O’ shaped mouth onto the marshmallow head using the black icing. Use some leftover white icing to glue a long orange sprinkle in place for the snowman’s carrot nose.
Notes
- Thinning royal icing to the correct consistency is essential for a smooth drip effect and easy piping; adjust with small amounts of water.
- Work quickly when applying decorations so the icing remains sticky enough to hold candy pieces.
- Allow cookies to fully dry before packaging or stacking to avoid smudging the decorations.
- Use gel food colors to avoid altering the icing consistency.
- For a gluten free version, substitute sugar cookies with a gluten free recipe.
Nutrition
- Serving Size: 1 cookie
- Calories: 150
- Sugar: 12g
- Sodium: 80mg
- Fat: 5g
- Saturated Fat: 2.5g
- Unsaturated Fat: 2g
- Trans Fat: 0g
- Carbohydrates: 23g
- Fiber: 0.5g
- Protein: 1g
- Cholesterol: 5mg


