
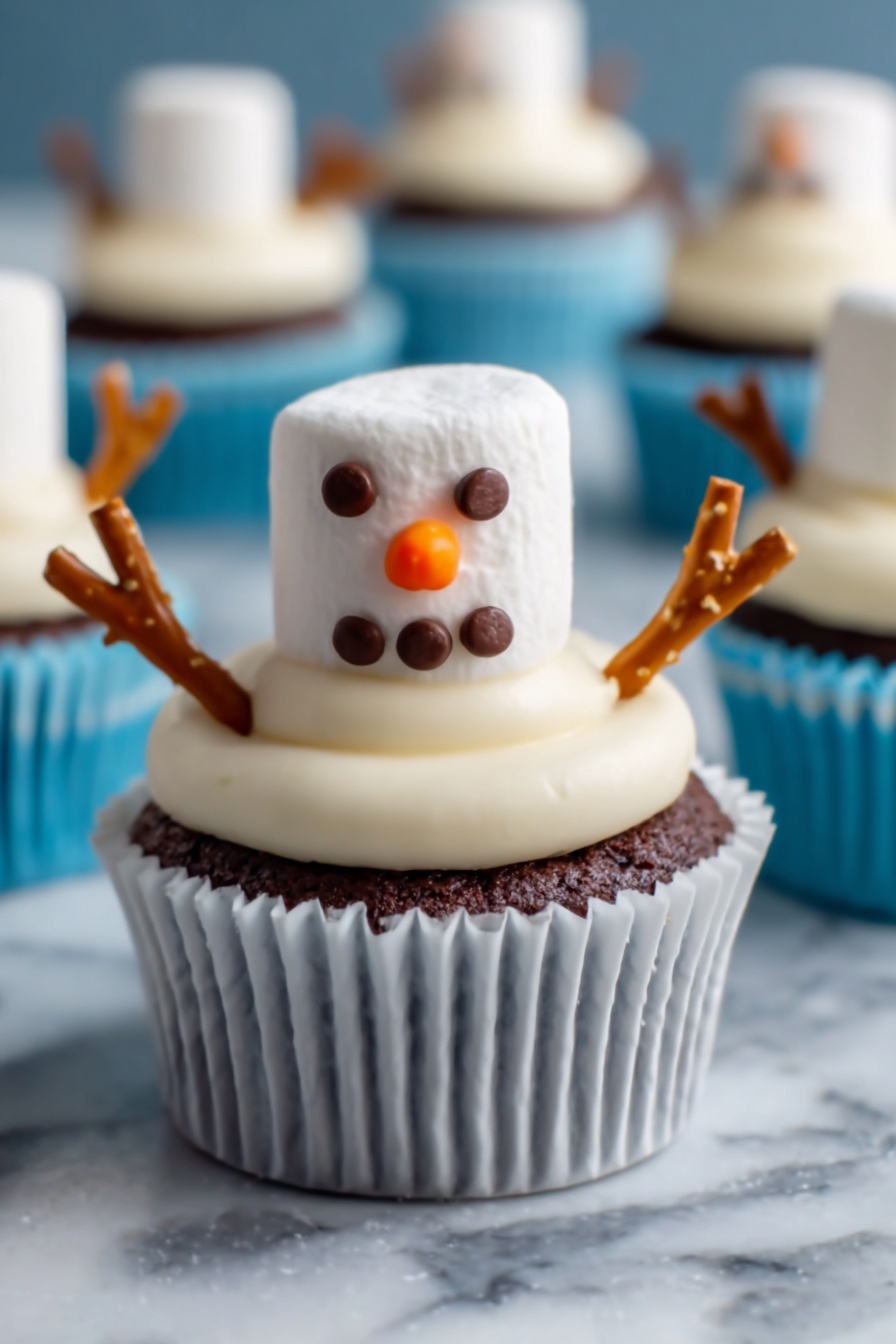
If you’re looking for a cute and delicious treat that’s sure to brighten up any winter day, you’re going to adore this Snowman Cupcake Muffins Recipe. These fun, chocolatey muffins are topped with fluffy buttercream snow piles and adorable snowman faces made from marshmallows and candies. When I first tried this recipe, I couldn’t believe how well the flavors and textures came together — plus, my family goes crazy for them! Stick around and I’ll share all the tips and steps to help you nail these charming winter delights.
Why You’ll Love This Recipe
- Super Cute & Festive: These snowman cupcakes are a perfect cozy winter treat that doubles as a festive centerpiece for any gathering.
- Moist Chocolate Muffins: The muffins are rich and chocolatey with a tender crumb that you’ll find just irresistible.
- Simple, Fun Decoration: Decorating with marshmallows and candy is easy and enjoyable, even for kitchen beginners or kiddos.
- Perfect for Gifting: These muffins look impressive but come together quickly, making them ideal for last-minute winter gifts.

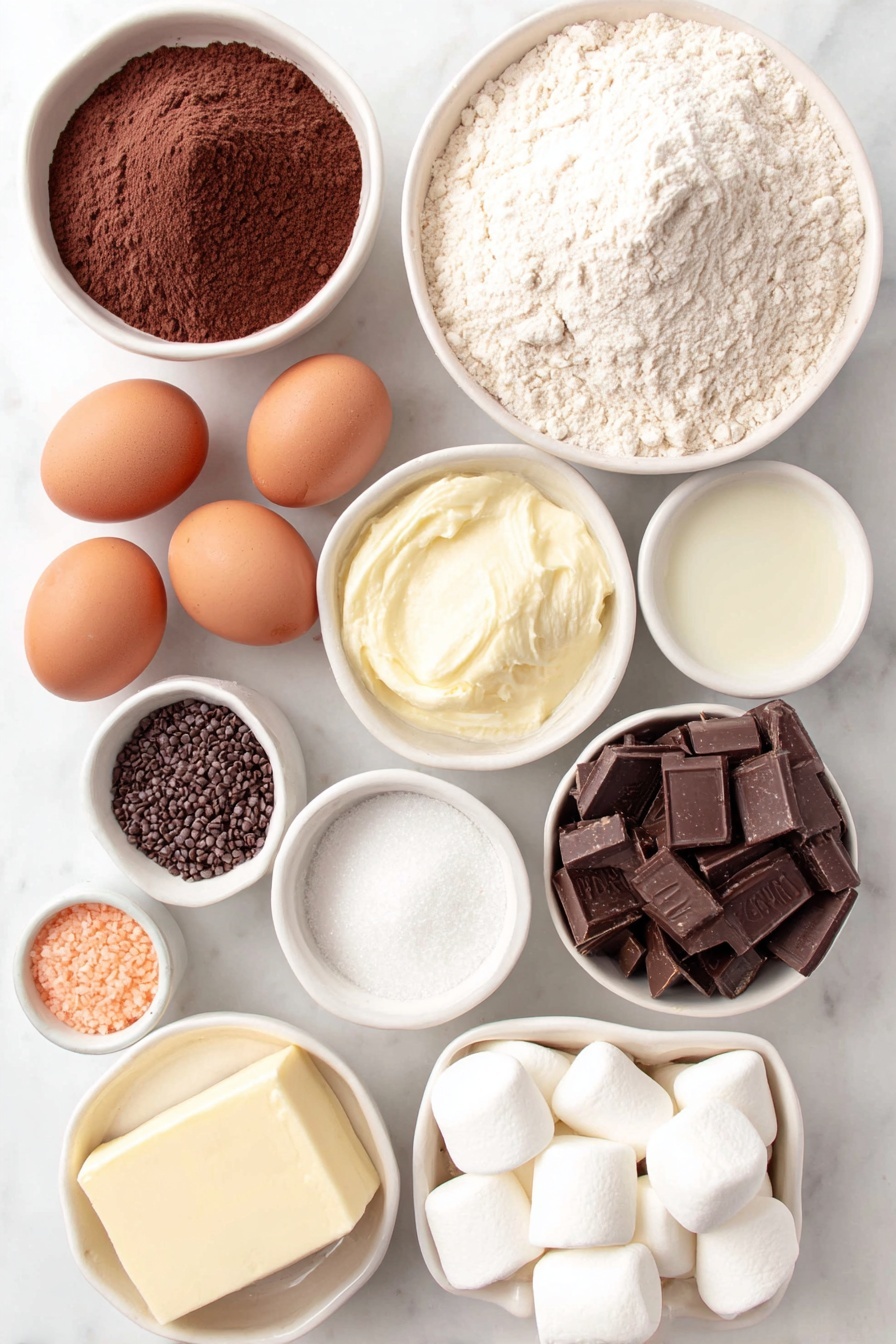
Ingredients You’ll Need
The magic in this Snowman Cupcake Muffins Recipe comes from combining classic chocolate muffins with a dreamy vanilla buttercream and fun decorations. Choosing quality ingredients like fresh eggs and good cocoa powder really makes a difference in the final taste and texture.
- All-purpose flour: Provides the sturdy structure your muffins need without weighing them down.
- Natural cocoa powder: For a rich chocolate flavor — I like to use natural over Dutch for that tangy intensity, but either works well.
- Baking powder and baking soda: Help your muffins rise perfectly and get that soft crumb.
- Unsalted butter: Using unsalted lets you control the saltiness better, plus it adds great moisture and flavor.
- Granulated and light brown sugar: The combo keeps the muffins sweet and slightly caramel-y thanks to the brown sugar.
- Eggs: They bind everything together and help the muffins stay tender.
- Vanilla extract: This really elevates the flavor, making everything taste homey and warm.
- Whole milk: Using whole milk keeps the batter moist and smooth.
- Powdered sugar: For the silky buttercream frosting—sifted to avoid lumps.
- Heavy cream or milk: Adjusts the buttercream to a perfect piping consistency.
- Marshmallows: The base for snowman heads—choose large, soft ones for best results.
- Dark chocolate sprinkles (jimmies or vermicelli): For eyes and mouth details; tiny but oh so important!
- Orange candy-coated chocolates or candy corn: These make adorable little noses.
- Mini pretzel sticks: Cut in half to form the snowman’s twig arms.
- Regular chocolate chips: Used as buttons, giving that classic snowman look.
Variations
I love how adaptable this Snowman Cupcake Muffins Recipe is! Whether you want to tweak flavors or tailor them to your dietary needs, it’s easy to make these muffins your own. Don’t hesitate to experiment and have fun with the decorations, too.
- Flavor swap: I sometimes replace the cocoa powder with cinnamon and nutmeg for a “snowman spice” muffin, perfect if you want less chocolate and more warmth.
- Dairy-Free Variation: Use coconut oil instead of butter and plant-based milk for a vegan-friendly option that still tastes amazing.
- Gluten-Free: I’ve tried swapping all-purpose flour with a blend of gluten-free flour and xanthan gum — the texture changes slightly but it’s still delicious.
- Holiday Mix-Ins: Toss in white chocolate chips or crushed peppermint candies inside the batter for festive bursts of flavor.
How to Make Snowman Cupcake Muffins Recipe
Step 1: Prep Your Oven and Muffin Pan
Start by heating your oven to 350 °F (175 °C). Line a 12-cup muffin pan with bright blue paper liners — I love using blue because it gives a cool, wintry vibe that complements the snowmen perfectly. It also helps the muffins peel away cleanly later. Getting your oven ready early saves you time and helps everything bake evenly.
Step 2: Mix Your Dry Ingredients
Whisk together the all-purpose flour, natural cocoa powder, baking powder, baking soda, and fine salt in a medium bowl. This step ensures your dry ingredients are well combined which prevents any pockets of baking soda or salt in your muffins — trust me, that’s a mistake I learned to avoid the hard way!
Step 3: Cream Butter and Sugars Until Fluffy
In a large bowl, beat the softened unsalted butter with both granulated and light brown sugars on medium speed for about 2 minutes. This step is where air gets incorporated, making your muffins light and tender. Your mixture should turn lighter in color and feel fluffy — don’t rush this part or your muffins could turn out dense.
Step 4: Add Eggs and Vanilla, Then Combine
Beat in eggs one at a time, scraping down the bowl after each addition so everything combines evenly. Next, stir in pure vanilla extract. Now alternate adding your dry ingredients and whole milk in three parts — start and end with the dry. Mix gently until no flour streaks remain to keep your muffins tender instead of tough.
Step 5: Bake Your Muffins
Divide the batter evenly among your paper liners, filling each about two-thirds full. Bake for around 18 minutes or until a toothpick inserted in the center comes out clean. I find starting to check at 16 minutes helps avoid overbaking and drying out the muffins. Let them cool in the pan for 5 minutes, then transfer to a wire rack to cool completely before decorating.
Step 6: Whip Up the Buttercream Snow
Beat softened butter until smooth, then gradually add the sifted powdered sugar—about one cup at a time. Blend in vanilla extract, a pinch of salt, and enough heavy cream or milk to get a thick but pipeable consistency. Then increase the mixer speed and whip for a full minute to get that fluffy, dreamy buttercream. This is my favorite frosting to pipe because it holds shape perfectly and tastes like a cloud.
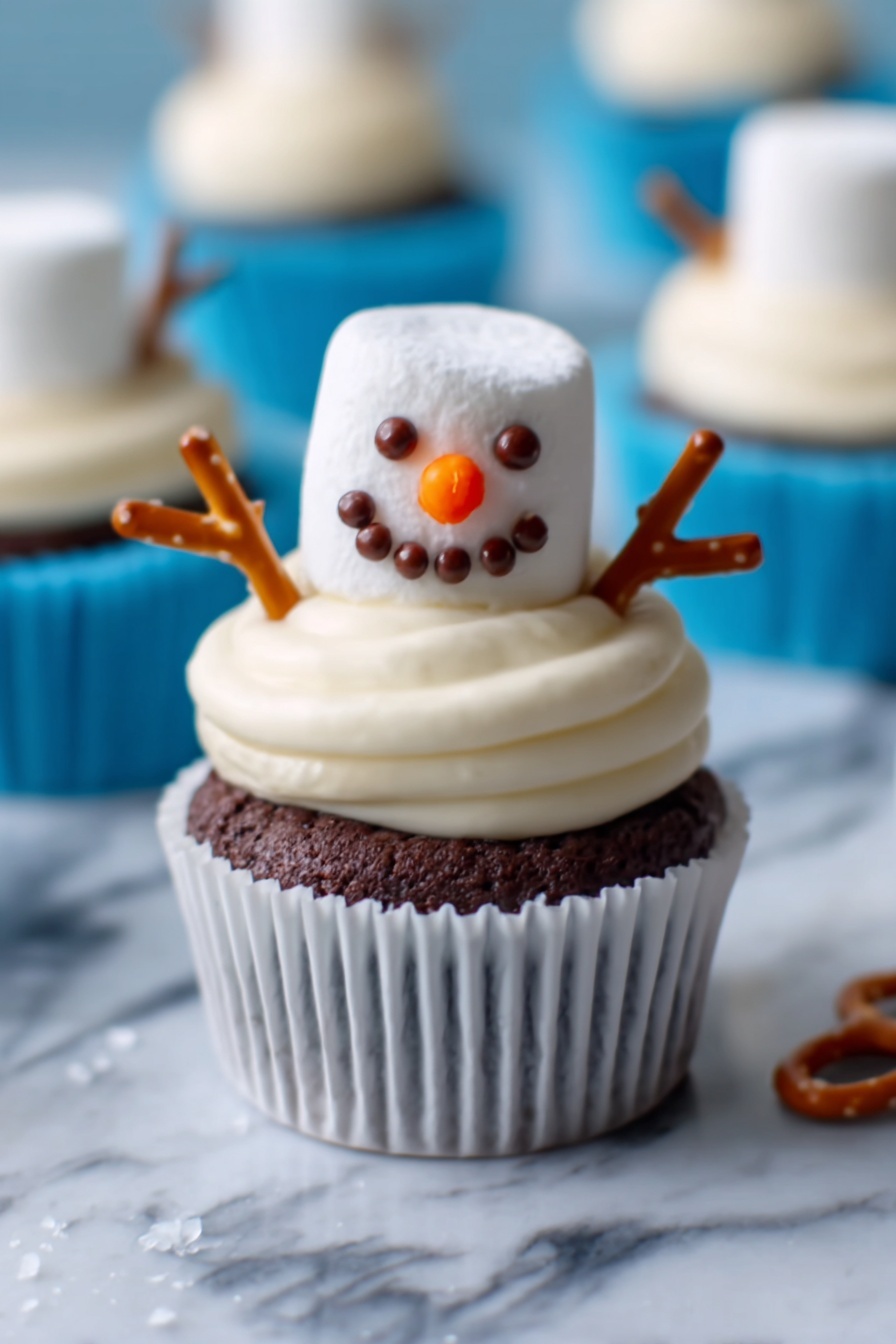
Step 7: Pipe Snow Piles and Create Snowman Faces
Fit a piping bag with a large round tip and pipe two stacked concentric circles of buttercream on each cooled muffin. This gives that lovely piled snow look. Then decorate your marshmallows: press two dark chocolate sprinkles into each marshmallow for eyes, arrange five in a smile shape for the mouth, and pop an orange candy in the center for the nose. I like using tweezers here—makes placing those tiny sprinkles much easier and less messy.
Step 8: Assemble the Snowmen
Set a decorated marshmallow snowman head on top of each buttercream snow pile. Stick two pretzel half-sticks into the frosting for arms, angled slightly upward to look natural. Finally, add three regular chocolate chips down the front as buttons. The first time I made these, I underestimated how much fun the assembly was — it really brings the muffins to life and always makes me smile!
Step 9: Serve and Store
Present your Snowman Cupcake Muffins on a cool platter so the buttercream stays firm. If you’re not serving right away, store them covered at room temperature for up to 2 days or refrigerate up to 4 days. Just bring them back to room temperature before eating — the buttercream softens perfectly again.
Pro Tips for Making Snowman Cupcake Muffins Recipe
- Use Room Temperature Ingredients: I found my muffins rise better and mix more evenly when eggs and milk aren’t cold straight from the fridge.
- Don’t Overmix Batter: Stopping as soon as flour is incorporated keeps muffins soft, avoiding a tough texture.
- Chill Buttercream Before Piping: If your kitchen is warm, pop the frosting in the fridge for 10 minutes—it holds its shape better when slightly chilled.
- Use Tweezers for Decoration: Helps with placing tiny sprinkles and candies precisely without smudging the frosting.
How to Serve Snowman Cupcake Muffins Recipe
Garnishes
I like to keep the garnishes simple but festive — the marshmallow snowman heads with their chocolate sprinkle eyes and candy noses do most of the talking! Sometimes I dust a little powdered sugar or edible glitter over the top for extra “snow sparkle.” It always impresses guests and adds a little magic to the presentation.
Side Dishes
These muffins pair wonderfully with warm drinks like hot cocoa or a spiced chai latte. For a brunch spread, I like serving them alongside fresh fruit or a mild cream cheese spread to balance the sweetness.
Creative Ways to Present
For winter parties, I’ve arranged mine on a platter lined with crushed graham crackers to mimic snow. Adding a few sprigs of rosemary or pine to the tray enhances the seasonal vibe. Another fun idea I tried was placing each muffin in small clear bags tied with a blue ribbon — perfect for gifting or party favors!
Make Ahead and Storage
Storing Leftovers
I usually store leftover Snowman Cupcake Muffins at room temperature in an airtight container for up to 2 days. If I need to keep them longer, refrigerating works well too, though the frosting firms up quite a bit and needs a little time to soften before eating.
Freezing
I’ve frozen the unfrosted muffins successfully by wrapping them tightly in plastic wrap then foil. When ready to serve, I thaw them overnight in the fridge and add buttercream the next day to avoid flavor or texture changes from freezing frosting.
Reheating
To enjoy leftover muffins, I warm them gently in the microwave for about 10 seconds—just enough to soften the crumb but not melt the buttercream if already applied. This little trick revives the fresh-baked feel and makes them irresistible again.
FAQs
-
Can I use store-bought frosting instead of making buttercream for the Snowman Cupcake Muffins Recipe?
Absolutely! While homemade buttercream gives a softer, fresher flavor and perfect pipeability, you can use a good-quality store-bought frosting. Just choose one that’s thick enough to hold shapes, and consider chilling it a bit to make piping easier. For best results, lightly whip it to aerate before decorating.
-
What if I can’t find dark chocolate sprinkles for the snowman’s eyes and mouth?
If you can’t find dark chocolate sprinkles, you can create your own tiny dots by melting semisweet chocolate, piping miniature rounds onto parchment, and chilling until firm. This DIY method gives you precise control and looks just as cute as the store-bought version.
-
How long will the decorated Snowman Cupcake Muffins stay fresh?
Decorated Snowman Cupcake Muffins are best enjoyed within 2 days if stored at room temperature. Refrigerating extends their life up to 4 days, but keep in mind the frosting will firm up and may need to warm to room temperature before serving for the best texture.
-
Can I make these muffins gluten-free?
Yes! Substituting with a gluten-free flour blend that includes xanthan gum works well. The texture might be slightly different, but with careful mixing and the right blend, you’ll still get tasty, tender muffins that hold up to piping.
-
What’s the best way to pipe the buttercream snow piles?
I recommend using a piping bag fitted with a large round tip. Pipe two stacked concentric circles to create a lovely snow pile effect. Starting from the base and moving inward helps build height and dimension, making your snowmen look extra adorable and realistic.
Final Thoughts
I absolutely love how this Snowman Cupcake Muffins Recipe turns out every time — from the rich chocolate base to the whimsical marshmallow snowmen. It’s one of those recipes that brings out the kid in all of us and makes winter feel just a little sweeter. I can’t wait for you to try it and bring that same joy into your kitchen. Whether it’s for a family gathering, a school party, or a cozy night in, these muffins are sure to become a seasonal favorite. Happy baking!
Print
Snowman Cupcake Muffins Recipe
- Prep Time: 20 minutes
- Cook Time: 18 minutes
- Total Time: 1 hour 8 minutes
- Yield: 12 cupcakes
- Category: Baking
- Method: Baking
- Cuisine: American
- Diet: Vegetarian
Description
These charming Snowman Cupcakes are rich, moist chocolate muffins topped with fluffy vanilla buttercream piped to resemble snow piles, adorned with marshmallow snowman heads and festive candy decorations. Perfect for winter celebrations, these delightful treats combine cocoa-infused cupcakes with creamy frosting and playful decoration for a fun and delicious dessert.
Ingredients
For the Muffins
- 1¼ cups all-purpose flour
- ½ cup natural cocoa powder
- 1 teaspoon baking powder
- ½ teaspoon baking soda
- ¼ teaspoon fine salt
- ½ cup unsalted butter, softened
- ¾ cup granulated sugar
- ¼ cup packed light brown sugar
- 2 large eggs, room temperature
- 1 teaspoon pure vanilla extract
- ½ cup whole milk, room temperature
For the Buttercream
- 1 cup unsalted butter, softened
- 3¾ cups powdered sugar, sifted
- 2-3 tablespoons heavy cream or milk
- 1 teaspoon pure vanilla extract
- Pinch of fine salt
For the Decoration
- 12 large marshmallows
- 1½ tablespoons dark chocolate sprinkles (jimmies or vermicelli)
- 12 orange candy-coated chocolates or small candy corn pieces (noses)
- 24 mini pretzel sticks, halved (arms)
- 36 regular chocolate chips (buttons)
Instructions
- Preheat Oven: Heat the oven to 350 °F (175 °C) and line a 12-cup muffin pan with bright blue paper liners to prepare for baking.
- Mix Dry Ingredients: In a medium bowl, whisk together the all-purpose flour, natural cocoa powder, baking powder, baking soda, and fine salt until fully combined and uniform.
- Cream Butter and Sugars: Using a mixer on medium speed, beat the unsalted butter, granulated sugar, and light brown sugar in a large bowl until the mixture turns pale and fluffy, about 2 minutes.
- Add Eggs and Vanilla: Incorporate the eggs one at a time into the creamed mixture, scraping down the bowl after each addition, then mix in the pure vanilla extract for flavor.
- Combine Wet and Dry: Add the dry ingredients into the wet mixture in three additions, alternating with the whole milk. Begin and end with the dry ingredients, stirring gently just until no flour streaks remain to avoid overmixing.
- Bake Muffins: Evenly divide the batter among the lined muffin cups, filling each about two-thirds full. Bake for 18 minutes or until a toothpick inserted in the center comes out clean. Let the muffins cool in the pan for 5 minutes, then transfer to a wire rack to cool completely.
- Make Buttercream: Beat softened butter until smooth. Gradually add sifted powdered sugar, one cup at a time, on low speed. Blend in vanilla extract, a pinch of fine salt, and 2 to 3 tablespoons of heavy cream or milk to achieve a thick but pipeable consistency. Increase mixer speed to medium-high and whip for 1 minute to lighten the texture.
- Pipe Snow Piles: Fit a piping bag with a large round tip and pipe two stacked concentric circles of buttercream on each cooled cupcake to resemble piles of snow.
- Create Snowman Heads: Press two dark chocolate sprinkles into each marshmallow to form eyes. Arrange five sprinkles in a curved line to create a mouth. Push an orange candy-coated chocolate or candy corn piece halfway into the center to form the nose, using tweezers or a toothpick for precise placement.
- Assemble Snowmen: Place a decorated marshmallow atop each buttercream swirl. Insert two halved mini pretzel sticks at slight upward angles into the frosting to serve as arms, and press three regular chocolate chips vertically into the buttercream for buttons.
- Serve and Store: Present the snowman cupcakes on a cool platter to keep the buttercream firm. Store covered at room temperature for up to 2 days or refrigerate for up to 4 days, allowing cupcakes to come to room temperature before serving.
Notes
- If dark chocolate nonpareils are unavailable, create micro dots by melting 2 tablespoons of semisweet chocolate, transferring it to a piping bag fitted with a size-1 tip, piping tiny rounds onto parchment paper, chilling for 5 minutes, then using these as eyes and smiles.
- For a deeper chocolate color, use Dutch-process cocoa powder; if doing so, reduce baking soda to ¼ teaspoon to balance acidity.
Nutrition
- Serving Size: 1 cupcake
- Calories: 320 kcal
- Sugar: 28 g
- Sodium: 150 mg
- Fat: 18 g
- Saturated Fat: 11 g
- Unsaturated Fat: 6 g
- Trans Fat: 0.3 g
- Carbohydrates: 38 g
- Fiber: 2 g
- Protein: 3 g
- Cholesterol: 55 mg
