
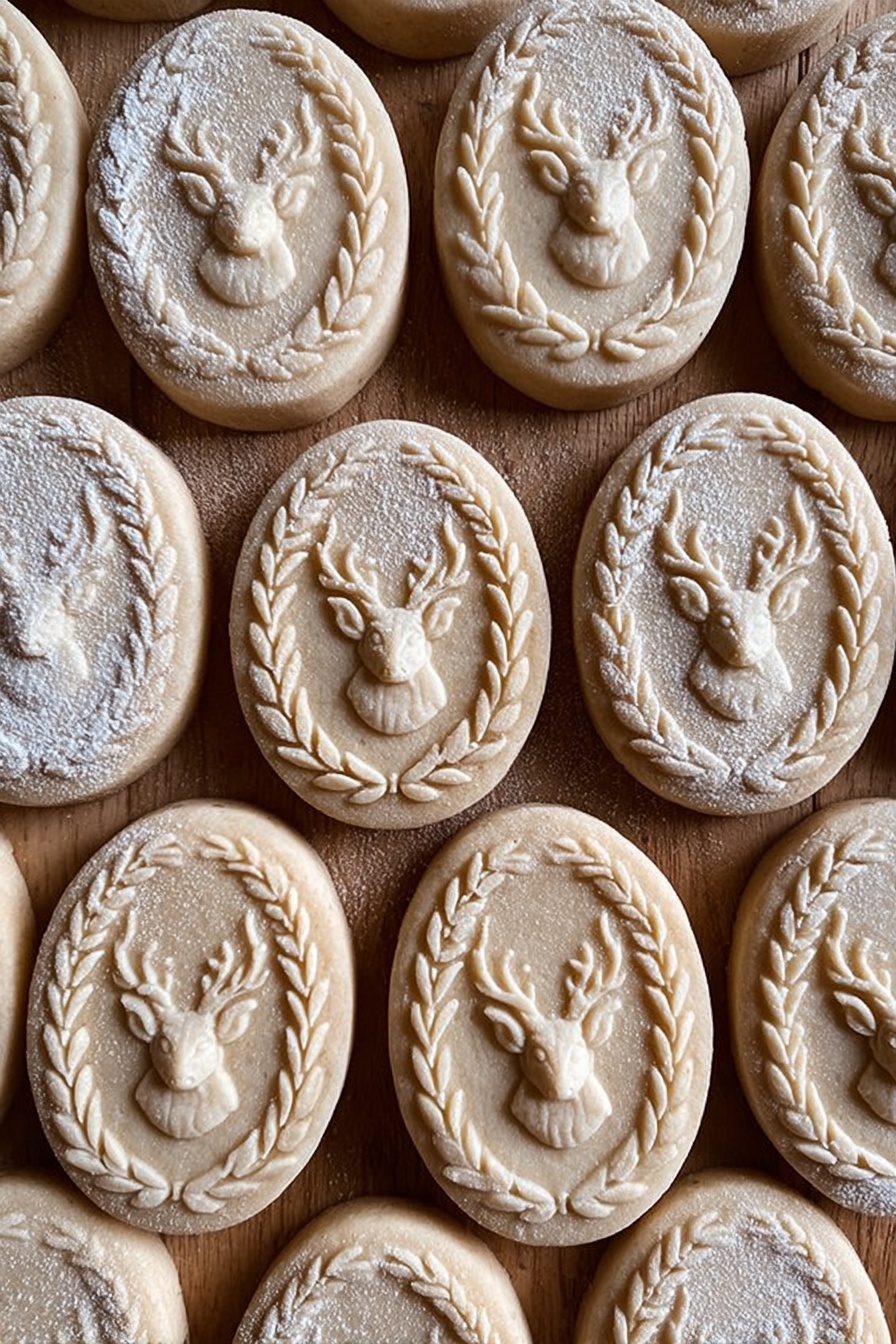
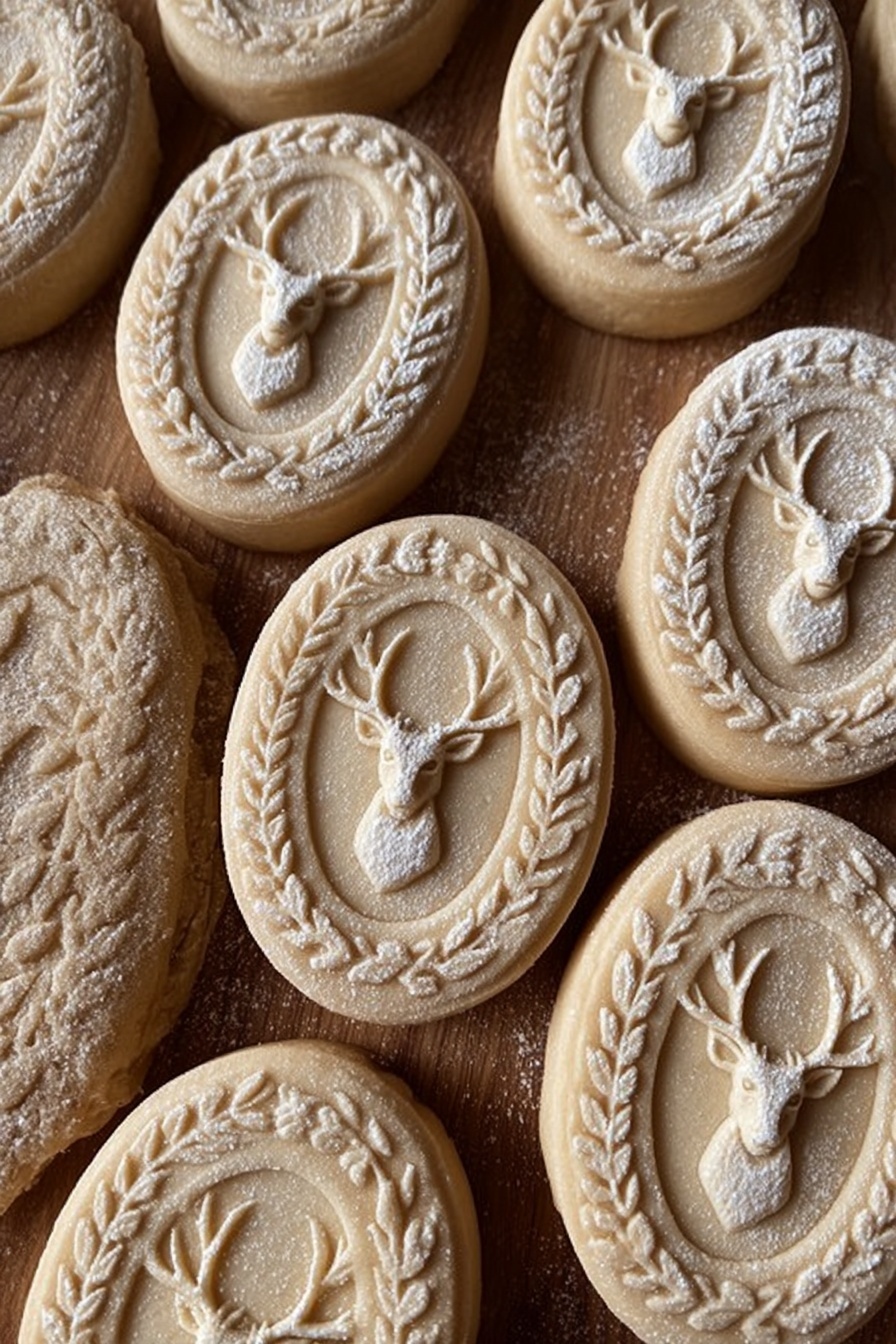
If you’re curious about perfect, delicate, and beautifully embossed cookies with a story, you need to try this Springerle Cookie Recipe. I absolutely love how these cookies come out with their crisp edges, lovely anise or almond aromas, and that traditional raised design that looks like little works of art. When I first tried making Springerle, I thought it would be tricky, but once you get the hang of the pattern pressing and resting times, you’ll find it’s really rewarding and fun. Stick with me—I’ll walk you through everything so you can nail these classic German treats in your kitchen.
Why You’ll Love This Recipe
- Timeless Tradition: Springerle cookies come from an old German recipe that brings festive charm and history to your baking.
- Beautiful Embossed Designs: You’ll enjoy creating intricate shapes and patterns with the classic molds—perfect for gifting or decorating.
- Rich Flavor Variations: Whether you love anise, almond, or vanilla, you can customize these cookies for your perfect taste.
- Perfect Texture Control: The unique resting and baking steps make sure the cookie’s texture is just right—crispy outside and tender inside.

Ingredients You’ll Need
When you gather your ingredients for this Springerle Cookie Recipe, you’ll see just how simple this classic treat is — mostly eggs, sugar, and a special flour. The flour is key to getting that tender yet firm texture, so choosing the right type will really boost your success.
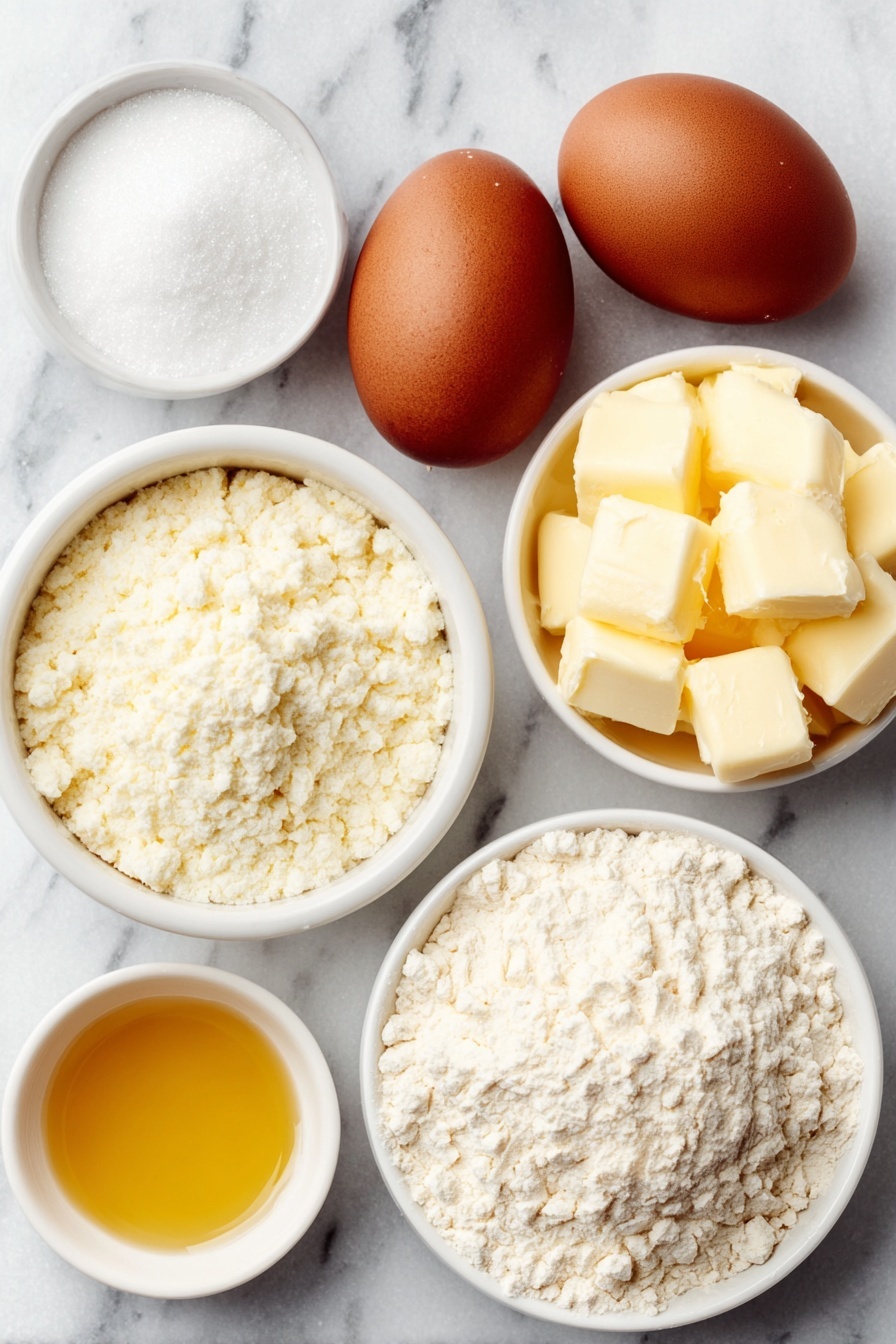
- Eggs: Room temperature eggs whip up better to create the airy base for this dough.
- Powdered sugar: Using icing sugar dissolves smoothly without graininess, which is essential for the perfect paste.
- Baking powder: Just a pinch to help with the rise and the formation of the cookie’s little foot.
- Flavoring: Vanilla extract, almond extract, anise seeds, or even pumpkin spice add wonderful character—feel free to get creative!
- Cake flour (T45 if you can find it): This flour is finer and lower in gluten than all-purpose; it helps keep that delicate crumb and hold the embossed patterns sharply.
- Cornstarch (for dusting): To prevent sticking while you roll and press your molds.
Variations
I like to mix things up depending on the season or what flavor mood I’m in. By swapping out the flavoring in this Springerle Cookie Recipe, you immediately get a new taste profile that feels fresh while keeping the traditional charm.
- Anise Variation: Using anise seed or anise extract gives that authentic licorice-like kick that my family associates with Christmas, and it fills the whole kitchen with a nostalgic aroma.
- Almond or Vanilla: For a more subtle flavor, vanilla or almond extracts are perfect and pair beautifully with tea or coffee.
- Pumpkin Spice or Kirsch: Adding a teaspoon of pumpkin spice or a splash of Kirsch (cherry brandy) creates a fun twist I tried last fall, and everyone loved it!
- Flour Swaps: If you don’t have cake flour, you can try all-purpose flour but be sure to reduce the quantity a bit and watch your dough texture closely.
How to Make Springerle Cookie Recipe
Step 1: Whip Up the Egg and Sugar Base
Start by beating your room temperature eggs in an electric mixer with the whisk attachment until they’re foamy—this takes a couple of minutes. Then, slowly add in the powdered sugar while mixing on medium speed. Keep whipping for about 10-15 minutes until the mixture thickens and looks creamy, almost like buttercream. The last 5 minutes are crucial as you add a pinch of baking powder and your chosen flavoring—this brings the dough its lift and aroma. I learned early on that this step is what makes the dough light and helps the cookies rise charmingly later.
Step 2: Incorporate the Flour and Chill
Next, gently fold in the cake flour while mixing on low-medium speed. The dough will start to come together, but it can be a bit sticky—don’t worry, that’s normal. After fully combining, wrap the dough tightly in plastic wrap, making sure the wrap touches the dough surface to prevent drying, and chill it in the fridge for several hours or overnight. Trust me, this resting time makes rolling and molding so much easier.
Step 3: Roll, Press, and Rest Your Cookies
When you’re ready, divide the dough into small portions and roll out on a surface dusted lightly with cornstarch until it’s about 1/4 inch (6mm) thick—the thickness should match your mold. Dust the top with cornstarch so the mold won’t stick, then press your Springerle mold firmly into the dough. Use a knife or cookie cutter to carefully cut around the design. I promise, the more you practice, the neater your edges get! Transfer each cookie to a cornstarch-dusted tray or board and let them sit at room temperature in a draft-free, dry spot for 12 to 24 hours. This drying step is a bit of a waiting game, but so worth it: it helps the designs set and the bottoms dry, so they bake up crisp and don’t spread.
Step 4: Bake to Perfection
Preheat your oven to 145°C (290°F)—a low and steady heat is key here. Right before baking, give each cookie a quick 30-second rest on a damp paper towel to moisten the bottom. This little trick helps them rise with that signature foot and prevents cracking during baking. Place them on a parchment-lined tray (you can sprinkle the parchment with your favorite spice or sugar for extra flair). Bake for about 15-17 minutes for smaller cookies and 18-20 minutes for larger ones. You’ll know they’re done when they have a little raised foot and don’t wiggle on the top when gently nudged. If baking two trays at once, don’t forget to swap and rotate trays halfway through for even baking.
Pro Tips for Making Springerle Cookie Recipe
- Flour Texture Check: Pay close attention to your dough’s feel—if it’s too sticky when rolling, dust with a little more cornstarch instead of adding flour, to maintain the delicate texture.
- Resting Patience: Don’t rush the drying time; it’s essential for getting clean, raised designs and crisp cookies. I set a timer to remind myself and trust the process.
- Mold Care: Keep your molds clean and dry; I run a dry pastry brush over the crevices between cookies to avoid stuck bits ruining the impression.
- Even Baking: Rotating trays halfway through baking ensures even browning and the right texture on every cookie rather than hotspots.
How to Serve Springerle Cookie Recipe
Garnishes
I usually keep these cookies naturally charming without over-the-top garnishes because the detail work on the cookies is the star. Sometimes, I lightly dust the tops with powdered sugar or even give them a gentle brush of edible pearl dust for a subtle glow at holiday parties. Simple and elegant wins here.
Side Dishes
Springerle pairs wonderfully with a hot drink like a spiced chai latte or classic black tea. I love serving them as a simple but special treat alongside a warm mulled wine or coffee during winter gatherings.
Creative Ways to Present
For festive occasions, I’ve arranged Springerle cookies in bakery boxes lined with parchment and ribbons, making lovely gifts. Another neat idea I tried was stringing some with ribbon through holes using icing and hanging them as edible ornaments—all while doubling as décor and treats!
Make Ahead and Storage
Storing Leftovers
I store leftover Springerle cookies in an airtight container at room temperature to keep their texture nice and crisp. They keep well for about two weeks like this, and I always check periodically that they haven’t softened, which can happen in humid conditions.
Freezing
Freezing Springerle is possible but I recommend freezing the dough before rolling and molding for best results. Once frozen, thaw it slowly in the fridge overnight before rolling out, so you preserve the dough’s moisture and texture.
Reheating
Reheating baked Springerle cookies isn’t usually needed, but if you want to freshen up day-old cookies, a quick 5-minute warm-up in a low oven (about 275°F) will bring back a little crispness without drying them out.
FAQs
-
What kind of flour is best for Springerle cookies?
The best flour to use is a fine cake or pastry flour, such as the French T45 type, because it has lower gluten content and produces a delicate, tender texture that holds the embossed designs beautifully. If you only have all-purpose flour, use less (about 2 ¾ cups or 340g) and adjust by feel.
-
Why do Springerle cookies need to rest before baking?
Resting the patterned cookies for 12-24 hours at room temperature allows the surface to dry and harden. This drying is crucial because it preserves the intricate molds during baking and prevents the cookies from spreading or losing detail.
-
Can I use different flavorings in the Springerle Cookie Recipe?
Absolutely! Vanilla and almond extracts are classic, but I also love trying anise seed for traditional flavor, or even seasonal twists like pumpkin spice or Kirsch. Just remember that stronger extracts might require slight adjustments in flour quantities.
-
How do I know when Springerle cookies are done baking?
These cookies are done when they have a little raised “foot” on the bottom and the top doesn’t wiggle if you gently shake or touch it. The baking time is low and slow to ensure they dry out properly without browning too quickly.
Final Thoughts
This Springerle Cookie Recipe has become a little holiday tradition in my family and something I genuinely enjoy baking over crisp winter weekends. Once you experience how the dough whips up, the slow anticipation of resting, and then the final reveal of those beautiful embossed cookies, you’ll realize why it’s more than just a recipe—it’s a joyful process. I hope you savor making these charming cookies as much as I do. Go ahead, grab your molds, and make something special!
Print
Springerle Cookie Recipe
- Prep Time: 20 minutes (plus 12-24 hours drying time and several hours chilling)
- Cook Time: 15-20 minutes
- Total Time: Approximately 14-25 hours including resting and drying times
- Yield: About 30-40 medium-sized springerle cookies depending on mold size
- Category: Dessert
- Method: Baking
- Cuisine: German
Description
Springerle cookies are traditional German anise-flavored, intricately molded cookies that require careful preparation and resting to develop their characteristic texture and design. Made with eggs, powdered sugar, and fine cake flour, these cookies are uniquely stamped with decorative molds, then dried overnight before baking at a low temperature. Perfect for special occasions or as charming edible ornaments.
Ingredients
Main Ingredients
- 4 eggs, room temperature
- 500 g (4 cups) powdered sugar (icing/confectioners sugar)
- 1/8 tsp baking powder
- 420-440 g (3½ cups) cake flour (non-rising, T45 recommended)
Flavoring Options
- 2 tsp vanilla extract or 1 tsp almond extract
- Or anise seed
- Or 1 tsp pumpkin spice seasoning
- Or Kirsch (cherry brandy) or other flavorings of choice
Additional for Rolling and Baking
- Cornstarch for dusting surface and mold
- Damp paper towel for moistening cookie bottoms before baking
- Parchment paper for lining baking trays
Instructions
- Prepare the Egg and Sugar Mixture: Using an electric mixer with a whisk attachment, beat the eggs until foamy. Gradually add the powdered sugar while whipping at medium speed. Continue whipping for 10-15 minutes until the mixture thickens and looks similar to buttercream. In the last 5 minutes, add the baking powder and your chosen flavoring (such as vanilla or anise extract) and incorporate thoroughly.
- Add Flour and Chill Dough: Slowly incorporate the cake flour into the egg and sugar mixture while whipping at low to medium speed to avoid lumps. Once fully combined, cover the dough with plastic wrap directly on the surface to prevent drying and chill it for several hours or ideally overnight. This resting period allows the dough to firm up for molding.
- Roll and Mold the Dough: On a surface dusted with cornstarch, roll out small portions of dough to about 1/4 inch (6mm) thick, matching the thickness of your springerle mold. Dust the top of the dough lightly with cornstarch, then press the mold firmly into the dough to imprint the intricate designs. Carefully cut around each embossed shape and place the cookies on a cornstarch-dusted surface to rest for 12-24 hours at room temperature, avoiding drafts and humidity to allow drying and setting of the pattern.
- Preheat Oven and Prepare for Baking: When ready to bake, preheat your oven to 145°C (290°F). Lightly dampen a paper towel and press each cookie bottom onto it for about 30 seconds to moisten, helping them adhere better to the parchment paper. Transfer the cookies to parchment-lined baking trays, which can be lightly sprinkled with any preferred seasoning if desired.
- Bake the Cookies: Bake the cookies for 18-20 minutes if they are large (4-5 inches), or 15-17 minutes for medium/smaller sizes. You should observe the cookie rising slightly on a small “foot” at the base, and the top should be firm enough not to wobble when gently nudged. If baking two trays simultaneously, make sure to rotate and flip the trays halfway through the baking time for even cooking.
- Cool and Store: After baking, allow the cookies to cool completely. Store them in an airtight container at room temperature. These springerle cookies can also be dried further and used as edible holiday ornaments due to their firm texture and decorative appearance.
Notes
- Use fine cake or pastry flour for the best texture. If using all-purpose flour, reduce quantity to about 340 g (2¾ cups) and adjust according to dough texture.
- If adding a large amount of extract or flavoring (1 tablespoon or more), you might need to add an extra 1/4 to 1/2 cup of flour to achieve the correct dough consistency.
- Ensure cookies dry for 12-24 hours before baking to preserve the detailed mold impressions and prevent spreading during baking.
- Handle dough gently and keep it chilled as it can be sticky and soft.
- Baking at a low temperature slowly ensures the delicate cookies form their signature foot without browning or cracking.
Nutrition
- Serving Size: 1 cookie (approx. 25g)
- Calories: 110
- Sugar: 15g
- Sodium: 5mg
- Fat: 0.2g
- Saturated Fat: 0.1g
- Unsaturated Fat: 0.1g
- Trans Fat: 0g
- Carbohydrates: 28g
- Fiber: 0.2g
- Protein: 2g
- Cholesterol: 55mg
