
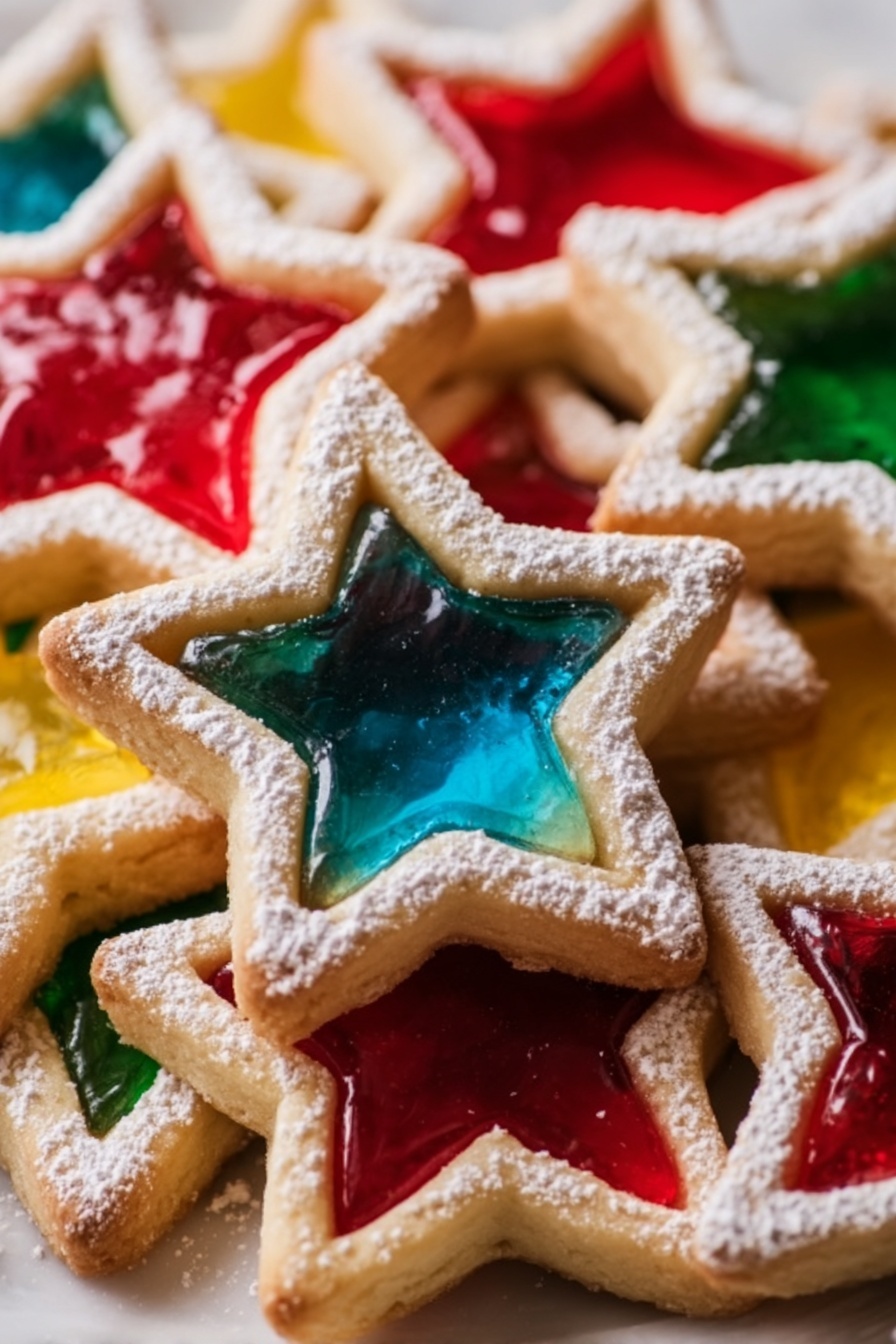
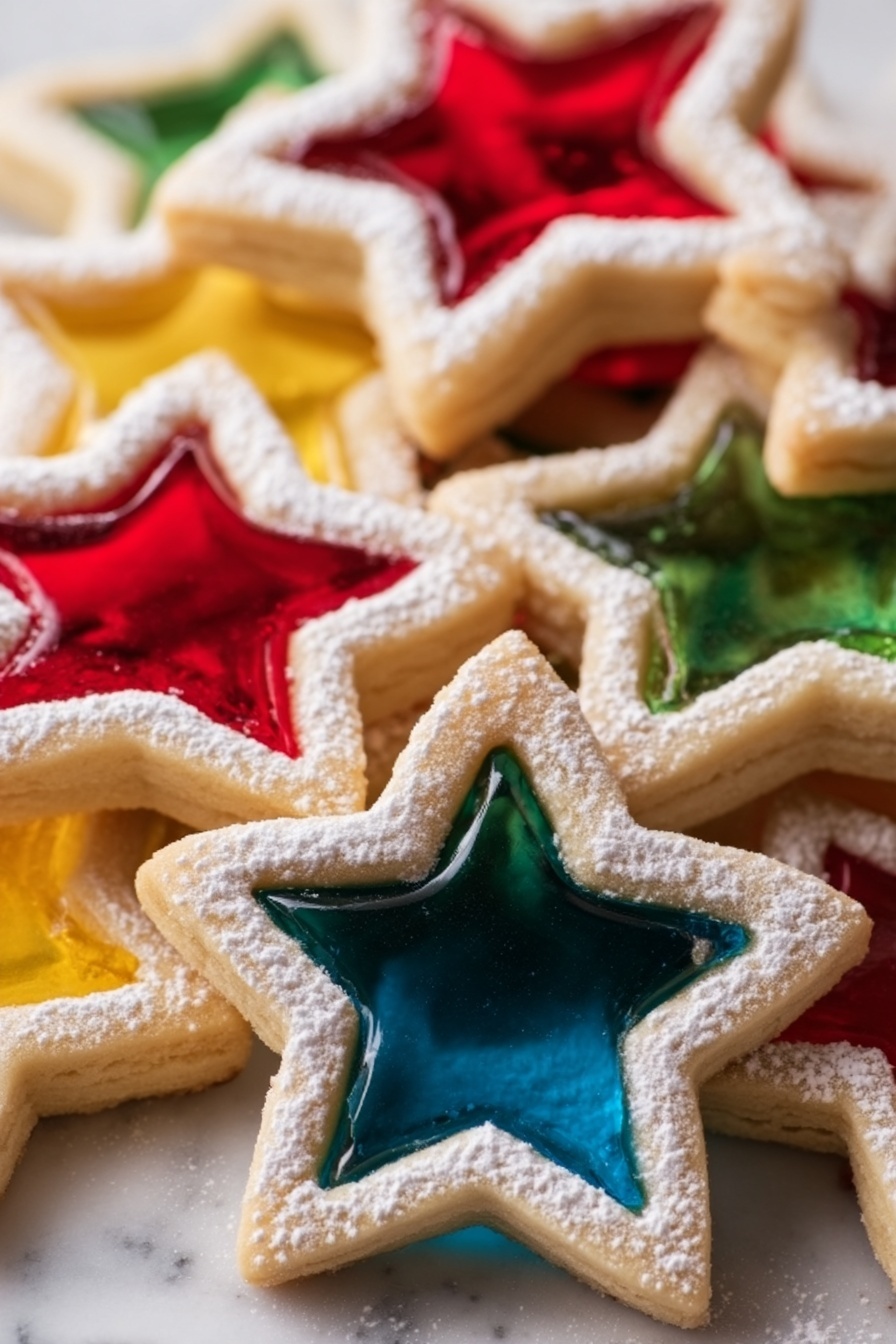
If you’re looking for a show-stopping holiday treat that feels like a little bit of magic in your hands, you’re going to love this Stained Glass Cookies with Candy Centers Recipe. I absolutely love how these cookies come together — the buttery dough, the burst of colorful candy in the center, and that glassy, jewel-like effect that just captivates everyone who sees them. They’re perfect for gifting, decorating, or just indulging yourself with a delicious, fun project in the kitchen. Stick around because I’m going to share all my tips to help you nail these beauties on your very first try.
Why You’ll Love This Recipe
- Eye-Catching Design: The candy centers create vibrant, jewel-like windows that are almost too pretty to eat.
- Simple Ingredients: With pantry staples and a few hard candies, you can easily whip these up anytime.
- Kid-Friendly Activity: My kids have so much fun helping crush candies and pressing the dough—it’s a holiday tradition now.
- Delicious Flavor Combo: The buttery cookie paired with sweet, crunchy candy centers always wins hearts at parties and bake sales.

Ingredients You’ll Need
These ingredients come together so well to create a dough that’s easy to roll and cut, plus candy that melts perfectly into a shiny, stained-glass center. I always recommend using high-quality butter and separating candies by color for the best results.
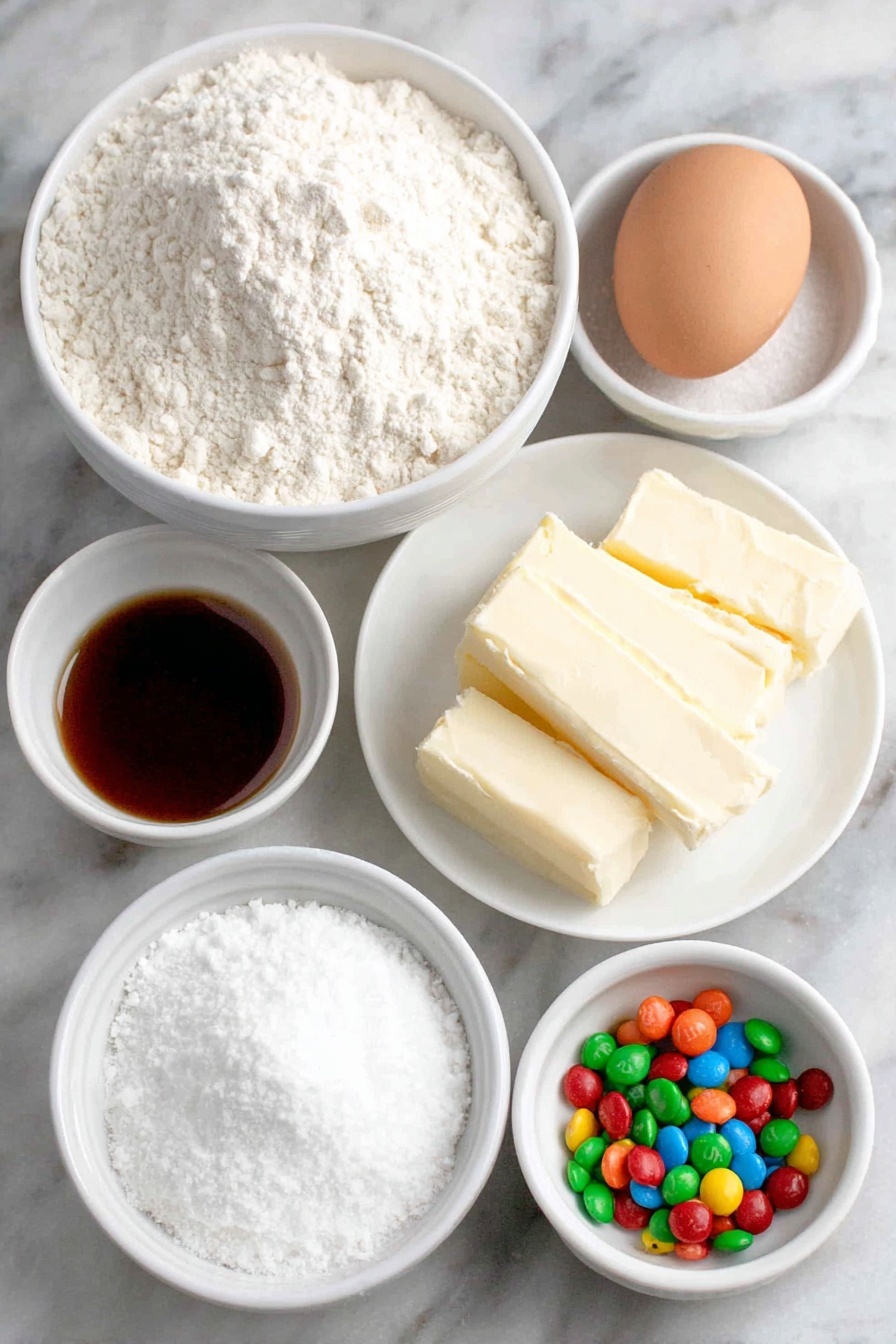
- All-purpose flour: Gives the cookies structure, so the edges stay crisp but the center soft enough to hold the candy.
- Baking powder: Just a touch to help the cookies rise slightly and stay tender.
- Salt: Balances sweetness and enhances the flavor of the buttery dough.
- Unsalted butter: Make sure it’s softened to room temperature for easy creaming.
- Granulated sugar: Provides sweetness and helps create that beautiful golden edge.
- Egg: Binds everything together and adds richness.
- Vanilla extract: Classic flavor that makes the cookies taste homemade and comforting.
- Almond extract (optional): Adds a subtle nutty note that pairs wonderfully with the candy centers.
- Assorted hard candies: Like Jolly Ranchers or Life Savers, sorted by color and crushed for your stained glass effect.
- Powdered sugar: For dusting the finished cookies, giving them a pretty, frosted look.
- Ribbon or string: Only if you’re turning your cookies into charming edible ornaments.
Variations
One of the things I love about this Stained Glass Cookies with Candy Centers Recipe is how easy it is to make it your own. Whether you want to swap extracts or try different shapes, the possibilities are endless—and fun to experiment with!
- Extract swaps: I once replaced vanilla with peppermint extract and it gave the cookies a fresh, holiday vibe that everyone adored.
- Gluten-free version: Using a gluten-free all-purpose flour blend works well, just chill the dough a bit longer before rolling to prevent cracking.
- Seasonal candy colors: Swap out red and green candies for pastels in spring or orange and black for Halloween-themed stained glass cookies.
- Different shapes: Hearts, stars, snowflakes—using smaller cookie cutters for the centers keeps things interesting and adds a bit of surprise inside each cookie.
How to Make Stained Glass Cookies with Candy Centers Recipe
Step 1: Prepare the Dough
Start by whisking together your dry ingredients—flour, baking powder, and salt—in a medium bowl. In a separate large bowl, cream your softened butter and sugar with an electric mixer until it’s fluffy and pale, about 2 to 3 minutes. This step is key because it creates that perfect tender crumb. Then, beat in the egg along with the vanilla and almond extracts (if you’re using almond). Scrape down the sides so everything incorporates evenly. Gradually mix in the dry ingredients, but be careful not to overdo it or your cookies might turn out tough. Form the dough into a disk, wrap tightly in plastic, and pop it in the fridge for at least an hour. Chilling helps keep the dough manageable and prevents spreading during baking.
Step 2: Crush Your Candies
While your dough chills, gather your hard candies and sort them by color into separate resealable bags—trust me, this makes your stained glass effect pop visually. Use a rolling pin or meat mallet to gently crush them into small pieces. You want them broken up but not to dust—too fine and they can burn, too chunk and they might not melt evenly.
Step 3: Roll and Cut the Cookies
Preheat your oven to 350°F (175°C) and line two baking sheets with parchment paper. Lightly flour your surface and roll out the dough to about a ¼-inch thickness—it’s a sweet spot for sturdy cookies that aren’t too thick or thin. Use a large star-shaped cutter (or any shape you prefer) to cut out your cookies. Then, take a smaller cookie cutter of the same shape to cut the centers out, creating a little window for your candy. Carefully move your shapes to the baking sheets.
Step 4: Fill and Bake
Fill each cookie center with the crushed candies—just enough to cover the hole without overfilling. As the candies melt, they’ll spread and create that stunning “stained glass” look. Bake the cookies for 8-10 minutes until the edges just start turning golden and the candy centers have melted completely. Let the cookies cool on the trays for 5-10 minutes—this allows the centers to harden before you carefully transfer them to a wire rack to finish cooling.
Step 5: Dust and Decorate
Once your cookies are fully cooled, sprinkle the edges lightly with powdered sugar for a delicate frosted look. If you want to turn these into ornaments, poke a small hole near the top of each cookie while they’re still warm (a straw works perfectly) and thread some ribbon through after they’ve cooled. I love hanging these on my tree—it’s like edible art!
Pro Tips for Making Stained Glass Cookies with Candy Centers Recipe
- Keep Dough Chilled: I’ve learned the hard way that chilled dough cuts crisper shapes and keeps candy from leaking out.
- Avoid Overfilling: Too much crushed candy can spill over and bake into the pan; less is definitely more here.
- Use Parchment Paper: This saves cleaning up sticky melted candy and helps cookies slide off the trays easily.
- Cool on the Sheet First: Wait for the centers to harden on the baking sheet before moving – this avoids cracks or broken “glass.”
How to Serve Stained Glass Cookies with Candy Centers Recipe
Garnishes
I usually keep it simple with just a light dusting of powdered sugar over the finished cookies—it adds a beautiful snowy touch without covering up the colorful centers. For special occasions, I’ve dusted with edible glitter for sparkle that kids (and grown-ups) adore.
Side Dishes
These cookies go brilliantly with a warm cup of spiced cider or rich hot chocolate. If you’re hosting, consider pairing them with a cheese board—the salty contrast really makes the sweetness pop!
Creative Ways to Present
One of my favorite ways to present these stained glass cookies is stacked in a clear glass jar tied with a festive ribbon. They also make charming edible ornaments hung on a Christmas tree or arranged on a platter surrounded by twinkle lights for holiday parties. Get creative with cookie shapes and colors to match your theme!
Make Ahead and Storage
Storing Leftovers
I store leftover stained glass cookies in an airtight container layered with parchment paper at room temperature. They keep well for 5-7 days, but be sure to separate layers to avoid any candy sticking to other cookies.
Freezing
I’ve frozen these cookies successfully by placing them in a single layer on a baking sheet to freeze solid, then transferring them to a sealed freezer bag. When ready to enjoy, I let them thaw in the container—just be gentle, as the candy centers can be a bit delicate.
Reheating
Since these are best enjoyed at room temperature, I avoid reheating, but if they’ve cooled too much in the fridge, a few minutes on the counter will bring out their full flavor and soften the buttery cookie properly without melting the candy centers again.
FAQs
-
Can I use any type of hard candy for the stained glass centers?
Yes! Hard candies like Jolly Ranchers, Life Savers, or other clear hard candies work best because they melt evenly and create vibrant colors. Avoid candies with added fillings or that might burn easily during baking.
-
How do I prevent the candy centers from spreading too much?
Use a moderate amount of crushed candy and make sure your dough is chilled well before baking. Overfilling or using soft candies can cause the centers to overflow, so less is definitely better here.
-
Can I make the cookie dough ahead of time?
Absolutely! In fact, I recommend chilling the dough for at least an hour, and you can refrigerate it for up to 2 days before rolling and cutting. This makes the dough easier to handle and improves the cookie texture.
-
What’s the best way to store stained glass cookies?
Store them in an airtight container at room temperature. Layer cookies with parchment paper to prevent sticking. They last about a week this way without losing their fresh flavor or crunch.
-
Can these cookies be used as Christmas ornaments?
Yes! Punch a hole in the top while cookies are still warm, insert a ribbon after cooling, and hang them carefully. They’re a fun, edible addition to holiday decor and make gifts super special.
Final Thoughts
Making these Stained Glass Cookies with Candy Centers has become one of my favorite holiday traditions — they’re not just cookies; they’re little windows to joy. From rolling the dough with the kids to seeing their eyes light up when the candy centers melt perfectly, it’s a recipe that brings fun, flavor, and festive magic all at once. I really hope you try this recipe soon and find as much happiness baking and sharing them as I do. Trust me, once you see those shimmering colors, you’ll be hooked!
Print
Stained Glass Cookies with Candy Centers Recipe
- Prep Time: 30 minutes
- Cook Time: 40 minutes
- Total Time: 1 hour 10 minutes
- Yield: 20 servings
- Category: Dessert
- Method: Baking
- Cuisine: American
Description
These delightful Stained Glass Cookies combine a buttery sugar cookie base with a colorful, melted candy center that resembles stained glass. Perfect for holidays or special occasions, these cookies are both visually stunning and delicious, featuring a tender cookie surrounding vibrant, sweet candy windows.
Ingredients
For the Cookies:
- 2 ¾ cups all-purpose flour
- 1 teaspoon baking powder
- ¼ teaspoon salt
- 1 cup (2 sticks) unsalted butter, softened
- 1 cup granulated sugar
- 1 large egg
- 1 teaspoon vanilla extract (or almond extract for a twist)
- ½ teaspoon almond extract (optional)
For the Stained Glass:
- Assorted hard candies (like Jolly Ranchers or Life Savers), separated by color and crushed
For Decorating:
- Powdered sugar (for dusting)
- Ribbon or string (if hanging as ornaments)
Instructions
- Prepare the Dough: Mix the dry ingredients by whisking together flour, baking powder, and salt. In a separate bowl, cream softened butter and sugar until light and fluffy. Add the egg and vanilla and almond extracts, mixing thoroughly. Gradually add the dry ingredients to the wet mixture until just combined. Shape into a disk, wrap, and refrigerate for at least 1 hour or up to 2 days to firm the dough.
- Prepare the Candies: Separate hard candies by color into ziplock bags and crush them using a rolling pin or meat mallet until pieces are small but not powdery. Set aside for filling.
- Shape the Cookies: Preheat oven to 350°F (175°C) and line baking sheets with parchment paper. Roll out dough on a floured surface to ¼-inch thickness. Use a large cookie cutter to cut out shapes and a smaller cutter of the same shape to cut out centers. Transfer cookies to baking sheets and fill centers with crushed candies without overfilling.
- Bake and Cool: Bake cookies for 8-10 minutes until edges are lightly golden and candy centers have melted. Cool on baking sheets for 5-10 minutes to allow candy to harden, then transfer to wire racks to cool completely.
- Dust and Decorate: Once fully cooled, lightly dust the edges with powdered sugar. To use as ornaments, make a small hole near the top with a straw while warm, then thread ribbon or string after cooling.
Notes
- Chilling the dough is essential to prevent spreading and maintain the cookie shape during baking.
- Be careful not to overfill the cookie centers with crushed candy to avoid overflow while melting.
- Use different colored candies to create a vibrant stained glass effect.
- Allow cookies to cool completely before dusting with powdered sugar to avoid melting.
- If making ornaments, thread ribbon only once cookies have fully cooled to prevent breakage.
Nutrition
- Serving Size: 1 cookie
- Calories: 180
- Sugar: 20g
- Sodium: 90mg
- Fat: 8g
- Saturated Fat: 5g
- Unsaturated Fat: 2g
- Trans Fat: 0g
- Carbohydrates: 25g
- Fiber: 0.5g
- Protein: 2g
- Cholesterol: 30mg


