

If you’re anything like me and have a bit of a sweet tooth craving that perfect combo of chocolate, caramel, and cookie all in one bite, then you’re in for a treat. This Twix Cookie Cups with Caramel and Chocolate Recipe is seriously fan-freaking-tastic—each bite delivers that luscious caramel drip surrounded by buttery cookie and topped off with creamy chocolate. I absolutely love how these turn out every time, and I know you will too. Stick around because I’m about to share all my best tips so your batch comes out perfectly.
Why You’ll Love This Recipe
- Perfect balance of flavors: The buttery cookie base pairs beautifully with gooey caramel and smooth milk chocolate for a triple-threat treat.
- Super simple to make: With every step straightforward, even if you’re a beginner baker, you’ll have success here.
- Great for sharing or gifting: These cookie cups hold their shape nicely, so they’re ideal for parties, potlucks, or holiday treats.
- Customizable and flexible: There’s room to tweak the caramel or chocolate to suit your tastes — I love adding a sprinkle of sea salt on top!

Ingredients You’ll Need
These ingredients come together to recreate that iconic Twix cookie in a fun bite-sized cup form. I suggest using good quality butter and chocolate chips because they really elevate the final flavor and texture.

- Salted butter: Adds richness and moisture; salted gives just the right hint of savory to balance the sweet.
- Granulated sugar: Gives that perfect sweetness and helps with a tender crumb.
- Vanilla extract: Elevates the cookie flavor with warm, aromatic notes — don’t skip!
- Egg white: Helps bind the dough without adding heaviness.
- All-purpose flour: The base for the cookie cup dough; easy to find and versatile.
- Baking powder: Just enough leavening to make each cookie cup a little puffed and soft.
- Caramels: Unwrapped, they’ll melt into that luscious layer inside the cookie cup.
- Milk: Used to melt the caramel; adds creaminess and smooths it out.
- Milk chocolate chips: Provides a creamy, sweet topping that hardens slightly for that classic finish.
Variations
One of the things I love about this Twix Cookie Cups with Caramel and Chocolate Recipe is how easy it is to make it your own. You can switch things up depending on your mood or dietary needs—get creative!
- Use dark chocolate: I swapped in dark chocolate chips for a richer, less sweet finish once, and my family went crazy for the bittersweet contrast.
- Salted caramel twist: Adding a sprinkle of flaky sea salt over the caramel before chilling amps up the flavor in the best way!
- Gluten-free dough: I’ve had luck substituting gluten-free flour blends to make these cookie cups accessible for friends with sensitivities.
- Add nuts: Chopped pecans or almonds folded into the dough add great texture and nutty flavor.
How to Make Twix Cookie Cups with Caramel and Chocolate Recipe
Step 1: Cream Your Butter and Sugar Like a Pro
Start by preheating your oven to 350°F (175°C). In a large bowl, cream together the softened salted butter and granulated sugar until the mixture is light, fluffy, and pale in color. This step is key because properly creamed butter and sugar create that tender, buttery texture. I like to beat it for about 3-4 minutes, scraping the sides occasionally. Trust me, it makes a big difference.
Step 2: Mix in the Egg White and Vanilla
Once your butter and sugar are just right, add the egg white and vanilla extract. Mix gently until everything is combined and smooth. The egg white keeps these cookie cups from being cakey while adding just enough structure.
Step 3: Fold in Dry Ingredients and Shape Dough
Now, it’s time to add the all-purpose flour and baking powder. I recommend mixing them together in a separate bowl first to evenly distribute the baking powder, then gradually add the dry mix to your wet ingredients. Mix until you get a smooth dough. Don’t over-mix or the cookies might get tough. Roll the dough out on a lightly floured surface until it’s about 1/4 to 1/2 inch thick.
Step 4: Cut and Bake Your Cookie Cups
Grab a round cookie cutter (I like about 2-3 inches wide) and cut circles from the dough. Transfer them carefully to an ungreased baking sheet. Bake at 350°F for 6-8 minutes until the cookies look puffy and just lose their shiny surface. That’s your sign they’re perfect—don’t overbake or they’ll dry out! Once done, move them to a wire rack to cool completely.
Step 5: Make the Caramel Layer
While the cookies cool, place your unwrapped caramels and milk in a microwave-safe bowl. Microwave in 30-second intervals, stirring at each break to blend it smooth and creamy. This step is where the gooey magic happens. When melted and silky, spoon a few teaspoons of caramel onto each cooled cookie, spreading close to the edges but leaving a tiny border. Pop them into the fridge for 10-15 minutes so the caramel firms up nicely.
Step 6: Top with Melted Chocolate and Chill
Last but not least, melt your milk chocolate chips in 30-second bursts, stirring well between sessions until smooth and fully melted. Spread a thin layer of chocolate over the set caramel on each cookie cup. The chocolate should harden as it cools, sealing all those layers together perfectly. Chill again if needed before serving.
Pro Tips for Making Twix Cookie Cups with Caramel and Chocolate Recipe
- Don’t skip chilling the caramel layer: It helps the caramel firm up, preventing it from oozing out when you add chocolate.
- Roll dough evenly: Keeping your dough thickness consistent ensures all cookie cups bake uniformly.
- Use a silicone spatula for spreading: It gives you better control over the caramel and chocolate layers, reducing mess and breakage.
- Let chocolate set completely: Rushing to eat them too soon can cause the chocolate layer to crack or melt too fast.
How to Serve Twix Cookie Cups with Caramel and Chocolate Recipe

Garnishes
I usually add a tiny sprinkle of flaky sea salt or crushed pretzels on top of the melted chocolate for a little crunch and a flavor pop. Sometimes I drizzle white chocolate over the top for a pretty contrast if it’s for a special occasion—looks beautiful and tastes divine.
Side Dishes
These cookie cups make a fantastic dessert served alongside a scoop of vanilla ice cream or with a hot cup of coffee or milk. I also love pairing them with fresh berries to contrast the sweetness.
Creative Ways to Present
Try arranging these cookie cups in a decorative box tied with ribbon as gifts, or place them on a tiered dessert tray for parties. I once made a “build your own Twix cup” station for a birthday, letting guests add toppings like nuts, sprinkles, or extra chocolate drizzle—so much fun!
Make Ahead and Storage
Storing Leftovers
Store your Twix Cookie Cups in an airtight container in the fridge. They keep well for up to 5 days, and the caramel stays perfectly soft without getting sticky or hard.
Freezing
I’ve frozen these cookie cups before—just place them in a single layer on a baking sheet to freeze solid, then transfer to a freezer-safe bag. They keep great for about 2 months. Thaw overnight in the fridge for best texture.
Reheating
To bring back that freshly made warmth, pop a couple cookie cups in the microwave for about 10-15 seconds—just enough to loosen the caramel without melting the chocolate completely. It’s delicious but be careful not to overheat!
FAQs
-
Can I use salted or unsalted butter for this recipe?
You can use either, but salted butter is preferred here because it adds a subtle savory note that balances the sweetness nicely. If using unsalted, consider adding a tiny pinch of salt to the dough.
-
What if I don’t have caramel squares on hand?
If you can’t find caramel squares, you could substitute with thick caramel sauce, but it might be a bit messier to handle. Just be careful to chill them well to avoid caramel oozing.
-
How do I prevent the cookie cups from cracking?
Rolling your dough evenly and avoiding overbaking are the biggest helpers here. Also, don’t spread the caramel or chocolate when the cookies are still warm or they might crack or melt unevenly.
-
Can I make these gluten-free?
Absolutely! Just substitute your all-purpose flour with a high-quality gluten-free blend and add a binder like xanthan gum if your mix doesn’t include it. The texture might be slightly different, but still delicious.
-
How long do Twix Cookie Cups keep?
Stored in an airtight container in the fridge, they stay fresh for up to 5 days. For longer storage, freezing works well.
Final Thoughts
I genuinely love making this Twix Cookie Cups with Caramel and Chocolate Recipe whenever I want a crowd-pleasing dessert that’s a little nostalgic but presented in a new way. I used to struggle with candy bar copycats that never quite matched the flavor or texture, but this recipe nails it every single time. It feels like a little slice of happy wrapped up in every bite. I hope you give it a try and enjoy the process as much as I do—can’t wait to hear how yours turn out!
Print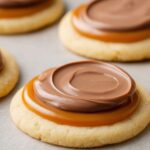
Twix Cookie Cups with Caramel and Chocolate Recipe
- Prep Time: 10 minutes
- Cook Time: 10 minutes
- Total Time: 40 minutes
- Yield: 24 cookie cups
- Category: Dessert
- Method: Baking
- Cuisine: American
Description
Twix Cookie Cups are a delightful homemade treat featuring a buttery cookie base topped with creamy caramel and rich milk chocolate. These bite-sized desserts bring together the classic flavors of Twix candy bars in a playful, easy-to-make form, perfect for sharing or enjoying as a sweet snack.
Ingredients
Cookie Dough
- 1/2 cup (111g) salted butter
- 1/2 cup (115g) granulated sugar
- 1 tsp vanilla extract
- 1 egg white
- 1 1/2 cups (228g) all-purpose flour
- 1 tsp baking powder
Caramel Topping
- 20 caramels, unwrapped
- 1 tbsp milk
Chocolate Topping
- 2 cups (400g) milk chocolate chips
Instructions
- Preheat Oven: Preheat your oven to 350°F (175°C) to get it ready for baking the cookie cups.
- Cream Butter and Sugar: In a mixing bowl, cream together 1/2 cup salted butter and 1/2 cup granulated sugar until light and fluffy, which provides a tender base for the cookies.
- Add Egg White and Vanilla: Mix in 1 egg white and 1 teaspoon vanilla extract until fully combined, enriching the dough with moisture and flavor.
- Combine Dry Ingredients: Add 1 1/2 cups all-purpose flour and 1 teaspoon baking powder to the wet ingredients. Mix thoroughly to form a smooth dough.
- Roll and Cut Dough: Roll the dough out to about 1/4 to 1/2 inch thick. Using a round cookie cutter, cut circles and transfer them to an ungreased baking sheet.
- Bake the Cookies: Bake at 350°F for 6-8 minutes until the cookies are puffed and no longer glossy. This ensures a properly cooked cookie base without overbaking.
- Cool Cookies: Transfer cookies to a wire rack and allow them to cool completely to prepare them for the caramel layer.
- Prepare Caramel Topping: Microwave 20 unwrapped caramels with 1 tablespoon milk for 1 minute, stirring at the 30-second mark until smooth and creamy.
- Apply Caramel: Spoon a few teaspoons of the creamy caramel onto each cooled cookie, spreading it to nearly cover the surface evenly.
- Chill Caramel Layer: Place the cookie cups with caramel in the fridge for 10-15 minutes until the caramel is fully set and cold.
- Melt Chocolate Chips: Melt 2 cups of milk chocolate chips by heating in 30-second intervals, stirring until smooth and completely melted.
- Spread Chocolate Layer: Spread a small amount of melted chocolate onto each cookie cup, covering the caramel layer. Allow the chocolate to cool and harden before serving.
Notes
- Ensure cookies are completely cooled before adding caramel to prevent melting and sliding.
- If caramels are too firm, add a little more milk to help achieve a smooth consistency.
- Use a silicone spatula for spreading chocolate evenly and cleanly.
- Store finished cookie cups in an airtight container in the fridge to keep chocolate firm.
- For a variation, substitute milk chocolate chips with dark or white chocolate chips.
Nutrition
- Serving Size: 1 cookie cup
- Calories: 150
- Sugar: 12g
- Sodium: 80mg
- Fat: 8g
- Saturated Fat: 5g
- Unsaturated Fat: 3g
- Trans Fat: 0g
- Carbohydrates: 18g
- Fiber: 1g
- Protein: 2g
- Cholesterol: 20mg

