
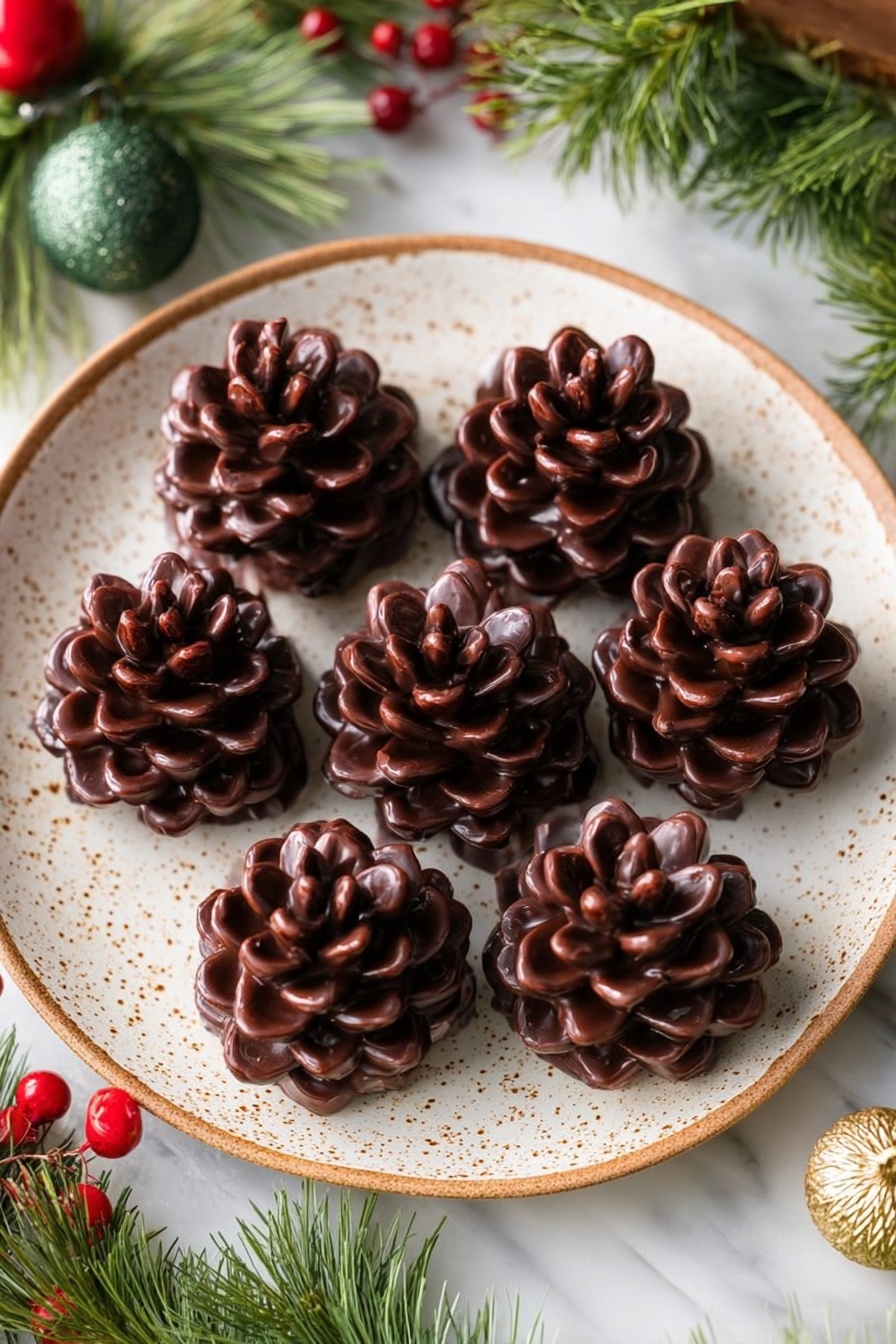
If you’re on the hunt for a fun, eye-catching dessert that tastes as amazing as it looks, you’re in for a treat with this Viral Pine Cone Brownies Recipe. I absolutely love how these brownies turn out—rich, fudgy, and shaped like delightful little pine cones that will wow your friends and family. Whether you’re baking for the holidays or just want to impress at your next gathering, this recipe is sure to become a favorite.
Why You’ll Love This Recipe
- Visual Wow Factor: These brownies look like beautiful pine cones, making them a perfect centerpiece dessert.
- Deliciously Gooey: The fudgy center keeps every bite perfectly soft and indulgent.
- Customizable Ingredients: You can easily swap toppings or brownie mixes based on your preferences or dietary needs.
- Great for Any Occasion: Whether it’s a cozy night in or a holiday party, these pine cone brownies will steal the show.

Ingredients You’ll Need
This Viral Pine Cone Brownies Recipe is pretty straightforward, and the ingredients come together beautifully to create both the structure and flavor. I always recommend using a gluten-free or grain-free boxed brownie mix if you’re aiming for a healthier twist—I’ll share my favorite one below!

- Gluten-Free/Grain-Free Boxed Brownie Mix: I love Simple Mills for this—it bakes up super fudgy and easy to work with.
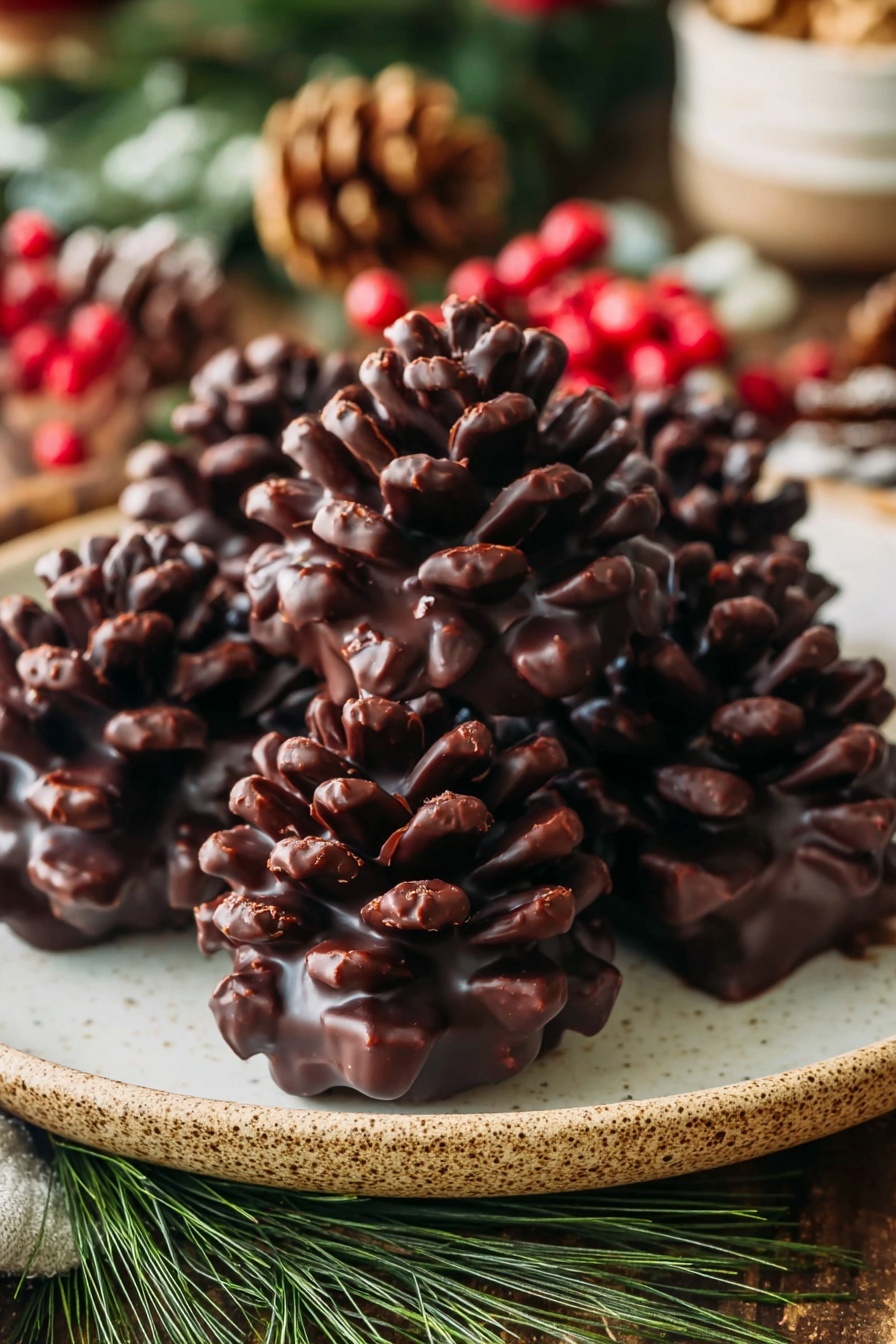
- Sliced Almonds: These mimic pine cone scales perfectly; cereal flakes work great as a crunchy substitute.
- Chocolate Chips: Use semi-sweet or dark chocolate for richer, less sweet coating, essential for that glossy finish.
- Coconut Oil: Helps melt the chocolate smoothly and create a shiny coating.
- Powdered Sugar or Powdered Monk Fruit: Adds a frosted snowy touch—perfect for a winter vibe!
Variations
I’m a big fan of making this Viral Pine Cone Brownies Recipe my own depending on the occasion or mood—you should definitely feel free to experiment! Toss in what you love or swap out for dietary needs.
- Nuts or Seeds: I’ve tried swapping sliced almonds for chopped pecans or pumpkin seeds to give a slightly different texture and flavor—each version brings its own charm.
- Sweetener Options: Using powdered monk fruit instead of powdered sugar worked perfectly for me when I wanted to cut back on sugar without sacrificing that frosted look.
- Dairy-Free Coating: Coconut oil combined with dairy-free chocolate chips makes these totally vegan-friendly, which was great when I had friends with allergies over.
- Adding Frosting: If your brownie mixture feels a little crumbly, I discovered adding cream cheese or chocolate frosting helps bind it nicely without losing fudginess.
How to Make Viral Pine Cone Brownies Recipe
Step 1: Bake Your Brownies Just Right
Start by preparing your brownie mix exactly as the box instructions say—I’ve found it’s important not to over-bake here, so the brownies stay a bit gooey in the middle. You want them firm enough to shape but soft enough to mold, so I usually bake mine about 2-3 minutes less than the suggested time. Once they’re baked, let them cool for about 10 minutes; any longer and they’ll harden and be tricky to shape.
Step 2: Shape Your Pine Cones
Here comes the fun part—take your slightly warm brownie and form it into little cone shapes, roughly the size of a cake pop. Don’t worry if your first few are a little messy; I used to struggle with getting the shape right, but using gentle hands and a bit of patience helps a lot. These cones are fragile, so try not to squeeze too hard.
Step 3: Add the “Scales” with Almonds or Cereal Flakes
Carefully press sliced almonds (or your cereal flakes) into the surface of each cone to mimic pine cone scales. I learned that the key is to place them just lightly and a bit overlapped to create that full, textured look. Remember, the brownie still has some warmth, so the almonds will stick pretty quickly—if they’re too warm and soft, placing the almonds gets tricky, so cool slightly first.
Step 4: Freeze to Set Shape
Once shaped and “scaled,” pop your pine cone brownies onto a parchment-lined sheet pan and freeze for about 30 minutes. This step is essential because it firms them up, making dipping in chocolate much easier without breaking.
Step 5: Melt and Coat with Chocolate
Melt your chocolate chips and coconut oil together in the microwave in 30-second bursts, stirring in between. If the chocolate feels too thick to pour, add a bit more coconut oil to thin it out until you get a smooth, shiny consistency. Carefully dip each pine cone into the chocolate coating, making sure to cover all the almond edges and create that smooth outer shell. Place the coated pine cones back on the parchment paper to set.
Step 6: Add a Dusting of Powdered “Snow”
Once the chocolate has set, sprinkle powdered sugar or powdered monk fruit on top for a beautifully frosted, wintery look. It’s such a simple final touch that makes these pine cones look professionally done!
Pro Tips for Making Viral Pine Cone Brownies Recipe
- Don’t Overbake: Keeping the brownies gooey but firm enough to handle is key—otherwise, shaping will be tough.
- Use a Good Quality Brownie Mix: I found that Simple Mills works wonders for this recipe and gives consistent results.
- Add Coconut Oil to Chocolate: This helps melt it smoothly and gives a glossy finish that sets beautifully on the pine cones.
- Be Gentle with Almond Placement: The brownie cones are delicate so take your time placing the ‘scales’ to avoid breaking.
How to Serve Viral Pine Cone Brownies Recipe
Garnishes
I usually keep the garnish simple with just a dusting of powdered sugar to keep that snowy pine cone feel. But if I’m feeling fancy, I’ll drizzle a little extra melted white chocolate over the top for a snowy branch effect—your choice!
Side Dishes
These are a sweet treat on their own, but I love pairing them with a scoop of vanilla ice cream or a dollop of whipped cream. For a festive touch, they go perfectly alongside spiced hot cocoa or mulled wine during the holidays.
Creative Ways to Present
For parties, I like to arrange these Viral Pine Cone Brownies Recipe on a bed of fresh pine needles or evergreen branches for a nature-inspired display. Wrapping them up in clear cellophane tied with twine also makes a charming homemade gift!
Make Ahead and Storage
Storing Leftovers
I store leftover pine cone brownies in an airtight container at room temperature for up to 3 days. Just be sure to keep them in a cool area away from direct sunlight so the chocolate coating doesn’t melt or get sticky.
Freezing
If you want to make these ahead of time, freezing works really well. Place the pine cone brownies on a parchment-lined tray to freeze individually, then transfer them to a freezer-safe container. They can last up to 2 months frozen—perfect for holiday prep!
Reheating
When ready to enjoy, take them out of the freezer and let them thaw at room temperature for about 15-20 minutes. Avoid microwaving, as it can soften the chocolate coating too much, but a gentle warm-up in a low oven (around 200°F/93°C for 5 minutes) works nicely to refresh the fudgy texture.
FAQs
-
Can I make Viral Pine Cone Brownies Recipe without nuts?
Absolutely! You can replace the sliced almonds with cereal flakes like cornflakes or gluten-free flakes for that crunchy effect without nuts. Just make sure they’re sturdy enough to hold onto the brownie cones.
-
What if my brownie mix is too crumbly to shape?
If your brownie mix feels crumbly, I recommend mixing in a little cream cheese frosting or chocolate frosting to help it bind better. This keeps the cones moist and easy to shape while still tasting amazing.
-
Can I use milk chocolate instead of dark chocolate for coating?
You can, but keep in mind milk chocolate is sweeter and melts differently. I found semi-sweet or dark chocolate offers a better glossy finish and balances the sweetness of the brownie and almond scales nicely.
-
How long do Pine Cone Brownies last?
At room temperature, they stay fresh for about 3 days. In the fridge, the texture might firm up but they last about a week. Freeze if you want longer storage.
Final Thoughts
This Viral Pine Cone Brownies Recipe quickly became one of my go-to desserts when I want to impress with minimal fuss. They’re festive, fun, and absolutely delicious, plus I love how versatile they are depending on what ingredients you have on hand. I really encourage you to give these a try—the process is surprisingly relaxing, and the end result will have everyone asking for your “secret” recipe. Happy baking!
Print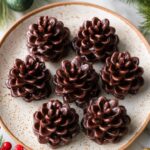
Viral Pine Cone Brownies Recipe
- Prep Time: 1 hour 15 minutes
- Cook Time: 20 minutes
- Total Time: 3 hours
- Yield: 12 pine cone brownies
- Category: Dessert
- Method: Baking
- Cuisine: American
- Diet: Gluten Free
Description
These Viral Pine Cone Brownies are a creative twist on traditional brownies, shaped like pine cones and decorated with almond slices to mimic pine cone scales. They have a gooey, rich chocolate center and are coated in melted chocolate for a stunning presentation perfect for holidays or special occasions.
Ingredients
Brownie Base
- 1 box gluten-free/grain-free brownie mix (such as Simple Mills) and the ingredients required for the mix
- 1 cup sliced almonds (can substitute with cereal flakes)
Coating
- 9 oz chocolate chips
- 1 tsp coconut oil
Finishing
- Powdered sugar or powdered monk fruit for dusting
Instructions
- Prepare brownie base: Follow the brownie mix package instructions carefully to prepare the batter. Bake the brownies but avoid overbaking to keep the center gooey and workable. Once baked, let them cool for about 10 minutes so they are warm but not hardened.
- Shape pine cones: Take the cooled brownie mixture and form approximately 12 cone shapes by hand, similar to shaping cake pops. These shapes will be the base of your pine cones.
- Apply almond “scales”: Gently press the sliced almonds (or cereal flakes) into and around the brownie cones to create the appearance of pine cone scales. Handle the brownies carefully as they are delicate.
- Freeze pine cones: Arrange the pine cone brownies on a parchment-lined sheet pan and place them in the freezer for 30 minutes to firm up.
- Melt chocolate coating: In a microwave-safe bowl, combine chocolate chips with coconut oil. Melt in 30-second increments, stirring between each until smooth. Alternatively, melt using a double boiler.
- Coat the pine cones: Remove the pine cones from the freezer and carefully dip or brush each one with the melted chocolate to coat completely. Return them to the parchment-lined tray to set.
- Finish and serve: Once the chocolate has set, sprinkle the pine cone brownies lightly with powdered sugar or powdered monk fruit to create a frosted look. Enjoy!
Notes
- Brownie mixes vary in results; using the recommended Simple Mills brand gives best results but results may vary with others.
- If melted chocolate is too thick for coating, add more coconut oil to thin it out.
- Semi-sweet or dark chocolate chips work better than milk chocolate for coating.
- If the brownie mixture is crumbly, incorporate some chocolate or cream cheese frosting to help bind the mixture for shaping.
Nutrition
- Serving Size: 1 pine cone brownie (approximate)
- Calories: 280
- Sugar: 18g
- Sodium: 140mg
- Fat: 16g
- Saturated Fat: 9g
- Unsaturated Fat: 6g
- Trans Fat: 0g
- Carbohydrates: 30g
- Fiber: 3g
- Protein: 4g
- Cholesterol: 15mg


