
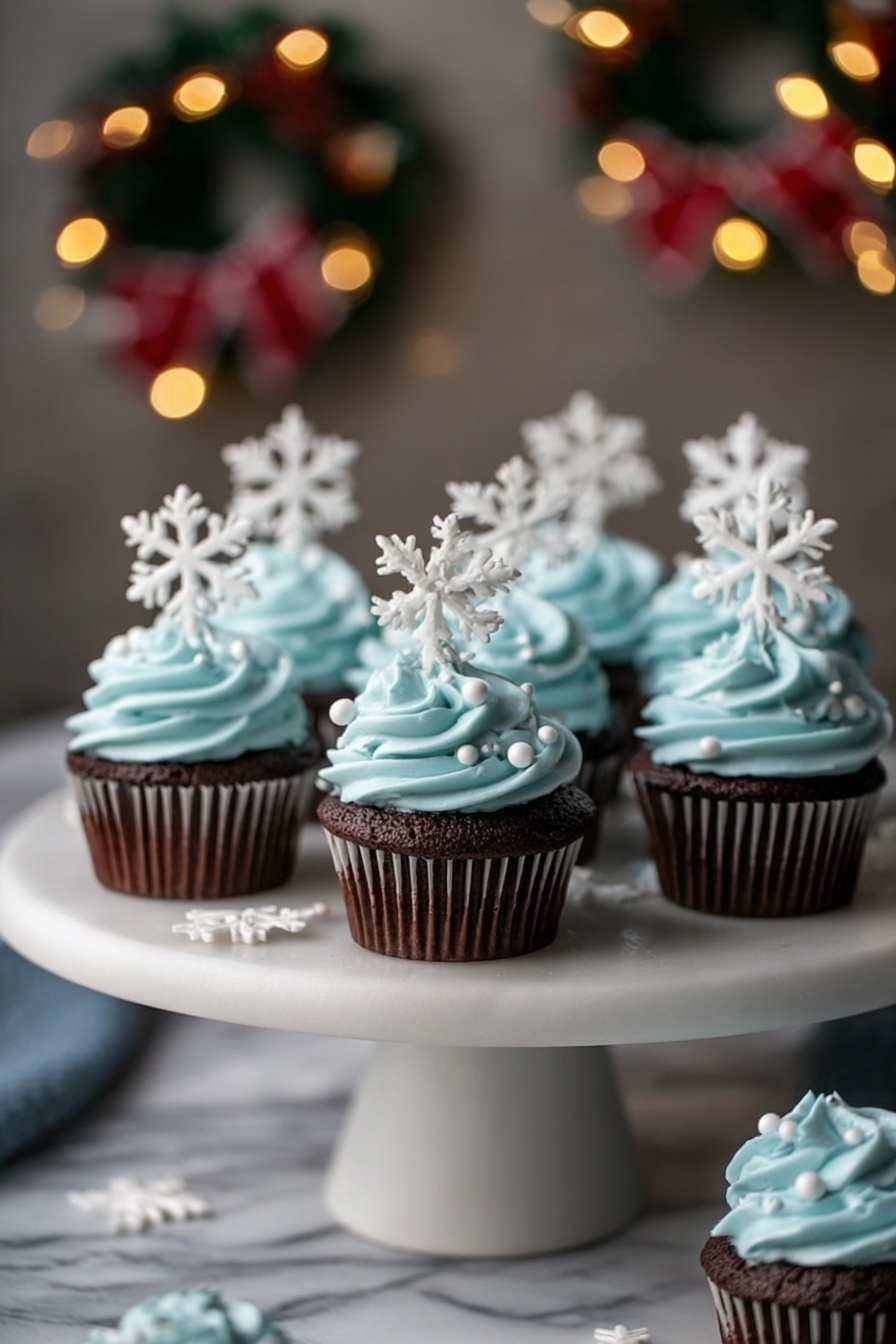
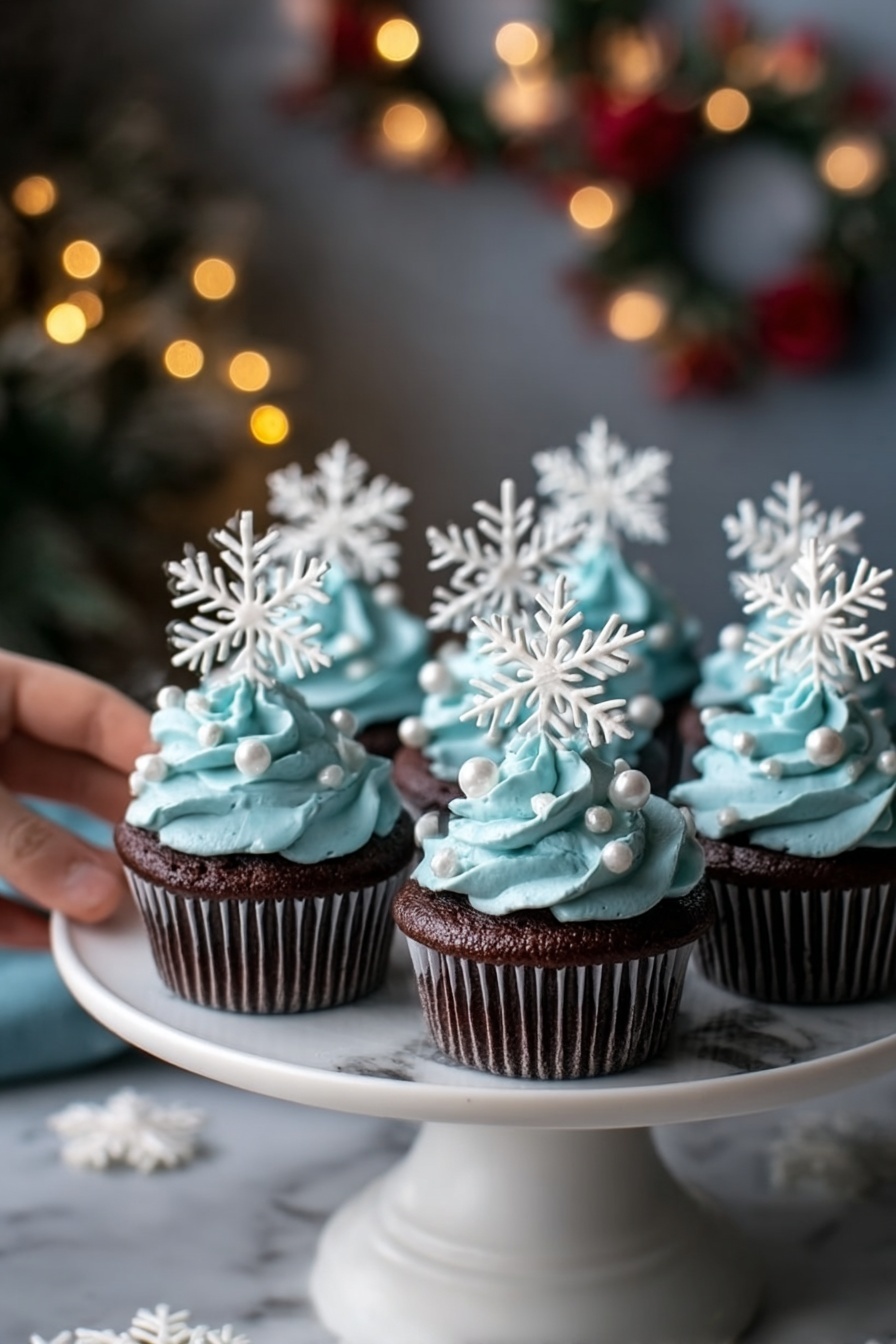
If you’re looking to bring a little magic to your winter baking, let me share my absolute favorite Winter Wonderland Chocolate Cupcakes Recipe with you. I promise you, these cupcakes are like little snowy hugs—moist, rich chocolate cake topped with the creamiest blue-tinted buttercream and delicate snowflake decorations. When I first tried this recipe, I was hooked, and now I’m excited to help you create these festive treats that are sure to wow everyone at your holiday table.
Why You’ll Love This Recipe
- Perfect Winter Flavors: The deep chocolate paired with a hint of vanilla and winter-blue frosting creates a cozy, festive bite.
- Easy Yet Stunning Presentation: You’ll love how simple decorations like snowflake toppers and edible pearls make these cupcakes party-ready.
- Moist, Tender Texture: The combination of buttermilk and creamed butter ensures every cupcake stays soft and rich.
- Family Approved: My kids and friends never get enough—these cupcakes always disappear fast!

Ingredients You’ll Need
The beauty of this Winter Wonderland Chocolate Cupcakes Recipe is in how everyday ingredients come together to make something truly special. I always recommend using fresh butter and quality cocoa powder—it makes a difference you can taste!
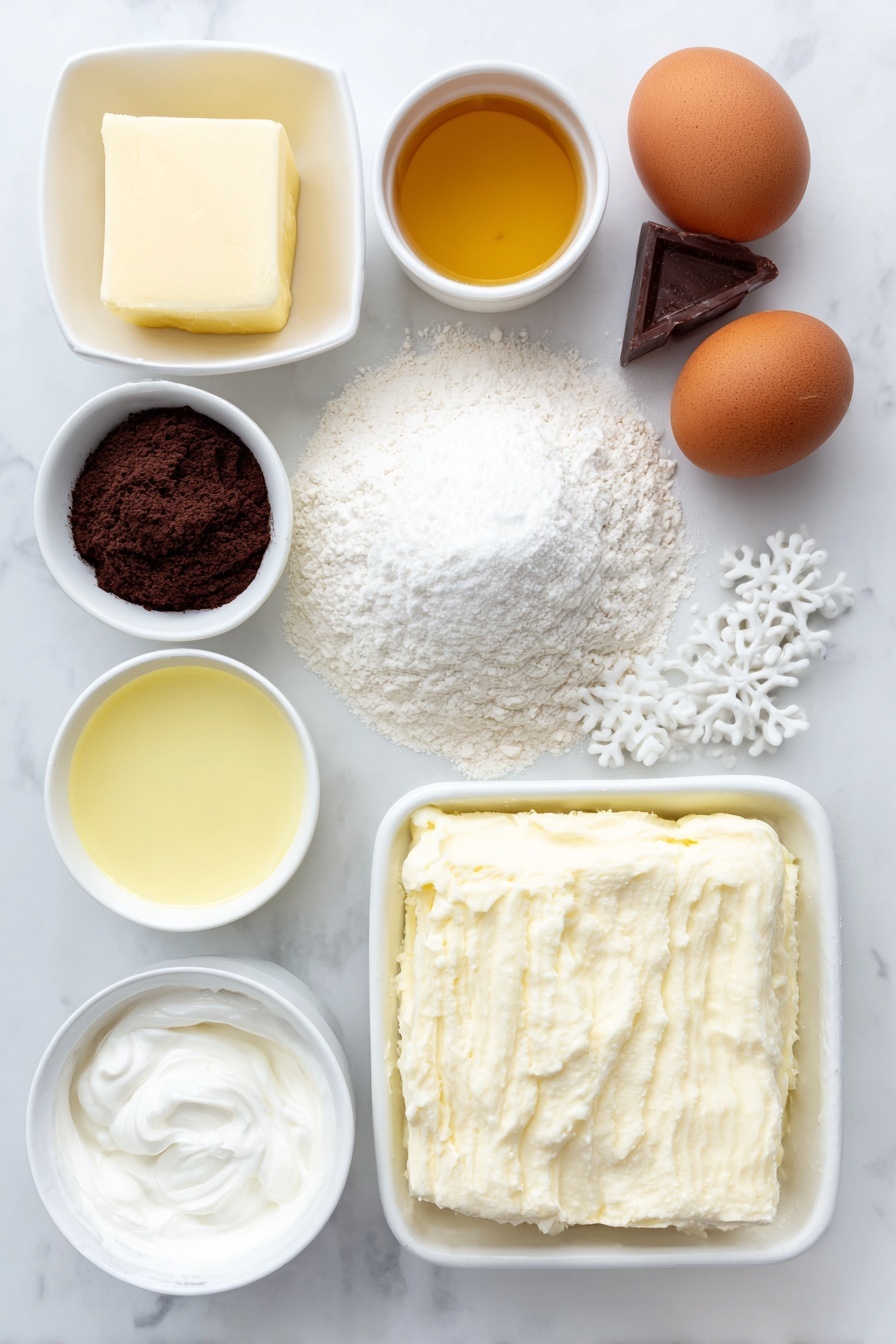
- All-purpose flour: The backbone of your cupcakes; use a light scoop method to avoid dense cakes.
- Unsweetened cocoa powder: Opt for good-quality Dutch-processed or natural cocoa depending on preference for richer chocolate flavor.
- Baking powder and baking soda: Both work together to give your cupcakes a nice lift and tender crumb.
- Salt: Enhances the chocolate flavor without making it salty.
- Unsalted butter: Room temperature is key for smooth creaming with sugar—don’t skip this step!
- Granulated sugar: Sweetens and helps create that fluffy texture.
- Eggs: Bring structure and moisture; large eggs work best for balanced baking.
- Vanilla extract: A little vanilla deepens the flavor and complements the cocoa.
- Buttermilk: Adds tang and tenderness, giving the cupcakes that melt-in-your-mouth feel.
- Powdered sugar: For the buttercream’s sweet, silky finish.
- Heavy cream: Helps keep the frosting smooth and pipeable.
- Blue gel food coloring: The secret to that stunning wintery frost effect without watering down the flavor.
- Edible snowflake toppers: Whether you buy them or make your own, they bring the whole theme together.
- Edible pearls: Silver and white pearls add just the right sparkle for that frosty winter look.
Variations
I love how versatile this Winter Wonderland Chocolate Cupcakes Recipe is—you can easily customize it to suit your tastes or dietary needs without losing any of that festive charm. Don’t be afraid to get creative!
- Gluten-Free: I swapped regular flour for a gluten-free blend once, and the texture was just as fluffy—perfect for family gatherings where someone’s gluten-sensitive.
- Vegan Version: Use plant-based butter, flax eggs, and oat milk mixed with vinegar to mimic buttermilk. It’s surprisingly delicious!
- Spiced Chocolate: Add a pinch of cinnamon and nutmeg to the dry ingredients for a cozy, warming flavor twist that screams winter evenings.
- Frosting Flavors: Try adding peppermint extract to the buttercream for a cool holiday kick or swap blue coloring for pastel pink or white for different winter themes.
How to Make Winter Wonderland Chocolate Cupcakes Recipe
Step 1: Prep and Combine Your Dry Ingredients
Always start by preheating your oven to 350°F (175°C) and lining your muffin tin with cupcake liners. In a medium bowl, whisk together the all-purpose flour, unsweetened cocoa powder, baking powder, baking soda, and salt. This ensures all your dry ingredients are evenly distributed, so your cupcakes bake perfectly every time.
Step 2: Cream Butter and Sugar to Perfection
In a large bowl, beat your room temperature butter with granulated sugar until the mixture looks light and fluffy—usually about 3 to 4 minutes. This step is essential because it incorporates air into the batter, giving your cupcakes a beautiful, tender crumb. Then, add your eggs one at a time, beating well after each addition. Don’t forget the vanilla extract—it’s a subtle boost to the overall flavor.
Step 3: Alternate Dry Ingredients and Buttermilk
Now for the fun part: slowly add the dry ingredient mixture to your butter mixture in three additions, alternating with the buttermilk in two additions—start and end with the dry ingredients. Stir gently after each addition, just until everything is combined. Overmixing can make cupcakes tough, so stop right when there are no more streaks of flour.
Step 4: Bake and Cool Your Cupcakes
Divide the batter evenly among the lined muffin cups; I find a standard ice cream scoop works wonders for even portions. Bake for 18-20 minutes, or until a toothpick inserted in the center comes out clean. Once baked, let the cupcakes cool completely on a wire rack before frosting. Patience here ensures your buttercream won’t melt!
Step 5: Whip Up That Winter-Blue Buttercream
Beat the unsalted butter in a large bowl until creamy and smooth. Gradually add powdered sugar, a cup at a time, mixing on low speed to keep the sugar from flying everywhere. Add heavy cream and vanilla extract, then increase the speed to medium-high and beat for 3-5 minutes until the frosting turns light and fluffy. Mix in blue gel food coloring a few drops at a time until you get your perfect winter shade.
Step 6: Pipe and Decorate Your Cupcakes
Transfer your buttercream to a piping bag fitted with a large star tip and swirl generous mounds onto each cooled cupcake. Top with edible snowflake toppers and sprinkle silver or white edible pearls around for that glistening snow-kissed effect that makes these cupcakes truly look like a winter wonderland.
Pro Tips for Making Winter Wonderland Chocolate Cupcakes Recipe
- Room Temperature Ingredients: I always make sure my butter, eggs, and buttermilk are at room temp; it makes mixing easier and your batter smoother.
- Don’t Overmix: I learned the hard way that mixing too much toughens cupcakes—stop when dry ingredients disappear for a tender crumb.
- Even Batter Distribution: Using an ice cream scoop helps ensure all cupcakes bake evenly, so nobody gets a lopsided cupcake!
- Frosting Consistency: If your buttercream feels too thick, add a bit more heavy cream by teaspoonfuls for easy piping without losing flavor.
How to Serve Winter Wonderland Chocolate Cupcakes Recipe
Garnishes
For my final cupcake touch, I use edible snowflake toppers combined with silver and white edible pearls—these add that magical sparkle and keep things elegant yet festive. Sometimes I swap pearls for a dusting of edible glitter for a frosty shimmer that catches every eye.
Side Dishes
These cupcakes pair perfectly with warm drinks—think hot cocoa, chai lattes, or even a peppermint mocha. For a fuller dessert spread, I like serving a light fruit salad or a citrusy sorbet on the side to balance the rich chocolate.
Creative Ways to Present
One of my favorite ways to present these cupcakes at holiday parties is on a tiered stand sprinkled with faux snow or coffee grounds dyed white for a snow effect. You can also arrange them on decorative platters garnished with pine sprigs and cranberries for a touch of woodland winter charm.
Make Ahead and Storage
Storing Leftovers
If you happen to have any leftovers (which is rare!), store the cupcakes in an airtight container at room temperature for up to two days. Keeping the frosting intact is easier this way because refrigerators sometimes dry out the cakes and can cause the buttercream to harden.
Freezing
I’ve had great success freezing just the cupcakes before frosting—wrap them tightly in plastic wrap and freeze in a zip-top bag for up to three months. When you’re ready, thaw completely and then pipe frosting fresh for the best taste and texture.
Reheating
If you want to warm a cupcake, I gently microwave it for 10-15 seconds without frosting and add the buttercream afterward. This way, you get that freshly baked warmth without melting the frosting into a puddle.
FAQs
-
Can I use regular milk instead of buttermilk in this recipe?
Yes, you can substitute regular milk mixed with 1 tablespoon of lemon juice or white vinegar per ½ cup of milk to mimic buttermilk’s acidity. Let it sit for 5 minutes before using, which helps keep the cupcakes tender and moist.
-
How do I prevent my cupcakes from sinking in the middle?
Make sure not to overmix your batter and be cautious not to open the oven door during baking. Also, check your baking powder and soda freshness; old leavening agents can cause poor rise and sinking.
-
Can I make the frosting less sweet?
If the buttercream is too sweet for your liking, try reducing powdered sugar by ½ cup and increasing the butter slightly, or add a pinch of salt to balance sweetness without sacrificing texture.
-
What tips do you have for piping frosting neatly?
Practice piping on parchment paper first, and make sure your frosting is at the right consistency—not too stiff or too runny. Chilling the frosting slightly before piping can also help maintain shape.
Final Thoughts
This Winter Wonderland Chocolate Cupcakes Recipe has truly become a holiday staple in my kitchen. It’s such a joy to see the sparkle in my family’s eyes when they bite into these little chocolate dreams topped with frosty blue buttercream. Trust me—you’ll enjoy making (and eating) them as much as I do. So grab your mixing bowl, and let’s bring a dash of winter magic to your home!
Print
Winter Wonderland Chocolate Cupcakes Recipe
- Prep Time: 25 minutes
- Cook Time: 20 minutes
- Total Time: 45 minutes
- Yield: 12 servings
- Category: Dessert
- Method: Baking
- Cuisine: American
- Diet: Vegetarian
Description
These Winter Wonderland Chocolate Cupcakes with Snowflake Buttercream are a festive and delightful treat perfect for the holiday season. Moist chocolate cupcakes are topped with a creamy blue buttercream frosting and decorated with edible snowflakes and pearls for a magical wintery touch.
Ingredients
Chocolate Cupcakes
- 1 cup all-purpose flour
- ½ cup unsweetened cocoa powder
- 1 tsp baking powder
- ½ tsp baking soda
- ¼ tsp salt
- ½ cup unsalted butter, room temperature
- ¾ cup granulated sugar
- 2 large eggs
- 1 tsp vanilla extract
- ½ cup buttermilk
Buttercream Frosting
- 1 cup unsalted butter, room temperature
- 4 cups powdered sugar
- 2-3 tbsp heavy cream
- 1 tsp vanilla extract
- Blue gel food coloring
Decorations
- Edible snowflake toppers (store-bought or homemade)
- Silver, white, or mixed edible pearls
Instructions
- Preheat Oven and Prepare Pan: Preheat your oven to 350°F (175°C) and line a 12-cup muffin tin with cupcake liners to prepare for baking.
- Combine Dry Ingredients: In a bowl, whisk together the all-purpose flour, unsweetened cocoa powder, baking powder, baking soda, and salt until evenly blended.
- Cream Butter and Sugar: In a separate large bowl, beat the room temperature unsalted butter and granulated sugar until the mixture is light and fluffy, creating a smooth base for the batter. Then add the eggs one at a time, mixing well after each addition, followed by the vanilla extract.
- Mix Wet and Dry Ingredients: Gradually incorporate the dry ingredients into the butter mixture, alternating with the buttermilk, starting and ending with the dry ingredients. Mix just until combined to avoid overmixing and maintain cake tenderness.
- Bake the Cupcakes: Evenly divide the batter among the cupcake liners. Bake for 18 to 20 minutes or until a toothpick inserted into the center comes out clean. Remove and let cool completely before frosting.
- Prepare Buttercream Frosting: In a large bowl, beat the butter until creamy and smooth. Gradually add the powdered sugar, one cup at a time, mixing on low speed to avoid a sugar cloud. Add heavy cream and vanilla extract, then increase the speed to medium-high and beat for 3 to 5 minutes until the frosting is light and fluffy.
- Color the Frosting: Add a few drops of blue gel food coloring to the buttercream and mix until you achieve your desired shade of winter blue.
- Decorate the Cupcakes: Transfer the colored buttercream to a piping bag fitted with a large star tip. Pipe swirls on top of the cooled cupcakes. Finish by placing an edible snowflake topper on each cupcake and scattering silver, white, or mixed edible pearls around them for a beautiful wintery finish.
Notes
- Make sure the butter is at room temperature for both the cupcakes and frosting for better mixing and texture.
- You can substitute buttermilk with milk plus a teaspoon of lemon juice or vinegar if buttermilk is unavailable.
- Use gel food coloring as it does not alter the frosting’s consistency.
- Store cupcakes in an airtight container at room temperature for up to 2 days or refrigerate for up to 5 days.
- Bring refrigerated cupcakes to room temperature before serving for best taste and texture.
Nutrition
- Serving Size: 1 cupcake
- Calories: 350 kcal
- Sugar: 30 g
- Sodium: 150 mg
- Fat: 20 g
- Saturated Fat: 12 g
- Unsaturated Fat: 7 g
- Trans Fat: 0.3 g
- Carbohydrates: 40 g
- Fiber: 3 g
- Protein: 4 g
- Cholesterol: 60 mg
